Pages

Tuesday, December 29, 2015

Happy New Year

Hi everyone, Steph Ackerman here today and I'm happy to be working with these lovely stamps and Clip Art Sheets from Paper Wings Productions.


I've used the Vintage Clip Art Sheet to create the backgrounds.  This clip art sheet contains 11 images that can be used individually or mixed together.

 
I've used the Happy clear stamp set which includes the large happy word and 4 additional words that can be used together.


Thanks for stopping by today.
 
Steph
 

Thursday, December 24, 2015

Home is Where I'm With You

Merry Christmas Eve everyone! Pam here today. As we rush through the hustle and bustle this time of year, I wanted to stop and reflect on what's important to me.  So this project using the Home Cling Stamp from Paper Wings Productions was just perfect. 


The Home sentiment was stamped in Versafine Black ink and covered with clear embossing powder.


To create the "skylike" background I used Ranger Distress Inks and a bit of Hero Arts Unicorn White spray. 

I hope everyone has a very Merry Christmas and a safe and Happy New Year!
Embrace Imperfection!
Pam

Tuesday, December 22, 2015

Happy New Year shaker card

Hello! It's Ashley with my last card this year! This one is a shaker card wishing you a happy New Year!
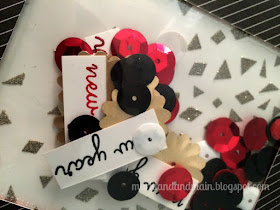
I made my card base with gold embossing powder, a stencil, and embossing paste. Next I made my shaker - I use old page protectors and my Fuse tool. I threw in a bunch of sequins and the Happy New Year confetti I made.

I used the Say It Winter Greeting stamp set to stamp 'happy new year' and then I cut the words apart to make confetti. I added those into the pocket with my sequins and sealed it up with my Fuse.
Here's a close up of the shaker:
Shaker cards are fun because you can make them any size or shape and you can throw in just about anything! I recently made a Christmas one you can check out HERE.


For more details and a full supply list, visit my blog.

Thursday, December 17, 2015

A Coffee Christmas

Hello friends. Larissa here today with a little different spin on a Christmas card. I used the stamp set Play with your Coffee.

I stamped the the cups on top of each other and colored them using my Copic markers. 
I used: G02, YG09, G07, G28, R24, R27, R29, R46, E55, E23. 

I stamped the Merry Christmas sentiment from the set Say It Winter Greetings 


To finish off the card front I added a few red and green sequins. 

I hope you enjoyed my post today. 

Have a wonderful day and rest of your week. 

Larissa

Tuesday, December 15, 2015

Black and White Christmas Cards

Hi everyone, Steph Ackerman here today and I'm happy to be working with these lovely stamps from Paper Wings Productions.


This stamp is from the Winter Cling Stamp Set.

 
I wanted to keep everything black and white so I stamped the image in black ink on white cardstock.  After fussy cutting the image, I matted it with black cardstock and fussy cut it again.


I added some ribbon to soften the cards.  I love the black and white effect.
 
Thanks for stopping by today.
 
Steph
 

Tuesday, December 8, 2015

wishing you merry Christmas shaker card

Hi, it's Ashley here today and I'm sharing a Christmas shaker card that I think is super cute! To start, I used a polka dot stencil and distress inks for my card base. Next, I used a circle die to cut out the center of my card.
Then I started working on my sentiment for the inside of the card. I used the Fall Mix It Up stamp set to stamp 'wishing you' and Say It Winter Greetings stamp set for 'merry Christmas.' I heat embossed 'merry' with green embossing powder and I love the font for 'Christmas.'
My final step was to finish the shaker card. Using the Fuse tool makes shaker cards super easy! I added some sequins, a little resin piece, and then I stamped an ornament and some stars from the Winter Wood Cuts stamp set, fussy cut those, and threw them in there too. Here's my finished card:


Thanks for looking! :)

Monday, December 7, 2015

What gifts are on your own wishlist this year?


I know this time of year is busy.  You are running around shopping for everyone on your list...but what's on your list?  Here's a way to get some of your holiday shopping done while at the same time get a chance to win something for yourself!  Craftsy has now made it possible for you to give a class as a gift!  If you haven't looked through the Craftsy classes before, they have everything from cooking, painting, photography, and of course PAPER ARTS!  You can even give the class "40 Techniques Every Stamper Should Know" by Paper Wings owner, Carrie Avery that features lots of awesome Paper Wings stamps.  

Need more reasons to take or gift a class?  Here are just a few...
  • Show off new skills after just a few hours.
  • Learn in the comfort of your favorite chair and your favorite sweatpants.
  • Enjoy online learning that fits your schedule.
  • Easily overcome "uh-oh" moments by rewatching any part of your class anytime.
  • Watch anytime, anywhere, forever.
  • Watch whenever you need inspiration or want to enjoy a few minutes of fun. Go as slow or as fast as you want and take as long as you want.
  • Ask your instructor questions to get the personalized attention your projects deserve.
Click HERE to purchase a gift card for your loved one today and be entered to win another class of your choice!   Chance to win ends 12/12/2015 so don't wait!  


Thursday, December 3, 2015

Merry Christmas

Hello friends. Larissa back with you today. I used a few different stamp sets for this card. Being from San Antonio I thought this was a perfect card for me to send to some of my out of state friends.

I used:
Say it Winter Greetings Clear Stamp Set 
San Antonio Clear Stamp Set 


I stamped the image of the Alamo on the card first and masked it off. I then stamped the San Antonio skyline stamp behind it both of these stamps are from the San Antonio set.  I left the mask on the Alamo and Stamped the two trees from the Build A Scene set. To finish off the trees I took the small light set from Holiday Ad Ons and stamped them across each one. I colored the images using Copic markers.

The greeting is two different sets as well. The Merry Christmas is from the Say it Winder Greetings set and then the "From the Alamo City" came from the San Antonio set. It actually says greetings from the Alamo city. I just cut off the word "greetings".


To finish off the card from I added a few red sequins and matted it on a piece of red cardstock and then adhered it to a white card base, 


I have already stamped a few more of these card fronts to get in the mail. This is a perfect "from San Antonio" card.


Thank you for stopping my today. Don't forget to check back to see what the amazing design team girls create for you.


Have a wonderful day friends.

Larissa
Muffins and Lace 


Sunday, November 29, 2015

Dear Santa

Hi everyone, Steph Ackerman here today and I'm happy to be working with these lovely stamps from Paper Wings Productions.

Christmas will be here before we know it, so let's get those cards ready.  I think this would be a great card for the kids to send their letters to Santa.

 
I used the Christmas Mix It Up clear stamp set, which includes 11 words and images.  I repeatedly stamped the santa hats across white cardstock, then colored them with Copic Markers.


Two different sized panels were cut to fit the card, then matted with cardstock before adhering them to the card.

 
Dear Santa was stamped and punched out then added to the card.  Now have your child write their letter to Santa and send it on it's way.
 
Thanks for stopping by today.
 
Steph


Friday, November 27, 2015

Black Friday


Use coupon code

THANKS25 

for 25% off your entire purchase now through
November 30, 2015

GO SHOP!
http://www.paperwingsproductions.com

Thursday, November 26, 2015

Happy Thanksgiving!

Happy Thursday everyone and Happy Thanksgiving!!  Pam here today to share some Christmas inspiration!  It is that time of year now-only 29 days till Christmas, have you started making your Christmas cards/projects yet? Here's a fun one featuring PWP's stamps:


I love how this one layer card has so much dimension and texture and is super fun to create.  I started by stamping the Big Textures background stamp with white acrylic paint to create a background resist. After drying Ranger Distress Stain Festive Berries was applied over top. 
And then the magic happens- I stamped the tree from the wood cuts set over the background and I just love how it melts into the background as the white paint resists the ink. 


I am going to make a few more of these to send as Christmas cards-adding a fun holiday sentiment inside!
Thanks for joining me today and Happy Turkey Day! Enjoy with your loved ones!
Embrace Imperfection!
Pam


Tuesday, November 24, 2015

warm winter wishes

We had our first snow of the season in Indiana this weekend and it put me in the mood to bundle up the penguin in the Winter Wonderland stamp set:
I wanted to use the penguin from the Winter Wonderland stamp set and I wanted to bundle him up with a hat and a scarf. I stamped my penguin and the hat and fussy cut them both. Then I stamped the image of the wolf wearing the scarf and fussy cut the scarf.

I colored the hat and scarf with Copic markers and attached them to my penguin. Then I attached the penguin to my card. I stamped the sentiment using the Say It Winter Greetings stamp set.
For a little bling, I added snowflakes using the Sparkle red rubber cling stamp set. I heat embossed them with silver embossing powder.
Here's my finished card:
Thanks so much for looking! Hoping you're staying warm this winter :) For more details, check out my blog today, Markland and Main.

Wednesday, November 18, 2015

Peace Love Joy

Hello friends. Larissa here today with a Christmas card for you. 

I am using two different sets on my card today. First the sentiment set is

Say it Winter Greetings


So I stamped the images on a piece of white cardstock and colored them with Copic markers. I took my glitter pen and colored in a few places but you can't really see it in the picture.
I cut each image out with a pair of detailed scissors.

I took a piece of watercolor paper and made my background using different yellow and orange watercolors. 

I adhered the images onto the front of the watercolor paper using liquid adhesive and then used foam tape on the back of the angel.

I stamped the sentiments onto the watercolor paper using Versafine Onyx Black ink. 


I hoped you enjoyed my card today.
Have a wonderful week friends. 


Thursday, November 12, 2015

"Woolicious" Mittens-Tags

Happy Thursday crafters! Today I have a really fun project featuring the Winter Wood Cuts stamp set. In a couple of weeks my sister and I are going to be selling our handmade wares at a Holiday Bazaar.  My sister makes these amazing "woolicious" mittens that are super warm.  She makes them using recycled wool sweaters. 

So I decided to make some handcrafted little tags to go with the mittens- these tags can also be used for your Christmas presents.


I just love the detail in this stamp.  The mittens were stamped with Versafine Black ink, embossed with clear embossing powder, and colored with Copic markers.
The tags were cut from patterned paper using a Tim Holtz Thinlits die.


Now I have to make 30 more of these tags for all the sets of mittens! I best get busy!

Thanks for joining me today and stay tuned to the Aviary for more great inspiration from the PWP design team!
Embrace Imperfection!
Pam


Tuesday, November 10, 2015

winter tags

Hi there! Ashley here with two winter tags I made this weekend as our weather in Indiana is starting to turn chilly. I used heat embossing with distress ink resist on both tags.

I used the Winter Wood Cuts cling stamp set with white embossing powder. Then I chose three green distress inks to color the tags. For the tag on the left, I used peeled paint and forest moss. The tag on the right is shabby shutters and peeled paint. The white heat embossed images resist the distress inks and the white really pops against the green background.

My sentiments are from the Say It Winter Greetings and the Fall Mix It Up clear stamp sets. For finishing touches, I added sequins, twine, and ribbon.

Thanks so much for looking!

Thursday, November 5, 2015

Warm Winter Wishes


Hello friends. Larissa here with a warm winter wishes card for you today.  I am actually using 3 different stamp sets for this card.
I stamped the cups "Playing with your coffee" on a piece of kraft cardstock and colored them using Spectrum Noir markers.
I then stamped each cup with a different stamped image from the "Holiday Add Ons" set.


For the sentiment I used the stamp set "Say it Winter Greetings" and heat embossed it with white embossing powder. 

For the inside of the card I added another cup also colored with Spectrum Noir markers and left it blank to be able to write a note if I wanted. 


I hope you enjoyed my card today. Have a wonderful day friends. 


Thursday, October 29, 2015

Christmas Tags

Hi everyone, Steph Ackerman here today and I'm happy to be working with these lovely stamps from Paper Wings Productions.

I recently received some new stamps and this Christmas set - Holiday add ons - really caught my eye.


I stamped the houses on white cardstock which had been cut to fit the tags.  2 were matted with cardstock and one was inked before adding them to the tags.  Holiday lights were added across the top and color was added using Smooch Accent Inks.   The phrases were stamped and die cut. 


These tags can be created assembly line style so they come together quickly.  Why not create some tags today?

Thanks for stopping by today.

Steph