Pages

Wednesday, November 29, 2017

cocoa warms the heart

Hi everyone! Ashley here today sharing a cup of warm cocoa! 

I made this card using the Play with your Coffee and Frothy Concoctions stamp sets. 

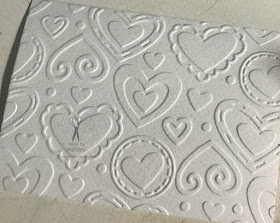
The first thing I did was run my background through my Grand Calibur. I chose this layered heart embossing folder because I knew my sentiment would be 'cocoa warms the heart' from the Frothy Concoctions stamp set and I wanted a play on words. Next I watercolored the background with distress inks.


I stamped my coffee cup from the Play with Your Coffe stamp set onto patterned paper and fussy cut it. I stamped some marshmallows on white cardstock and fussy cut those before adding them to my cup with foam adhesive.


Then I used foam adhesive to place my cup of cocoa on my embossed heart background.


Thanks for looking!

Wednesday, November 22, 2017

Stamped Clip Art Christmas Ornaments

Stamped-Snowflake-Santa-Clip-Art-Christmas-Ornament-by-Dana-Tatar-for-Paper-Wings-Productions

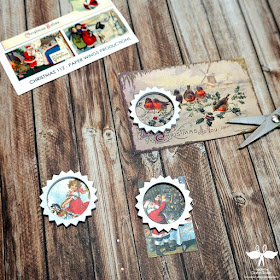
Hi friends! Dana here today sharing a fun Christmas ornament tutorial featuring Clip Art Sheets. All the Clip Art Sheets from the Paper Wings Productions Store are laser printed on high quality paper, which makes them great for image transfer techniques. I used pieces from the Itty Bitty Christmas Clip Art Sheet more simply for this project. I cut them out and sealed them with a layer of glaze for a festive focal point on some stamped snowflake ornaments.

How-to-Prime-Masonite-Snowflake-Ornaments-by-Dana-Tatar-for-Paper-Wings-Productions

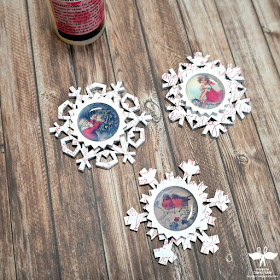
Step One: Prepare Masonite snowflake ornament blanks for stamping by applying a layer of white spray primer. Note: I chose a spray primer to quickly color the inside of the detailed cutouts on my snowflake ornaments. Gesso, acrylic paint, or embossing powder would also work for this step.

How-to-Stamp-on-Masonite-Snowflakes-by-Dana-Tatar-for-Paper-Wings-Productions

Step Two: Use the Writing Backgrounds Cling Stamp Set with red archival ink to add a script print to the snowflake ornaments bases.

Christmas-Clip-Art-Ornament-Assembly-by-Dana-Tatar-for-Paper-Wings-Productions

Step Three: Select several images from the clip art sheet and cut them down to size. Glue the clip art into the top layer of the ornaments.

How-to-Glaze-Clip-Art-for-Christmas-Ornaments-by-Dana-Tatar-for-Paper-Wings-Productions

Step Four: Cover the clip art images with a layer of glaze. Glue the clip art rounds onto the center of the snowflake bases.

How-to-Cut-Wire-Hangers-for-Christmas-Ornaments-by-Dana-Tatar-for-Paper-Wings-Productions

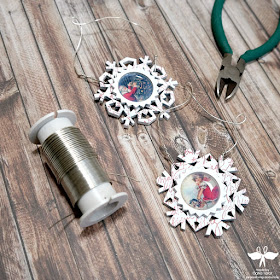
Step Five: Cut several lengths of wire. Bend and twist the wire into hangers and attach to the ornaments.

Stamped-Snowflake-Clip-Art-Christmas-Ornaments-by-Dana-Tatar-for-Paper-Wings-Productions

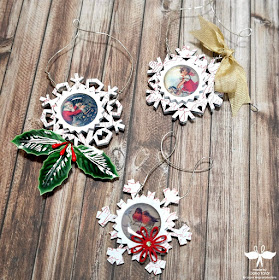
Step Six: Embellish the ornaments.

These ornaments look great on the tree, but they would also look fantastic as gift toppers. Be sure to visit the Paper Wings Productions Store to see the wonderful range of Christmas, Holiday, and Seasonal stamp sets.

Pin It!

Stamped-Snowflake-Christmas-Ornament-Tutorial-by-Dana-Tatar-for-Paper-Wings-Productions
Thanks for stopping by today and let your creativity take flight!

Wednesday, November 15, 2017

DT: Viva la Vida


Dear Scrappers,

This is Veronica from www.vickyscrappingpassion.blogspot.com  sharing with you today a double layout I made for last year Halloween pictures. I was inspired by the Paper Wings Productions: Frida por vida, clear stamp set.


I also used:


Colonial white, cream, and Cocoa cardstock
Neon colors cardstocks
Crafty Chica day of dead printed cardstock
Liquid Glass
Inks: Black, Hero Stamps. 

Stickles

Nuvo Drops

Left side:


The right side:


I hope you enjoyed my layout and visit my blog.

Have wonderful and blessed day,


Vicky Tovar

Wednesday, November 8, 2017

hello Gorgeous

Hi everyone! Leslie here to share a DT inspiration project with you today, a fun accordion birthday book with a twine bow closure. I used the Vintage Domino Melange, Vintage Melange and Sayings and Sentiments stamp sets. All of these are just amazing!


I cut the accordion base from kraft cardstock. I cut the cover pieces with a stitched rectangle die and stamped the large flourish from the Vintage Melange stamp set on the front and back covers in brown ink. I heat embossed the front sentiment in gold, cut the words apart and affixed them to the front cover just above and below the twine line.


I stamped all nine domino-sized images from the Vintage Domino Melange stamp set on kraft cardstock and colored them in a very basic fashion with Spectrum Noir markers. I cut the images with a slightly smaller stitched rectangle die and layered them on brown die cuts. The birthday sentiment on the last panel is also from the Sayings and Sentiments stamp set.


For more details and additional photos, please see my blog post at Love To Scrap 2.

I hope you’ve enjoyed today’s project! Be sure to check out all the fun stamps and other goodies at Paper Wings Productions! Thanks so much for stopping by today – we’ll see you next time!

Scrappy hugs,
Leslie

Tuesday, November 7, 2017

Cocoa Warms the Heart

Before we begin today's post, we want to congratulate Sande on winning our blog hop giveaway!  Please contact us at info@paperwingsproductions.com for instructions on how to claim your prize.  Thank you to everyone who participated!

Hello friends, Larissa here with you today with a few fun Christmas coffee cards. You know me and these fun coffee stamps. I love using them and making different things with them. This past week I have seen a lot of my friends enjoying their expensive morning coffee's in a cut new holiday cup and it gave me an idea. I pulled out two different Christmas stamps and my favorite coffee stamp and got busy. I ended up with not one, not two but three new cards.

I stamped the cup 3 times and then stamped 2 lids and one of the frothy lids. I colored the first card with Prismacolor Pencils after I stamped the Santa in the middle.


One the second card I stamped Believe down the cup and added a little set of bells. I colored the whipped cream image using Red and Green Copic markers and topped it glitter. 


For the 3rd and final card, I stamped Santa's Sleigh and Dear Santa on the cup and colored in the cup using Prismacolor Pencils. 


I adhered all the card fronts to white card bases and added Nuvo drops to finish them off.
I hoped you enjoyed my cards today. Have a wonderful day friends.


For these cards I used:

Paper Wings Productions Stamps

Other Supplies Used:
White Cardstock
Versafine Onyx Black Ink
Hot Cherry Ink
Garden Green Ink
Prismacolor Pencils
Copic Markers
Velum
Gold and Silver Glitter Cardstock
Pattern Paper
Nuvo Drops
Spectrum Noir Clear Sparkle Pen
White JellyRoll Pen
Nuvo Liquid Adhesive

Friday, November 3, 2017

November Blog Hop

WELCOME to the Paper Wing Productions Design Team Blog Hop & Giveaway!

Now that Halloween is over, we start thinking about the holidays. What holidays do you and your family celebrate? One way to make the holidays special is to create your own decorations and greetings. Are design team have come up with projects with the theme “home for the holidays”. We hope you will hop through the projects and find inspiration for your own holiday projects. If you complete the hop, you will be eligible to win an awesome prize!

The prize is a $25.00 gift certificate to the Paper Wings Productions online store.
For a chance to win all you need to do is:
  • be a follower of the Paper Wings Productions blog
  • visit each of the participating designer's blogs and leave a comment
  • come back and leave us a comment on the pwp blog telling us you completed the hop.
To increase your chances of winning: like our Facebook page and/or invite your friends to the hop. Be sure to leave a separate comment for each of your additional entries. The winner will be announced on Tuesday, November 7, 2017 on the Paper Wings Productions blog.
Grab your favorite drink and head on over to Leslie's Blog to get started.
***Here is the complete line up just in case you get lost along the way***
Paper Wings Productions Blog “The Aviary­ - http://paper-wings-productions.blogspot.com/
THANK YOU SO MUCH FOR JOINING US TODAY!
&
Let Your Creativity Take Flight!