Thursday, April 26, 2018

Bless Your Heart

Hello friends. Larissa here with you today. I created a card today using one of my favorite sayings. 
So lets get started. 


For this card I used: 


Other Products Used:
White Cardstock
Versafine Onxy Black Ink
Copic Markers
Black Gel Pen
Blue Ribbon 
Pattern Paper from my stash

I stamped the saying and the blue bonnets on a piece of cardstock and colored the images using Copic markers. 
I then went around the image with a black gel pen making little stitch marks. 


I adhered the images on a piece of pattern paper and then onto a white card base. 


To finish off the card I added a piece of blue ribbon I tied in a bow. 

Thank you for stopping by today. Be sure to check back to see what inspiration the DT team has for you this month. 


Have a wonderful day friends. 


Wednesday, April 25, 2018

April Blog Hop Winner

Hello, friends!

It looks like I dropped the ball and left off the post announcing our April Blog Hop winner!

The winner this month is Kirsty VittetoeApril 7, 2018 at 12:05 AM
Thanks for sharing, what a lovely blog hop, amazing and beautiful creations from the team!

Kirsty, please contact me at info@paperwingsproductions.com to claim your prize.

I also have a special gift for Denise Bryant who brought the mistake to my attention.

Thank you all for participating in our blog hops and visiting our blog, we appreciate each and every one of you!

Blessings,
Carrie

DT post: Bluebonnets and Butterflies Canvas

Hi Scrappers,

This is Veronica from www.vickyscrappingpassion.blogspot.com  sharing with you a Canvas I modified with wings-cling-stamp-setflowers-cling-stamp-set, and  the wildflowers-cling-stamp-set:


I used:
wings-cling-stamp-setflowers-cling-stamp-set PWP

Moments like this, Canvas Kit, Quick Quote


In short, I distressed the die cuts using the powder puffs mocha mama. I added some pearl watercoloring in shades of blue. Then, I added some stamped sentiments to the flourish die cuts and to the heart cut outs using powder puffs or distress oxide inks. For the butterfly die cuts, I stamped the wings using distress oxide. I also inked the edges of the canvas. The rest, I just followed the instructions of the kit.  For more details, here is the SnapGuide with more instructions.


Here some closeups:


I love the details the butterfly wings stamps add to these die cuts.


I also added some blue watercoloring to the big butterfly overlay. It blends everything together with bluebonnets in the pictures.

I hope you enjoyed my canvas and visit my blog:  www.vickyscrappingpassion.blogspot.com.

Wednesday, April 18, 2018

Stamped Mail Art Envelopes for National Letter Writing Month


Stamped Mail Art Envelopes

Hi friends! Dana here today sharing a set of mail art envelopes that I stamped up for National Letter Writing Month. I have a thing for handwriting, so I really appreciate it when I receive a letter or card in the mail. I have a box full of handwritten letters and cards that I have saved over the years. This is all that I have left from some of my relatives. I thought it would be fun to celebrate National Letter Writing Month by sending some love through the mail in a pretty stamped envelope. The selection of stamps in the Paper Wings Productions Store is amazing, and you're sure to find a great design for any recipient. I chose some of my favorite stamp sets for this project.

Colofully Colored Stamped Fibonacci Sprial Mail Art Envelope

Whenever I get stuck with design, I like to go back to the basics. The Sacred Geometry 2 Clear Stamp Set has classic patterns that are super fun to work with. I chose the Fibonacci Spiral stamp for this envelope. I stamped up the left side of the envelope using black archival ink and then colored in the shapes with Distress Markers. I added a bit of decoration to the edge of the geometric design with the Lace Border Outline Clear Stamp.

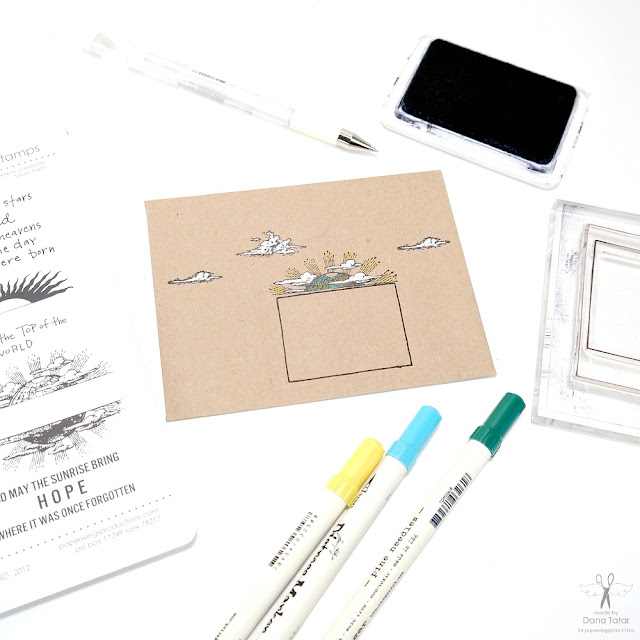
Stamped Globe with White Clouds on Kraft Mail Art Envelope

I wanted to use a kraft envelope specifically with a white gel pen. I just love how the white ink really pops off the paper for a 3D-like effect. I used the Earth and Sky Mélange Cling Stamp Set to decorate the top half of this envelope. I added an address box using the inner frame of the polaroid stamp from the Snapshot Framer Clear Stamp Set.

Colorful Stamped Bird Panel Mail Art Envelope

I had to use a stamp featuring something with wings for my last design. The Bird Panel Clear Stamp Set is so beautiful and is an easy way to add a pretty scene using just one stamp. I used the Snapshot Framer Clear Stamp Set again to add an address spot, but this time I used the larger outer frame. After inking up the entire stamp, I removed the ink from the smaller frame using a wet wipe, and then stamped only the larger frame onto the envelope.

Thanks for stopping by today! I hope I have inspired you to send a friend or loved one some happy mail this month.

Pin It!

Colorfully Colored and Stamped Mail Art Envelopes for National Letter Writing Month


Friday, April 6, 2018

April Blog Hop


Welcome to the Paper Wings Productions April Blog Hop and Giveaway! The theme for the hop this month is Watercolor. The design team is sharing their own water-colored projects! We hope you will hop through and find inspiration for your own projects.


If you complete the hop, you will be eligible to win a $25 Gift Certificate to the Paper Wings Productions Store!


For a chance to win all you need to do is:

  • Follow the Paper Wings Productions blog.
  • Visit each of the participating designer's blogs and leave a comment.
  • Leave a comment on the PWP blog telling us you completed the hop. 

To increase your chances of winning, like the PWP Facebook page and/or invite your friends to the hop. Be sure to leave a separate comment for each of your additional entries. The winner will be announced here on Tuesday, April 10th.


Let's get hopping!

Dana
Ashley
Larissa
Veronica
Paper Wings Productions


THANK YOU SO MUCH FOR JOINING US TODAY!

~and~

Let your creativity take flight!

Related Posts Plugin for WordPress, Blogger...