Pages

Thursday, May 30, 2013

Themed Thursday - Mixed Media Inspiration


Hello Everyone!!  I hope you all are having a fabulous day and a wonderful week.  Today I wanted to share an inspiration board with you that showcases this month's Nesting Components kit.


All of these wonderful projects were made from the same kit.  Can you believe that?!  Well it's true, lol!!  Do you see that gorgeous layout on the top right hand side?  Here's a closer look!


This stunning layout was created by Cathi Smith O'Neill of Celtic Knots.  Here is a link to her post so you can leave her some bloggie love: Celtic Knots

May 2013 Mixed Media Kit

To pick up your own kit, visit PWP Online Store.  Then share your creation with us on Facebook just like Cathi!  

Thanks so much for stopping by today!  Have a Beautiful Day!!


Tuesday, May 28, 2013

Tutorial Tuesday: Stamped Flower


Hello everyone! It's Amber here to share this quick and fun flower tutorial. See the pink flower with the stamping on the smaller card below, that's the flower I will be showing you how to make today.                   
         

 Below you will find the seven steps I used to create the pink stamped flower. I know seven steps seems like a lot but it really is easy.


Step1. Die cut or punch five circles out of colored pattered paper or cardstock


Step 2. Stamp all five layers with a background stamp. I used a background stamp from the Text Cling Stamp Set.


 Step 3. Fold and wrinkle each layer and then carefully unfold all five layers.


Step 4. Take a large paper piercer or anything else that is sharp and make a hole in the middle of all five layers for a brad.


Step 6. Add a colored brad to the center then layer by layer fold and wrinkle the paper around the brad. This is what will give the flower a fuller look when finished.


Step 7. Unfold the five layers as desired until you are happy with the finished flower.

Its really as easy as that. There are many things you can do with this flower technique like adding more layers for a fuller flower, you could just use patterned paper instead of stamping, you could distress the edges, emboss the layers, or you could make a smaller or larger flower. I hope you enjoyed my tutorial today and Thanks for visiting!. We would love to see what you make with Paper Wings Productions Stamps so add your projects to our Flickr Group, to Pinterest, or leave a comment with a link to your project.

Supplies: Cardstock- White & Blue / Patterned Paper- CTMH / Paper Wings Productions Cling and Clear Stamps- Text,Artsy To The Bone, Happy Day / Versa Color Ink Pad- Hyacinth / Circle Die Cut- Sizzix / Ribbon- The Ribbon Boutique / Brad- Orange / Large Paper Piercer / Sulky Thread- Light Purple


Friday, May 24, 2013

Feature Friday - May Nesting Components kit Fun!

Happy Friday Bloggie Friends!!  Norma here to share the fun I've been having with the May Nesting Components kit.

I have two quick and easy projects to share with you today.  First up, I have this super cute altered block of wood.  


If you visit my blog, then you probably saw the video tour I shared of my creative space and remember the scrap piece of wood I had on my desk.  I save all kinds of things to either incorporate into a project or to alter.  It makes me SO happy when I finally use one of the things I've been holding onto because then I feel like less of a hoarder, lol.


I started out by prepping the wood with a coat of gesso.  You could skip this step and you would just have a darker undertone on your background.  


Next I covered the block with the Christy Tomlinson Coffee Filter Text Sheet.  To adhere, I just used a homemade mixture of decoupage (50% Elmers Glue & 50% Water).


I used the misting canvas flower but instead of misting, I actually painted it with gouache.  In case you're not familiar with gouache, it's a water soluble paint just like watercolors except it gives a more opaque finish.  All of the resist details showed through but I wanted them to be brighter so I just went over them with a white Signo pen. Then I added some dyed burlap for leaves.


I used a scrap of clear packaging from my hoard stash to stamp "thankful".  I wanted to make sure that it would standout against the background and not cover it up like a piece of cardstock would.  To finish up, I added some of the Pink Paislee paper goods.  Easy Peasy right?!!  Since this was so quick and easy, I decided to play around in my art journal.


This is a background that was already halfway done in my art journal.  I like to use up paints and inks left on my stencils by putting them in my art journal.  It helps clean them off without wasting my precious products and also saves time on future art journaling.


I added some scraps of the coffee filter text sheet, Pink Paislee journaling tags and used one of the circle frames from the paper goods pack as a mask.


To complete my design, I randomly stamped "so very thankful for you", added more paper goods and outlined the circles with india ink.  Another quick and easy project using this very versatile kit!

Thanks so much for joining me today! I hope I've inspired you to get creative and MESSY with your May Nesting Components kit.  If you don't have one yet, you can pick one up HERE but don't wait to long because they're going fast!!
Enjoy your weekend!!!


Tuesday, May 21, 2013

HELLO!!!

Hi Everyone, Norma here!  I hope you all are having a terrific Tuesday so far, I just wanted to pop in to share a little Nesting Components Kit inspiration with you.  So in case you don't know, the monthly mixed media kit has changed it's name to "Nesting Components Kit".   This is still the monthly mixed media kit that you all know and love.  The May kit released at the beginning of the month and it is FILLED with a beautiful mix of Pink Paislee Cottage Farms Collection items, Christy Tomlinson Coffee Filter Text Sheets, flowers, ribbon and of course PWP stamps.

Carrie kicked things off with this gorgeous canvas filled with texture.  To see her entire post, click HERE


Dana created this gorgeous mini album using the kit and shared a wonderful tutorial to help you make your own.  To see her post, click HERE


I've also had some fun with this kit and made this whimsical shadow box:

If you'd like to see my complete post, click HERE.

May 2013 Mixed Media Kit
For a complete list of items included in the kit or to purchase your own, please visit the PWP Online Store.  We'll be sharing more projects featuring this kit and we'd love to see what you're making with it so don't be shy!  Feel free to share your projects with us on FB or just stop by to say hi!!

Thanks for joining me, have a great one!!!

Monday, May 20, 2013

Mixed Media Monday - Grad Shadowbox!


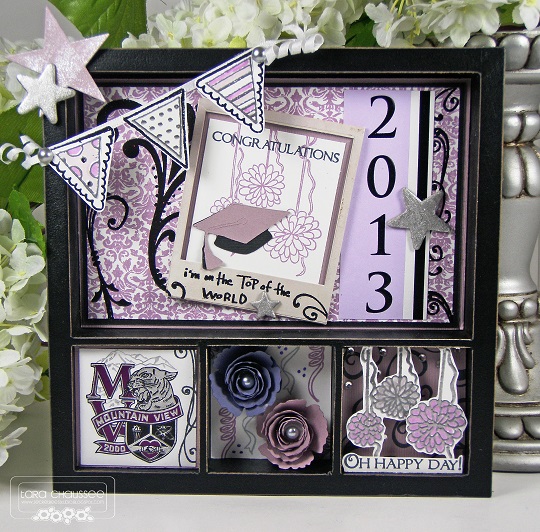
Hi everyone! Tara C. here with a graduation celebration Mixed Media Monday.  It's graduation season and today I have the perfect gift for this high school rite of passage. I will be attending a special young lady's graduation in a few weeks and I wanted to create a memento to help her remember this special day.  Not that she is likely to ever forget the final day of mind numbing classes, bad lunches, crazy teachers..... but hopefully this little gift will help!


I purchased the shadowbox at Archivers and left it black as it is one of her schools colors. I took her graduation announcement and cut it up to use as decoration in some of the boxes and then combined them with fabulous Paper Wings Productions stamps!  


The largest box has a gorgeous damask background from the Backgrounds Cling stamp set that I also embossed with a few flourishes from Flourish Fun One in glossy black.  It also features a sweet little banner embossed in silver and colored with Copic Markers and some poms from Happy Day stamped in lilac.  I added in a grad cap cut with my Cricut and some painted and glitter misted stars. The perfect sentiment is from the Earth & Sky set.


I wanted to showcase her school logo cut directly from the announcement.  I only added a couple of stamped flourishes from the Flourish Fun One set.


I had to girly this box up so I added some rolled flowers on a background of silver and purple confetti from Happy Day.


The final box again features more of the pretty poms embossed in silver and colored in shades of purple and more flourishes.  Plus a few clear crystals for a bit of bling!

Thanks for visiting today! I hope you enjoyed my Mixed Media Monday project and that it inspires you to create handcrafted gifts for the grads in your life. Check out all of these fabulous stamps at the Paper Wings Productions store and come back and visit on Wednesday and Friday to see what the other designers have created for your viewing pleasure.

The Paper Wings Productions supplies used:

Thursday, May 16, 2013

Hope


Hello everyone! It's Amber here sharing a stamped and colored card today for this weeks Themed Thursday Post. Today I will be using the Snapshot Framer Set and the Crane Panel Set.


For my card I started by stamping the frame from the Snapshot Framer onto a white and teal piece of cardstock. I cut out, stamped hope and set aside the teal frame. Then I stamped the crane from the Crane Panel set onto the white cardstock frame,colored it and cut it out. After I had all that done I cut and stitched a piece of patterned paper and adhered it to my card front along with two buttons. I then added my teal frame with the crane and stamped the other half of the sentiment to the bottom right of my card. You can see a close up below.


We would love to see what you make with Paper Wings Productions Stamps so add your projects to our Flickr Group, to Pinterest, or leave a comment with a link to your project. Thanks for visiting today!
Supplies: Cardstock: White & Teal / Patterned Paper- K&Company Ancestry.com Mat Pad / Paper Wings Productions Clear Stamp Sets- Snapshot Framer & Crane Panel / Staz-On Ink Pad- Jet Black / General's Chalk Pencils / Mini Green Buttons- Favorite Findings / Sulky Thread- White 


Tuesday, May 14, 2013

Tutorial Tuesday - May Nesting Components Mini Album


Hi PWP fans!  Dana here today sharing a fun project that I created with the May Nesting Components Mixed Media Kit and some of my favorite quick and easy mixed media techniques.


Here is a peek of the May Nesting Components. You can read all about the kit contents HERE and can purchase this limited edition kit from the Paper Wings Productions Store while supplies last. When I saw the packages of Pink Paislee Journaling Cards and Paper Goods I immediately thought mini album!


I incorporated the majority of the kit contents into this album. I added color and designs to both the front and the back of each journaling card. I used the Thankful Clear Stamp Set for the sentiment on the cover and I tied everything together with a piece of seam binding.


I wanted this album to be pretty and practical so I also made a mini photo album with some of the smaller cards that were part of the Paper Goods embellishment package that ties into my larger album.


I added a gorgeous script pattern to the front of each Journaling Card with my favorite Background Writings Stamp and some gold embossing powder. To add a splash of color I scribbled several colors of Distress Markers onto a stamp block, spritzed the block with water, and then gently pressed the Journaling Card onto the block. Stamp pads will also work for this technique!


Once the Journaling Cards were dry, I embellished them with Paper Goods, flowers and rhinestones.


The back of each Journaling Card is blank. I used the She Art Coffee Filter Sheets and Pink Paislee Press Ons to add pattern and color to the cards. I used the Dylusions Ink Spray to add splatters of white paint to each card.


Like the front of the cards, I embellished several of the back of the cards with Paper Goods, flowers and rhinestones.


I used the Sticky Back Canvas ATCs and several of the clip art images for image transfers. The canvas adds some great texture to my album! To transfer images to the canvas ATCs, cut several images from the clip art sheet. Next, peel of the backing of the ATCs and apply the images, color side down, to the sticky backing of the ATC. Press down to seal the image to the ATC. Lightly score the back of the image with a pair of scissors and spritz with water. Then, gently rub the paper away to reveal the transferred image.


Here are my completed embellished image transfer cards.


Here are the front and back of my cards. The Pink Paislee Paper Goods package included two larger cards that I used for the front and back covers of my album.

Check back here for more projects with the kit. If you missed the posts from last week you'll want to go back and check them out! Shay created a series of fabulous cards using several stamp sets in innovative and clever ways. Tara shared a fun way to document and display vacation photos with a bright and fun framed collage.

If you make something with our products, we hope you will share! Visit us on FacebookFlickr Group, and Pinterest. Thanks for stopping by today and let your creativity take flight!