*****To join our June Challenge: Chipboard and/or Wood Veneers, CLICK HERE*****
Hello PWP fans, Norma here with you today! Big thanks to everyone who joined us over the weekend for our June Blog Hop and Giveaway. So before I get started, I know you all are anxiously awaiting the winner announcement for that wonderful Faber-Castell prize pack so without further ado:
I loved all of the beautiful projects that your design team has created and shared. Awesome inspiration!!
Karen, please contact us at paperwingsproductions@hotmail.com

Today I have mixed media assemblage project to share with you. These types of projects are some of my very favorite to create so I wanna show you how easy it is to create.
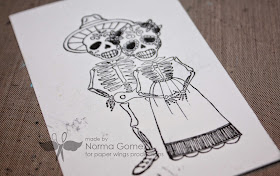
I'm working on matte board to give my project strength but you could use chipboard or heavy weight paper. I stamped the Muertos Mujer first then placed a mask over her before stamping the Muertos Hombre. I wanted it to look like they were very close.
I colored them in with Stickles and color pencils.
I added a wash of color to the background with gelatos and a water brush.
Then I just glued the matte board to a small flea market frame.
I chose to use Diana, she's one of my favorite PWP stamps. I used Prismacolor pencils to color her. She's also stamped onto matte board.
I wanted to give her beautiful shimmery wings. These butterfly wings are from the Wings stamp set. I stamped them with blue ink and then embossed them with Antique Gold embossing powder.
I'm using a canvas covered chipboard heart for my backdrop. I sprayed it with red Dylusions inks then stamped the large flourish from the Vintage Domino stamp set. I punched wholes on each side and added eyelets.
Assemblage time!! I added her wings, an embossed crown from the Crowns clear stamp set, roses from my jewelry stash and then attached Diana to the frame.
The banner and sentiment are both from A Banner Day. Using hot glue, I framed the edges with bling trim. It's those kind of finishing touches that make all the difference.
I added sheer black ribbon and flowers from my stash.
The bottom was looking a little bare so I added a piece of a bracelet. The bracelet was a failed resin attempt but nothing goes to waste around here. lol. For this piece it really doesn't matter that the bezels are full of little bubbles.
I'm so pleased with the way this project turned out!! It was pretty easy right?! I hoped I inspired you to give mixed media assemblage a try and if you mix in some chipboard or wood veneers, you can enter it in this month's challenge.
Thank you for joining me today, have a beautiful day!!!


Wow! This is wonderful! So many small details. I love how you used the stamps then cut out the pieces to construct this piece of art. Loved the tutorial.
ReplyDeleteThat is a really cool piece! The ornate frame is perfect for the blinged up stamped images!
ReplyDeleteNorma, this is so amazing! I love your art!
ReplyDeleteI love it Norma! You're inspiring me to try this!
ReplyDeleteStunning Norma! U never disappoint! I am a huge fan of all ur creations & this one joins the long list of fabulousness! Simply awesome!:)
ReplyDeleteBeautiful piece Norma!!
ReplyDeleteNice, Norma! I LOVE the word, Assemblage! So much going on here.
ReplyDeleteOh, and Im just a little mad at the blog hop winner, Karen! ;)
Laura