Showing posts with label mini book. Show all posts

Wednesday, February 14, 2018

Stamped Mini Book

Stamped Mini Book by Dana Tatar

Hi! Dana Tatar here today sharing a super fun mini book of colorful stamped art. I recently finished up Nathalie Kalbach's Creative JumpStart Online Workshop. I created this project with instructions from the lesson taught by Birgit Koopsen. I am a huge fan of mini books and albums and this is a great design! I often times have a hard time choosing stamps. This project allowed be to use a lot of my favorites!
Stamped Mini Book with Clip Art Cover by Dana Tatar


I chose to use a clip art image on the front of this book, rather than create a stamped cover similar in design to the inner pages. This cute photo of a girl and her bird caught my eye. I kept the cover simple, adding only a red vellum heart and ribbon closure. I think this plain, mostly black and white cover, makes the colorful pages of the book more of a surprise upon opening.

Here is the full list of stamp sets I used on this book:
Pin It!
Bird Girl Stamped Mini Book by Dana Tatar


Friday, September 9, 2016

Bee Beautiful Mini Book W/ Video Tutorials

I am in a mini book phase, they are so fun to make and just a chance to try fun techniques and get my hands all paint covered!!!


My inspiration for this mini book was bees, I kept seeing a bee/bug and I thought Bee Beautiful, would be wonderful for a title and then I went with the theme of yellow and black.  From there it just took on a life of its own.  I used a ton of Tattered Angels paints and mists along with some various mediums with stencils from The Crafter's Workshop.  I then added in some fun background stamps from Paper Wings Productions to help enhance the feel of the book.  

 
Here is the first video which is filled with the cutting of the pages, mists, painting, stenciling, stamping, and a fun technique with the EZ Steam II material and glitter, embossing powder, and flower soft to add a great dimension and texture to the page.
From here I added in a few pictures of my little girl form this year, not many just there is room for more as the year goes along.  I also added in some fun bling, brads, and other little gems from Eyelet Outlet to enhance the entire effect.  I did not want to cover the pages up too much, I love the effect I got from all the mists, stamps, and stencils.
Here are some close up shots of some of the pages.


Supplies Used
Raw Fabric/Paper Materials - Rebekah Meier Kit
Lace & Pearls -  Rebekah Meier Kit
Paints/Mists - Tattered Angels
Mediums  - Prima & Faber-Castell & Ranger
Stencils - TCW
Thread - Coats & Clarke
Sequins
Beads - Crafts Etc
Washi Tape - Eyelet Outlet
Brads - Eyelet Outlet
Gem/Bling - Eyelet Outlet
Flowers - Eyelet Outlet
Chipboard - Creative Embellishments
Dies  - Spellbinders - Heartfelt Creations
Embossing Powder - Stampin Up
Mica - Imagination Creations
Flower Soft - Flower Soft
Glitter - Martha Stewart & Prima
Stamps - Paper Wings Productions
Ink - Prima
Brushes - Prima
Heat Gun - Marvy
Glue - Beacon

Tuesday, October 21, 2014

Tutorial Tuesday- Stamped Thickers

Hey everyone, Katie here! It's Tutorial Tuesday so today I'm showing you how I stamped on the Thickers I used for the title of my camping mini album. I love camping so you'll always see a lot of camping scrapbook pages on my blog and I love finding new ways to embellish them.


I used the Writing cling stamp and Delicata gold ink by Imagine Crafts for this project. You want to use a background stamp for this technique.

1. Start by placing the thickers you want to use on a piece of plastic or something else that they will easily come back off of.
2. Ink up your stamp.
3. Place your stamp down over your thickers and just lightly press down. Be careful, you don't want to wiggle your stamp or the pattern will smear.
4. Lift your stamp straight off your thickers and let them dry.


It's a pretty easy technique, but a fun one! It adds a little extra embellishment to those fluffy letter stickers!
 

Thanks for reading! If you haven't stopped by the PWP blog lately, here are some of the amazing posts you should catch up on:
Kathleen shared some gorgeous Halloween Cards created with this month's nesting components kit.
Dana shared a spooky yet lovely Hodge Podge Mini Album.
and Agnieszka poster her beautiful mixed media layout as well as a card!

You can also join in on our October Challenge. Create a project using Orange or Black or the theme Halloween and share it with us before the end of the month for your chance to win a $20 Gift Certificate to the Paper Wings Productions Store!

Tuesday, August 5, 2014

Tutorial Tuesday - Resin Paper Mini Journal


Hi Paper Wings fans! Dana here today sharing a fun resin paper tutorial. Before I start my post I want to thank everyone who hopped with us over the weekend. We hope that our colorful projects were inspiring!

Congratulations to the winner of our August Blog Hop:

I shared about the contest. jean.bullock.148


Please contact Carrie at paperwingsproductions@hotmail.com for instructions on how to claim your prize.


I had a blast creating resin paper, which I then stitched onto the cover of a linen mini journal.


I wanted to create a one-of-a-kind print so I used a Gelli Plate with block printing ink and some of my favorite stamps. I do have to apologize for not having step-by-step photos on how I created my prints. The gelli print process is fast and if I stopped to take photos during the process I would risk having the ink dry on my plate. That being said, I kept my prints simple, so these written instructions should help you create similar prints if you are so inclined.

To create the print on the right, I applied a layer of turquoise ink over a 6x6 Gelli Plate. I then stamped onto the plate using the small circle stamp from the Art Textures Stamp Set, which removed paint from my plate. I then pressed a sheet of deli paper over my plate, pressed down, and peeled the paper away. I stamped the red numbers (Perfect Numbers Cling Stamp Set), bird (Bird Beauty Cling Stamp Set) and arrow (Vintage Melange Cling Stamp Set) once the turquoise ink was dry using red block printing ink and black archival ink directly onto the deli paper (no Gelli Plate transfer).

The base of the print on the left was created by passing a second piece of deli paper over the Gelli Plate after I took my first print off. The second print removed the rest of the ink from the plate. I love this print because it has the same pattern, but in a lighter shade of turquoise that I prefer. I added a small amount of yellow block printing ink to half of my Gelli Plate and pressed the deli paper over my plate to transfer the ink. I used the red numbers and black arrow I had out from my first print again, stamping directly onto the deli paper. I still had red ink on my paintbrush so I added a red stripe to separate the yellow and blue halves of my print. To finish this print I stamped several bees (Vintage Melange Cling Stamp Set) with brown archival ink onto the deli paper.

Note: Any letters or numbers will print backwards during the Gelli Plate transfer process. I think this is cool! If you want spell a word or have the numbers print in the right orientation, you must apply them to the gelli plate backwards.


I mixed up Ice Resin per the package directions. Once the resin is mixed there is a limited working time before the resin hardens. I only needed a small amount of resin to cover my prints. I did not want to waste the rest of the resin in the cup, so I covered several more gelli prints with resin.


I covered my workspace with a plastic garbage bag and used a piece of sponge to spread a thin layer of resin over both the back and front sides of my prints.


While the resin was wet I sprinkled some Relique Glitz Gold Iced Enamels over the top. I then left the paper to dry for about 8 hours. After that, I peeled the prints from the plastic, they were a bit tacky, and hung them to dry overnight.


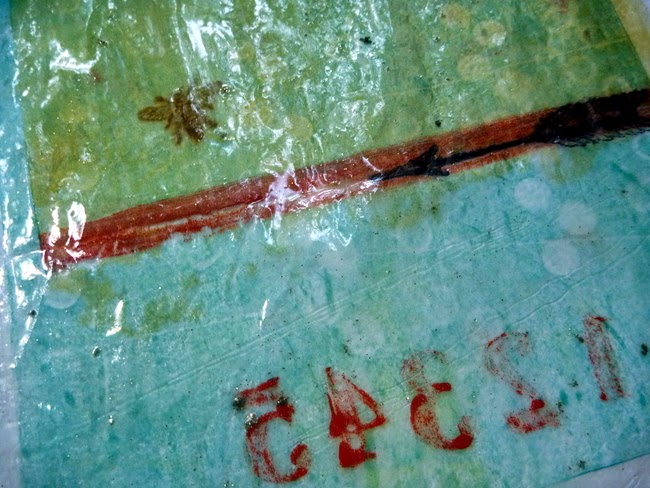
Here are my finished resin prints. The texture is similar to that of a fruit roll-up and the shine is fantastic!


Here is a closer look. The resin helped to brighten and highlight the details of my print.


I trimmed my print to size and then stitched it onto the cover of a linen mini journal. I haven't altered the inside pages yet.


This is a shot of the back of the journal.

Thank for stopping by today! I hope I have inspired you. If anything was unclear in this post, please don't hesitate to ask me questions. Be sure to stop by here tomorrow for the August challenge reveal!


Friday, July 18, 2014

Featured Friday- Tea Album

*****To Join our July Challenge: Click Here*****

Hey guys, Katie here!For today's Featured Friday post I am featuring this cute mini book I made using the July Nesting Components kit! I am a total tea lover, so of course you can imagine how excited I was when I saw that this months kit was tea themed. 

I used the supplies from this kit combined with the new Tea Time stamps to create this mini book.


I really loved the little tea charms that came in the kit, so I attached those to the binding of my book using some twine I had (not included in the kit).

While you're here, you need to take a peek at Dana's amazing project using this kit! She uses the extra heavy gel medium from the kit to create a unique, mixed media background. Go check it out!

Thanks for stopping by! -Katie

Friday, April 18, 2014

Feature Friday

*****Join our April Challenge: GET INKY, HERE***** 

Happy Friday Paper Wings Productions fans!!  Erica here with you today for Feature Friday and I am excited to bring you a project I am currently working on using the April Nesting Components Kit!
I decided to create a mini album to hold my 2014 Easter memories!  Today I am sharing the cover of my album since Easter is on Sunday!  I will share the inside pages on my next post!  Now to be totally honest when I opened up myApril Kit I had no idea what I was going to create so I pushed it aside for a couple days.  A few days later I pulled it out again and starting laying everything out and then the wheels in my head started turning and I began cutting, gluing and creating this album!  I think I need to start setting up my camera when I create to show you all my process!  I started with the chipboard pieces that are actually pieces of the packaging in the kit. I cut it down as the base of my album and adhered the muslin fabric included in the kit to the chipboard.  I then took a variety of Lindy's Stamp Gang mists and splattered around my cover and also added some stamping(which ends up getting covered up).  Next I took a few strips of the music note paper and adhered to the cover with mod podge and then added one of the vintage clip art images also included in this kit and tucked one of the Ranger tags that came in the March Nesting Components Kit behind the clip art.  Once it was dry I added the gold trim and the wired bow trim to the side and added a cluster of flowers from the kit.  The tiny gold eggs were created using the stamp set Single Dot Border that comes in the kit.  The circle outline reminded me of Easter eggs so that is what I created using a glassine bag and some glitter.
I inked up the stamp with VersaMark and then stamped onto the glassine bag and used some simple stick which is a very sticky embossing powder when heated.
After I heat the simple stick I added this beautiful glass glitter that is also included in this months kit and then hit it with my heat tool once more to help the glitter set.
 All that is left to do is cut them out and you have glittered Easter eggs ready for any project!  Here is a look at my completed mini album cover and a peek at the inside.


Thank you so much for joining me today and I hope I have inspired you to get a little creative today!  Mini albums are so fun to create and I just love to have fun and get a little messy with them!  They are perfect for holding memories and to document special events!  This month our April Challenge is Get Inky  and I hope you will join us in for your chance to win a $20.00 gift certificate to the Paper Wings Productions shop!  We are also holding a Guest Designer Call till May 9 you can check out the details HERE!  For more inky inspiration head on over to Katie's Whats Up Wednesday post HERE!  Enjoy your day and remember to let your creativity take flight!

Related Posts Plugin for WordPress, Blogger...