Showing posts with label Dana Tatar. Show all posts

Wednesday, June 13, 2018

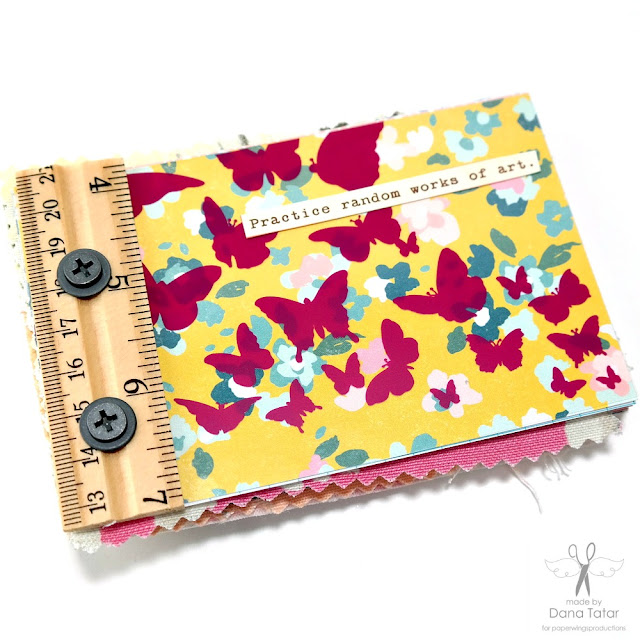
Mini Album with Ruler Binding

Mixed Media Patterned Paper abd Fabric Mini Album with Ruler Binding

Hi friends! Dana Tatar here today sharing a mixed media mini album that I put together. I usually struggle with album binding, so this Tim Holtz Ruler Binding set was a quick and easy way for me to hold my album together. The only tool necessary was a standard hole punch. (The metal screws, washers, and wing nuts are included with the rulers.)

Patterned Paper and Fabric Scraps Cut to Size for a Mini Album

I started this album by cutting up pieces of scrap patterned papers, clip art sheets, acetate, and fabric, to measure 3.25 x 5 inches. To add strength to the album, and to help keep the paper pages from tearing, I used acetate for the front and back covers.

Colorful Mixed Media Mini Album Pages with Stamping and Embellishments

I'm still working on embellishing all the pages in this album. I added handwritten song lyrics, stamping, chipboard stickers, and words cut from patterned papers, to the pages shown above. The fabric pages add fun texture to this album. I used a safety pin to attach a silver foil bird to a fabric page. Stitched beads or charms, or iron-on patches, would also make great embellishments for the fabric pages.

I gathered the punched pages together and placed them onto the screws to bind them together. The album is held together by wing nuts that twist onto the screws. I have 40 pages in this album and still have about 1/4 inch of space on the screws if I decide to add more pages at a later date.

Thanks so much for stopping by today!

Paper Wings Productions Supplies:
Big Textures Cling Stamp Set
Spring Flowers Clip Art Sheet
Silver Foil Bird

Pin It!


Mixed Media Patterned Paper abd Fabric Mini Album with Ruler Binding

Wednesday, May 16, 2018

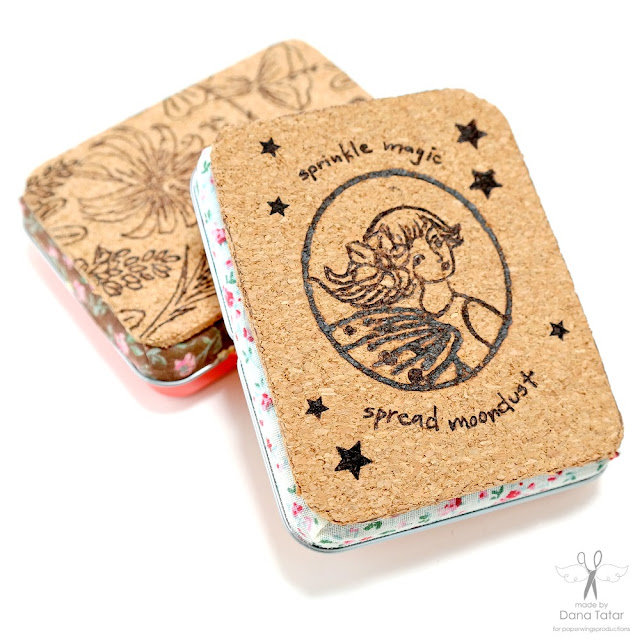
Burned Cork Gift Card Tins

Burned Cork Gift Card Tins

Hi! Dana Tatar here today sharing a fun way to alter metal tins. As both the sports season and school year come to a close, I find myself giving a lot of gift cards to the teachers and coaches that have helped my daughters over the year. Instead of tucking the gift cards into an envelope, I decided to upcycle some metal tins. I used some of my favorite Paper Wings Productions stamp sets and a wood burning tool to embellish pieces of cork. I love using my wood burning tool on soft materials like cork and leather.

Hello Kitty Metal Cookie Tins Before Altering

Here's what my metal tins looked like before I started this project. The bottom half of the tins are a solid color, so I chose to leave that portion of the tin untouched and focus my efforts on covering the top of the tin.

How to Apply Fabric Tape to Metal Tins

Metal can be tricky to cover with paint, so instead I applied a strip of fabric tape around edge of the lid.

How to Stamp on Cork with Archival Ink

Next, I cut pieces of cork to size and stamped designs onto them using archival ink.

How to Use a Wood Burning Tool on Cork

Once I was happy with the designs, I used a wood burning tool to trace over the stamped images.

How to Attach a Burned Cork Piece to a Metal Tin

Finally, I simply used hot glue to attached the burned cork pieces to the top of the metal tins. I love the look of burned cork. I plan to wrap a piece of colorful ribbon around each tin before I give them away. Markers work great on cork, and would be a great way to add color to the burned designs.

Je'Taime Floral Burned Cork Gift Card Tin

Sprinkle Magic Fairy Burned Cork Gift Card Tin


Paper Wings Productions Supplies:
Hanging Stars Clear Stamp Set
Fairies Clear Stamp Set
Paris Clear Stamp Set
Evening Primrose Cling Stamp Set
Mexican Hat Cling Stamp Set
Black Eyed Susan Cling Stamp Set
Bluebonnet Cling Stamp Set

Other Supplies: Metal Tins, Cork Sheet, Archival Ink, Fabric Tape. Wood Burning Tool

Pin It!

Burned Cork Gift Card Tin Tutorial


Wednesday, April 18, 2018

Stamped Mail Art Envelopes for National Letter Writing Month


Stamped Mail Art Envelopes

Hi friends! Dana here today sharing a set of mail art envelopes that I stamped up for National Letter Writing Month. I have a thing for handwriting, so I really appreciate it when I receive a letter or card in the mail. I have a box full of handwritten letters and cards that I have saved over the years. This is all that I have left from some of my relatives. I thought it would be fun to celebrate National Letter Writing Month by sending some love through the mail in a pretty stamped envelope. The selection of stamps in the Paper Wings Productions Store is amazing, and you're sure to find a great design for any recipient. I chose some of my favorite stamp sets for this project.

Colofully Colored Stamped Fibonacci Sprial Mail Art Envelope

Whenever I get stuck with design, I like to go back to the basics. The Sacred Geometry 2 Clear Stamp Set has classic patterns that are super fun to work with. I chose the Fibonacci Spiral stamp for this envelope. I stamped up the left side of the envelope using black archival ink and then colored in the shapes with Distress Markers. I added a bit of decoration to the edge of the geometric design with the Lace Border Outline Clear Stamp.

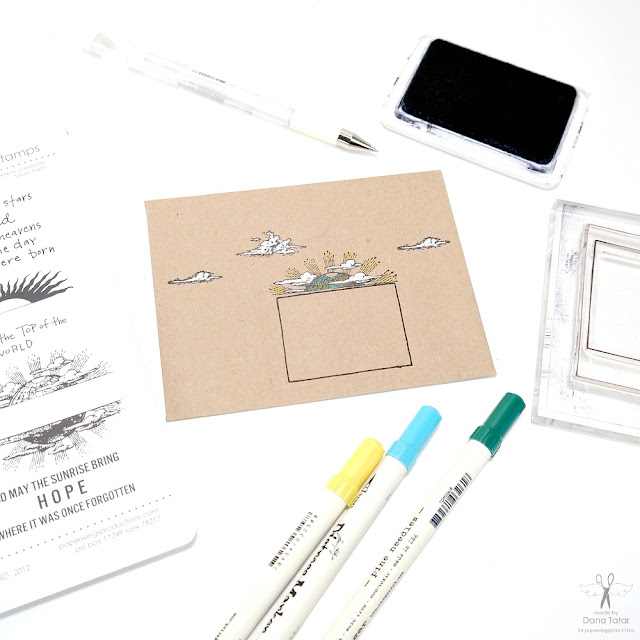
Stamped Globe with White Clouds on Kraft Mail Art Envelope

I wanted to use a kraft envelope specifically with a white gel pen. I just love how the white ink really pops off the paper for a 3D-like effect. I used the Earth and Sky Mélange Cling Stamp Set to decorate the top half of this envelope. I added an address box using the inner frame of the polaroid stamp from the Snapshot Framer Clear Stamp Set.

Colorful Stamped Bird Panel Mail Art Envelope

I had to use a stamp featuring something with wings for my last design. The Bird Panel Clear Stamp Set is so beautiful and is an easy way to add a pretty scene using just one stamp. I used the Snapshot Framer Clear Stamp Set again to add an address spot, but this time I used the larger outer frame. After inking up the entire stamp, I removed the ink from the smaller frame using a wet wipe, and then stamped only the larger frame onto the envelope.

Thanks for stopping by today! I hope I have inspired you to send a friend or loved one some happy mail this month.

Pin It!

Colorfully Colored and Stamped Mail Art Envelopes for National Letter Writing Month


Wednesday, March 14, 2018

Alcohol Ink Resist Cards

Press for Progress Alcohol Ink Resist Card by Dana Tatar for Paper Wings Productions

Hi! Dana here today sharing a set of cards that I created for Women's History Month. Annually during the month of March, the contributions of women to historical events, both in the past and in contemporary society, are highlighted. I thought a resist technique was suitable for cards supporting this movement. I used a tutorial by Carrie to create these cards in which alcohol ink is removed from acetate using Archival ink. You can find her tutorial and inspirational designs HERE.

Press for Progress Alcohol Ink Resist Card Closeup by Dana Tatar for Paper Wings Productions

I chose patterned acetate sheets for the base of both of my cards. I had to dig deep into my Hambly Screen Prints stash for this, and it was totally worth it! The International Women's Day theme this year is "Press for Progress." I love the theme and the imagery of hands used in the campaign so I used both hand stamps from the Handmade Clear Stamp Set on this card.

Persist Alcohol Ink Resist Card by Dana Tatar for Paper Wings Productions

I changed the color palette for this second card, but used circles in the design again. I stamped over alcohol ink with the circles stamp from the Big Art Textures Cling Stamp Set and then rubbed away the ink with a paper towel to create the white circles.

Persist Alcohol Ink Resist Card Closeup by Dana Tatar for Paper Wings Productions

I used my Dymo tape label maker to create the sentiments for both cards.

I hope I have inspired you to try this technique!

Pin It!


Alcohol Ink Resist Cards for Womens History Month by Dana Tatar for Paper Wings Productions

Wednesday, February 14, 2018

Stamped Mini Book

Stamped Mini Book by Dana Tatar

Hi! Dana Tatar here today sharing a super fun mini book of colorful stamped art. I recently finished up Nathalie Kalbach's Creative JumpStart Online Workshop. I created this project with instructions from the lesson taught by Birgit Koopsen. I am a huge fan of mini books and albums and this is a great design! I often times have a hard time choosing stamps. This project allowed be to use a lot of my favorites!
Stamped Mini Book with Clip Art Cover by Dana Tatar


I chose to use a clip art image on the front of this book, rather than create a stamped cover similar in design to the inner pages. This cute photo of a girl and her bird caught my eye. I kept the cover simple, adding only a red vellum heart and ribbon closure. I think this plain, mostly black and white cover, makes the colorful pages of the book more of a surprise upon opening.

Here is the full list of stamp sets I used on this book:
Pin It!
Bird Girl Stamped Mini Book by Dana Tatar


Wednesday, January 17, 2018

Stamped Canvas Heart Valentines

Stamped Canvas Heart Valentines by Dana Tatar for Paper Wings Productions

Hi friends! Dana Tatar here today sharing a quick Valentine tutorial. I used two craft materials that I love, canvas and mist, with Paper Wings Productions stamps to create this set of Valentines. I started this project with store-bought stitched canvas hearts, so all I needed to do to personalize these shapes was add color, stamp, and embellish.


Step 1: Prime the canvas hearts with a light spritzing of water. Wet canvas will readily absorb color. Next, spray the hearts with mist. I used several shades of red, orange, pink, and purple Tattered Angels mist. While the hearts were still wet, I stacked them and applied pressure to transfer colors from one heart to another. The results are similar to a tie dye effect with interesting spots of color.


Step 2: Stamp sentiments onto the canvas hearts with a permanent, waterproof ink. I used stamps from the Valentine Wishes Cling Stamp Set.


Step 3: Embellish! I finished my Valentines with some simple stitched buttons.

You can find the full selection of Valentine's Day stamp sets in the Holiday Section of the Paper Wings Productions Store. If you're looking to jumpstart your Valentines Day crafting, pick up the Valentine Mini Mixed Media Kit.

Pin It!


Stamped Canvas Heart Valentines Tutorial by Dana Tatar for Paper Wings Productions

Wednesday, December 20, 2017

Stocking Stuffies


Hi friends! Dana here today sharing a fun tutorial for stocking stuffer animals that I created for my daughters. My crafty time is definitely short this holiday season, so I started with a Craft-Tastic Design Your Own Stuffies kit from Ann Williams Group. I purchased this kit from Zulily, but you can find these kits in the craft sections of several major big box stores. These super-cute pre-sewn felt and plastic paper stuffies are ready to design and were a real time-saver.

Pre-Sewn Stuffie from Craft-Tastic DYO Stuffies Kit

Here are the two stuffies I started with. I know that with my limited sewing skills I could not have stitched these pieces together myself. I was happy to skip the assembly step and start designing with stamps!

How to stamp on a plastic paper stuffie by Dana Tatar for Paper Wings Productions

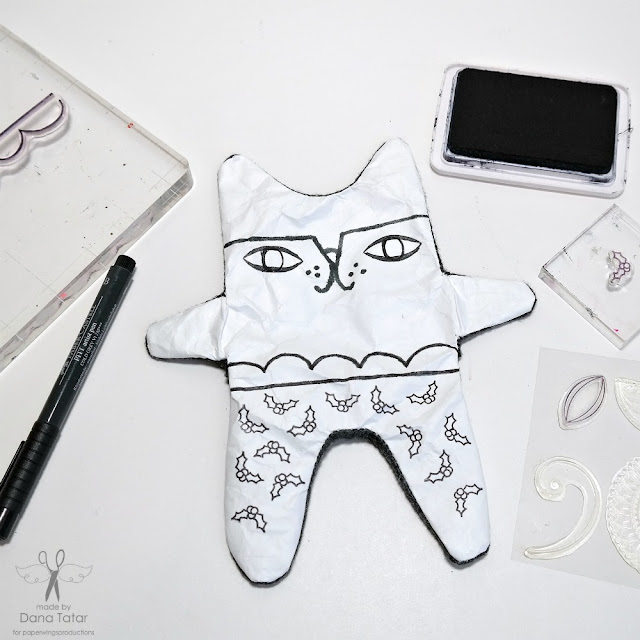
I designed a cat on the larger stuffie. I used the product examples from the box as a guide to draw the nose with a black marker. Then I used stamps and black archival ink to finish the rest of the design. The Sacred Geometry Clear Stamp Set and the Single Dot Border Clear Stamp Set together made a great eye! I used the Scallop Border Clear Stamp Set and the holly from the Holiday Add-Ons Clear Stamp Set to add a festive pair of pants.

How to color a stamped plastic paper stuffie by Dana Tatar for Paper Wings Productions

Next, I added color with Faber-Castell Gelatos, Pitt Artist Pens, and Stamper's Big Brush Pens. I added a small heart to the right side of this stuffie with the Easter Cling Stamp Set.

How to fill a stamped plastic paper stuffie by Dana Tatar for Paper Wings Productions

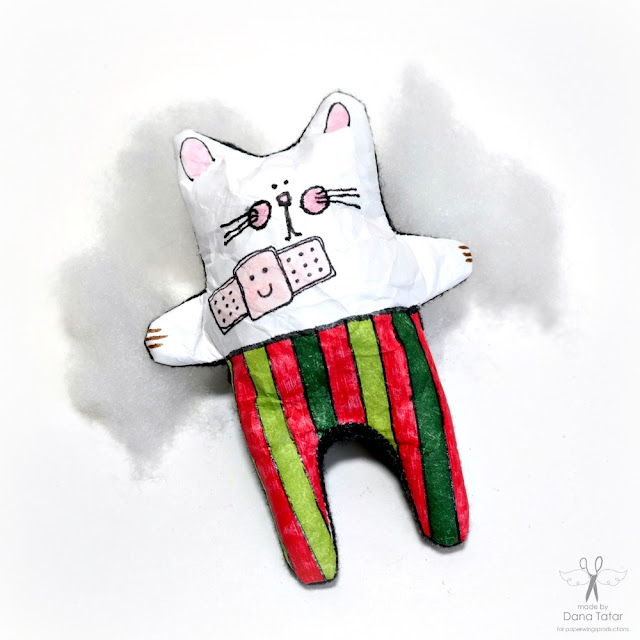
I used the Easter Cling Stamp Set again to stamp a rabbit face onto the second stuffie. The happy Band-Aid is part of the Under the Weather Cling Stamp Set. I created the striped pants with the Straight Journaling Lines Clear Stamp Set. Once both stuffies were stamped and colored, I filled them with the polyester stuffing that was included in the kit.

Stamped and Colored Stocking Stuffies for Christmas by Dana Tatar for Paper Wings Productions

I know my girls will love finding these stuffies in their stockings! Thanks for stopping by today!

Pin it!


Stamped and Colored Stocking Stuffies for Christmas Tutorial by Dana Tatar for Paper Wings Productions

Wednesday, November 22, 2017

Stamped Clip Art Christmas Ornaments

Stamped-Snowflake-Santa-Clip-Art-Christmas-Ornament-by-Dana-Tatar-for-Paper-Wings-Productions

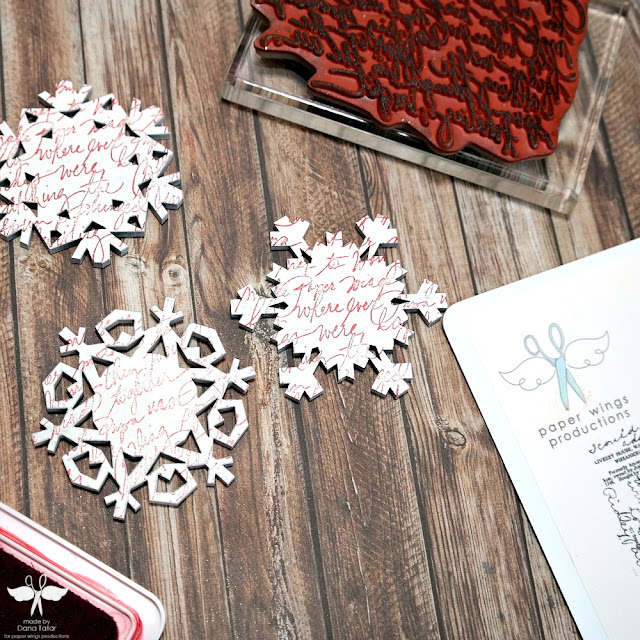
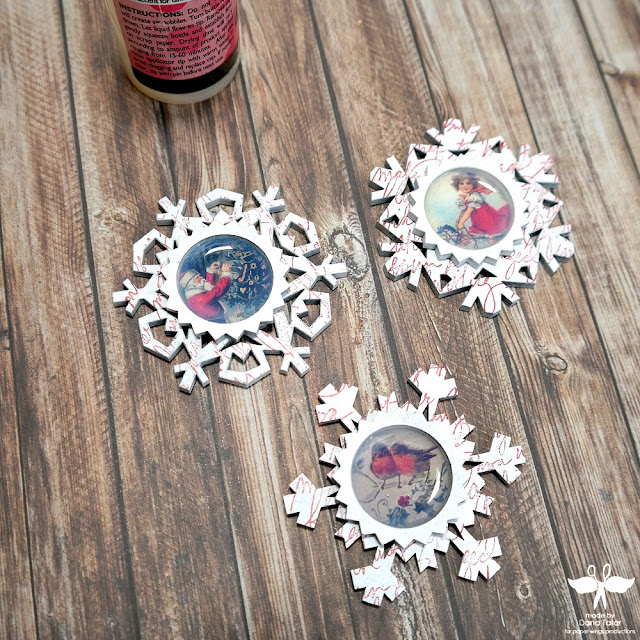
Hi friends! Dana here today sharing a fun Christmas ornament tutorial featuring Clip Art Sheets. All the Clip Art Sheets from the Paper Wings Productions Store are laser printed on high quality paper, which makes them great for image transfer techniques. I used pieces from the Itty Bitty Christmas Clip Art Sheet more simply for this project. I cut them out and sealed them with a layer of glaze for a festive focal point on some stamped snowflake ornaments.

How-to-Prime-Masonite-Snowflake-Ornaments-by-Dana-Tatar-for-Paper-Wings-Productions

Step One: Prepare Masonite snowflake ornament blanks for stamping by applying a layer of white spray primer. Note: I chose a spray primer to quickly color the inside of the detailed cutouts on my snowflake ornaments. Gesso, acrylic paint, or embossing powder would also work for this step.

How-to-Stamp-on-Masonite-Snowflakes-by-Dana-Tatar-for-Paper-Wings-Productions

Step Two: Use the Writing Backgrounds Cling Stamp Set with red archival ink to add a script print to the snowflake ornaments bases.

Christmas-Clip-Art-Ornament-Assembly-by-Dana-Tatar-for-Paper-Wings-Productions

Step Three: Select several images from the clip art sheet and cut them down to size. Glue the clip art into the top layer of the ornaments.

How-to-Glaze-Clip-Art-for-Christmas-Ornaments-by-Dana-Tatar-for-Paper-Wings-Productions

Step Four: Cover the clip art images with a layer of glaze. Glue the clip art rounds onto the center of the snowflake bases.

How-to-Cut-Wire-Hangers-for-Christmas-Ornaments-by-Dana-Tatar-for-Paper-Wings-Productions

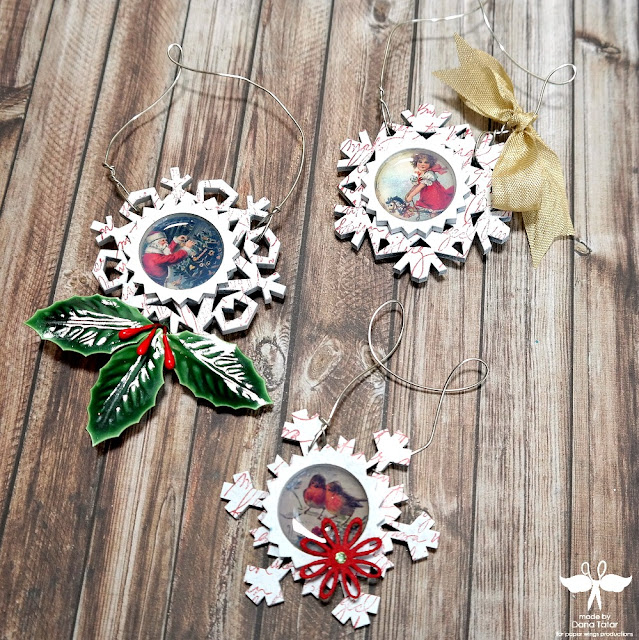
Step Five: Cut several lengths of wire. Bend and twist the wire into hangers and attach to the ornaments.

Stamped-Snowflake-Clip-Art-Christmas-Ornaments-by-Dana-Tatar-for-Paper-Wings-Productions

Step Six: Embellish the ornaments.

These ornaments look great on the tree, but they would also look fantastic as gift toppers. Be sure to visit the Paper Wings Productions Store to see the wonderful range of Christmas, Holiday, and Seasonal stamp sets.

Pin It!
Stamped-Snowflake-Christmas-Ornament-Tutorial-by-Dana-Tatar-for-Paper-Wings-Productions
Thanks for stopping by today and let your creativity take flight!

Wednesday, October 18, 2017

Los Animales Stamped Clay Trinket Dishes

Los Animales Cat Stamped and Painted Clay Trinket Dish by Dana Tatar for Paper Wings Productions

Hello! Dana Tatar here today sharing a fun tutorial that features the fantastic Los Animales Cling Stamp Set and ACTÍVA Hearty Air Dry Clay. I love crafting during the month of October. I already assembled a Halloween Mini Album, so I thought it would be enjoyable to create some trinket dishes for the Day of the Dead.

How to Stamp Air Dry Clay by Dana Tatar for Paper Wings Productions

Step 1: Roll out the clay into a flat disc. Firmly press a Los Animales cling stamp into the center of the clay. Press the stamped clay into a small dish and remove the excess clay. Carefully remove the wet clay from the dish and let dry overnight. Note: I used a glass dish as a mold for my clay. A free-form dish would also look amazing!

How to Paint Air Dry Clay with ColoriQue by Dana Tatar for Paper Wings Productions

Step 2: Paint the dishes and let dry. Note: I used ColorBox ColoriQue by Lisa Marie Jimenez to paint the inside of the dishes. I highlighted the edge of my dishes with Gold Lamé Smooch Accent Ink. Any ink or paint will work for this step.

How to Seal Air Dry Clay by Dana Tatar for Paper Wings Productions

Step 3: Seal the dishes. Note: I like a spray sealant for a smooth finish. Find Rust-Oleum Triple Thick Glaze in the hardware store.

Los Animales Dog Stamped and Painted Clay Trinket Dish by Dana Tatar for Paper Wings Productions

I really love these stamped animals! I hope I have inspired you to try working with a new medium. Air dry clay is easy to work with and is also great for beginners (like me!). Stop by the Paper Wings Productions Store to view the full selection of Day of the Dead Stamps.

If you used PWP products to create art, we'd love to see it! Share your creations with us on the Paper Wings Productions Facebook Page, in the Paper Wings Productions Facebook Share Group, or leave a link to your work here in the comments section.

 Day of the Dead Los Animales Trinket Dishes by Dana Tatar for Paper Wings Productions
Related Posts Plugin for WordPress, Blogger...