Showing posts with label Iced Enamels. Show all posts

Wednesday, September 17, 2014

What's Up Wednesday - Clear Tar Gel ATC


Hi Paper Wings fans! Dana here today sharing an artist trading card that I created using Clear Tar Gel, the fun medium included in the Well Dressed Nesting Components Mixed Media Kit. I have limited experience with Clear Tar Gel, so I tried several different techniques with the gel to help familiarize myself with the product, which I'm sharing today in addition to my finished project.


I cut small pieces of scrap foam board to test several techniques. I gathered some simple tools; a spatula, plastic spoon, paper piercer and rub-on stylus, and acrylic paint.


I spread a layer of gel onto each board using a plastic spatula. This gel is very slow to dry, so I spread the gel over all three boards at the same time and didn't have to rush through my experimenting. The wet gel is opaque but dries completely clear.

For my first technique, I dotted small amounts of blue and purple acrylic paint onto the surface of a gel covered board. 


I then used a plastic spoon and a light spreading motion to mix the paint into the gel.


I let the gel dry overnight. This effect is super cool!

Next, I applied acrylic paint to a gel covered board just like above, but instead of using a plastic spoon to swirl the paint, I used a paper piercer to connect the drops of paint together.


I pulled the paper piercer through the dots of paint in a side-to-side motion.


I then pulled a rub-on stylus up and down the board to blend the paint, which created broader lines of color.

This is what the board looks like after drying overnight.


Lastly, I mixed Iced Enamels directly into the gel. I could have mixed paint, glitter, beads or fibers into the gel for this technique.


I used a plastic spatula to drip the gel onto the board.


This is what the board looks like after drying overnight.


This is a great way to add some shimmer to projects without the risk of having any of the product flake off. The Iced Enamels are completely sealed in the gel.


I had some leftover gel with Iced Enamels mixed in from the previous step and simply spread the extra gel onto a blank artist trading card using a plastic spatula. I applied the gel in an even layer and left the card to dry overnight.


I added this piece of chipboard from a past Nesting Components Mixed Media Kit to the card. I filled in the cloud with a piece of burlap that I brushed with white acrylic paint. I filled the raindrops with Clear Tar Gel, added a small drop of blue acrylic paint to each drop, and then used a paper piercer to swirl the paint through the gel. The red bird is from the For The Birds Nesting Components Mixed Media Kit. I used the Under The Weather Cling Stamp Set for the sentiment.

Thanks for stopping by today! I hope I have inspired you to try this fun medium!


Tuesday, August 5, 2014

Tutorial Tuesday - Resin Paper Mini Journal


Hi Paper Wings fans! Dana here today sharing a fun resin paper tutorial. Before I start my post I want to thank everyone who hopped with us over the weekend. We hope that our colorful projects were inspiring!

Congratulations to the winner of our August Blog Hop:

I shared about the contest. jean.bullock.148


Please contact Carrie at paperwingsproductions@hotmail.com for instructions on how to claim your prize.


I had a blast creating resin paper, which I then stitched onto the cover of a linen mini journal.


I wanted to create a one-of-a-kind print so I used a Gelli Plate with block printing ink and some of my favorite stamps. I do have to apologize for not having step-by-step photos on how I created my prints. The gelli print process is fast and if I stopped to take photos during the process I would risk having the ink dry on my plate. That being said, I kept my prints simple, so these written instructions should help you create similar prints if you are so inclined.

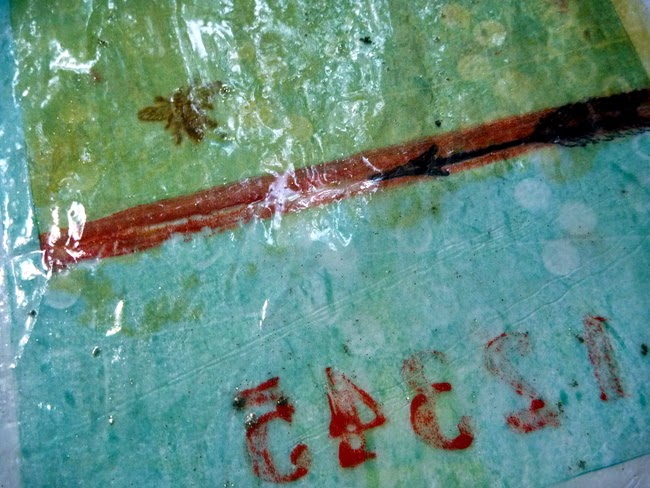
To create the print on the right, I applied a layer of turquoise ink over a 6x6 Gelli Plate. I then stamped onto the plate using the small circle stamp from the Art Textures Stamp Set, which removed paint from my plate. I then pressed a sheet of deli paper over my plate, pressed down, and peeled the paper away. I stamped the red numbers (Perfect Numbers Cling Stamp Set), bird (Bird Beauty Cling Stamp Set) and arrow (Vintage Melange Cling Stamp Set) once the turquoise ink was dry using red block printing ink and black archival ink directly onto the deli paper (no Gelli Plate transfer).

The base of the print on the left was created by passing a second piece of deli paper over the Gelli Plate after I took my first print off. The second print removed the rest of the ink from the plate. I love this print because it has the same pattern, but in a lighter shade of turquoise that I prefer. I added a small amount of yellow block printing ink to half of my Gelli Plate and pressed the deli paper over my plate to transfer the ink. I used the red numbers and black arrow I had out from my first print again, stamping directly onto the deli paper. I still had red ink on my paintbrush so I added a red stripe to separate the yellow and blue halves of my print. To finish this print I stamped several bees (Vintage Melange Cling Stamp Set) with brown archival ink onto the deli paper.

Note: Any letters or numbers will print backwards during the Gelli Plate transfer process. I think this is cool! If you want spell a word or have the numbers print in the right orientation, you must apply them to the gelli plate backwards.


I mixed up Ice Resin per the package directions. Once the resin is mixed there is a limited working time before the resin hardens. I only needed a small amount of resin to cover my prints. I did not want to waste the rest of the resin in the cup, so I covered several more gelli prints with resin.


I covered my workspace with a plastic garbage bag and used a piece of sponge to spread a thin layer of resin over both the back and front sides of my prints.


While the resin was wet I sprinkled some Relique Glitz Gold Iced Enamels over the top. I then left the paper to dry for about 8 hours. After that, I peeled the prints from the plastic, they were a bit tacky, and hung them to dry overnight.


Here are my finished resin prints. The texture is similar to that of a fruit roll-up and the shine is fantastic!


Here is a closer look. The resin helped to brighten and highlight the details of my print.


I trimmed my print to size and then stitched it onto the cover of a linen mini journal. I haven't altered the inside pages yet.


This is a shot of the back of the journal.

Thank for stopping by today! I hope I have inspired you. If anything was unclear in this post, please don't hesitate to ask me questions. Be sure to stop by here tomorrow for the August challenge reveal!


Tuesday, July 22, 2014

Tutorial Tuesday - Encaustic Wax


Hi Paper Wings Fans! Dana here today sharing an encaustic wax tutorial. I'm still experimenting with this new medium so please keep that in mind! Today I'm going to share some techniques that work for me, as well as my mistakes, and how to avoid them.


I used the Purple Cows Melt Tool, interchangeable tips and encaustic wax for the projects I'm sharing today. I also used a heat gun.


I cut several small pieces of cardboard (from my Nesting Components Kit) and primed them with gesso. I did experiment with pieces cut from a cardboard box and was not happy with the way the wax settled on the ridged surface.


Once the gesso was dry, I melted clear wax onto a piece of cardboard, spread the wax around to cover the entire piece of cardboard and then heated the wax with my heat gun to fuse and smooth the layer of wax. Note: Apply heat just until the surface of your project is shiny. Overheating the wax will cause the wax to run off your project.


I stamped an image from the Text Melange Cling Stamp Set onto a piece of white tissue paper using black Archival Ink.


I then placed the tissue paper onto my piece and melted a layer of clear wax over the top. The tissue paper blends with the wax for a seamless finish. Again, I used my heat gun to smooth and fuse the second layer of wax. Why not stamp directly onto the first layer of wax? I'm still a beginner and need much more practice to create a wax layer that is smooth enough to stamp onto and produce a crisp image. Until that time, tissue paper works great!


I changed the tip on my heat tool and selected a gold colored wax to add a colored edge to my piece.


I added a rub-on sentiment, which I then sealed with a small amount of clear wax.


I finished this piece with a set of Gold Foil Wings.


I created a second piece using the same techniques as above. I selected several stamps from the NEW Tea Time Cling Stamp Set, some small circles from the Double Dot Border Clear Stamp Set and some washi tape from the Tea Time Nesting Components Mixed Media Kit.


Everything was going well until I started adding color. Note the difference in the evenness of the wax in this photo compared to the finished piece. I overheated the wax when fusing the colored layer and then added more clear wax over the top to try to even out several areas. I made things much worse and smeared the yellow wax, which resulted in a "dirty" finish.

My advice is to add the colored layers last and do not try to go back over a finished piece. It is easy to overheat the wax when fusing layers, so keep the heat gun several inches above the project. Do not direct the heat onto any one area too long to avoid creating wells in the wax. Also, if adding layers of stamped tissue paper, overheating the wax will cause the tissue paper to slide around, smearing the image.

Since I was not able to repair the finish on this piece I decided to try adding some sparkle with a bit of Relique Glitz Gold Iced Enamels. If you work quickly, you can add glitter or other sparkly bits into the warm wax!

A big thanks if you made it to the end of this post! I'd love to continue my journey with encaustic wax and share my results with you. If you'd like me to try encaustic wax with a specific technique or on a different surface please leave me a note in the comments section.

Stick around awhile and check out Katie's Tea Time Mini Album and Amber's Christmas in July Card. There is still time to join our July Emboss It Challenge. CLICK HERE for all the details.


Related Posts Plugin for WordPress, Blogger...