Showing posts with label Perfect Number. Show all posts

Wednesday, December 13, 2017

DT: 12 Days of Christmas Love

Dear Scrappers,

This is Veronica from www.vickyscrappingpassion.blogspot.com  sharing with you A quick minialbum I made this morning. I was inspired by the Paper Wings Productions: Perfect numbers, clear stamp set.


For this album, I used:

Liquid Glass

Inks: Black, red, and gold: Hero Stamps. 
Glittery snow, DecoArt
Glittery snow, Martha Stewart 

A closer look at my mixed media title:


For this album, I used mostly components of the nesting mixed media kit. I added some fake snow 
to the snowflake and the inked wood shipies 


For the album covers, I used the harder packing material included in this kit. And make the wholes using my Cro-A-dile. I attached some trimmed paper from October afternoon included in the kit, sanded and inked the edges. I cut more paper for the inside pages and added picture mats and  stamped embellishments. The coordinated kits makes this process a breeze. 

I hope you enjoyed my minialbum and visit my blog.

Have wonderful and blessed day,


Vicky Tovar

Tuesday, August 5, 2014

Tutorial Tuesday - Resin Paper Mini Journal


Hi Paper Wings fans! Dana here today sharing a fun resin paper tutorial. Before I start my post I want to thank everyone who hopped with us over the weekend. We hope that our colorful projects were inspiring!

Congratulations to the winner of our August Blog Hop:

I shared about the contest. jean.bullock.148


Please contact Carrie at paperwingsproductions@hotmail.com for instructions on how to claim your prize.


I had a blast creating resin paper, which I then stitched onto the cover of a linen mini journal.


I wanted to create a one-of-a-kind print so I used a Gelli Plate with block printing ink and some of my favorite stamps. I do have to apologize for not having step-by-step photos on how I created my prints. The gelli print process is fast and if I stopped to take photos during the process I would risk having the ink dry on my plate. That being said, I kept my prints simple, so these written instructions should help you create similar prints if you are so inclined.

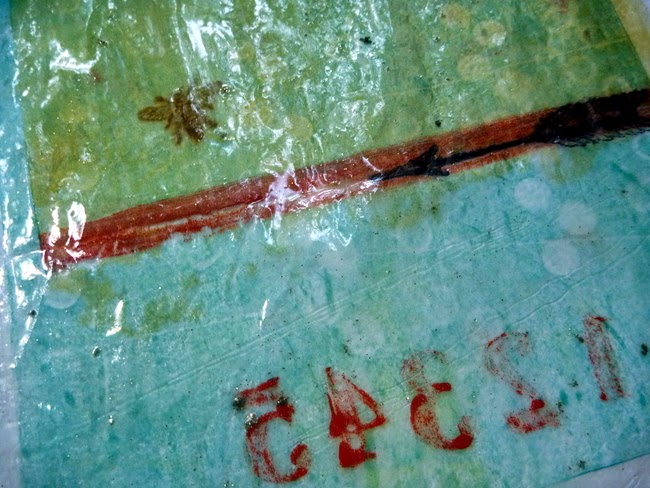
To create the print on the right, I applied a layer of turquoise ink over a 6x6 Gelli Plate. I then stamped onto the plate using the small circle stamp from the Art Textures Stamp Set, which removed paint from my plate. I then pressed a sheet of deli paper over my plate, pressed down, and peeled the paper away. I stamped the red numbers (Perfect Numbers Cling Stamp Set), bird (Bird Beauty Cling Stamp Set) and arrow (Vintage Melange Cling Stamp Set) once the turquoise ink was dry using red block printing ink and black archival ink directly onto the deli paper (no Gelli Plate transfer).

The base of the print on the left was created by passing a second piece of deli paper over the Gelli Plate after I took my first print off. The second print removed the rest of the ink from the plate. I love this print because it has the same pattern, but in a lighter shade of turquoise that I prefer. I added a small amount of yellow block printing ink to half of my Gelli Plate and pressed the deli paper over my plate to transfer the ink. I used the red numbers and black arrow I had out from my first print again, stamping directly onto the deli paper. I still had red ink on my paintbrush so I added a red stripe to separate the yellow and blue halves of my print. To finish this print I stamped several bees (Vintage Melange Cling Stamp Set) with brown archival ink onto the deli paper.

Note: Any letters or numbers will print backwards during the Gelli Plate transfer process. I think this is cool! If you want spell a word or have the numbers print in the right orientation, you must apply them to the gelli plate backwards.


I mixed up Ice Resin per the package directions. Once the resin is mixed there is a limited working time before the resin hardens. I only needed a small amount of resin to cover my prints. I did not want to waste the rest of the resin in the cup, so I covered several more gelli prints with resin.


I covered my workspace with a plastic garbage bag and used a piece of sponge to spread a thin layer of resin over both the back and front sides of my prints.


While the resin was wet I sprinkled some Relique Glitz Gold Iced Enamels over the top. I then left the paper to dry for about 8 hours. After that, I peeled the prints from the plastic, they were a bit tacky, and hung them to dry overnight.


Here are my finished resin prints. The texture is similar to that of a fruit roll-up and the shine is fantastic!


Here is a closer look. The resin helped to brighten and highlight the details of my print.


I trimmed my print to size and then stitched it onto the cover of a linen mini journal. I haven't altered the inside pages yet.


This is a shot of the back of the journal.

Thank for stopping by today! I hope I have inspired you. If anything was unclear in this post, please don't hesitate to ask me questions. Be sure to stop by here tomorrow for the August challenge reveal!


Thursday, May 22, 2014

Themed Thursday - Easy Iridescent Watercolor Fairies


Carrie here with you today with some quick and easy iridescent watercolor fairy cards and tag.  It looks like we are actually having themed week here at the Aviary with the fairies.  Norma posted an excellent tutorial on Tuesday using more of our fantastic fairy stamps.  Click here to check out her post.  


Hello and Happy Thursday!

All of my projects were made with this watercolor set that we have available in our online store


It is so reasonably priced and easy to use.  It adds such a nice sparkle of color to the stamped image.  You can order one by clicking HERE.  The colors are dry watercolor cakes.  I use them with a small paint brush and a little water.  The more water you use, the more subtle the color will be.  You can even layer color if you feel like it's not dark enough.  Remember, most of the sparkle doesn't show up until it's completely dry so I recommend using it sparingly until you get the hang of it.

My first project is a window card.  I stamped the fairy and colored with only the watercolors.  I stamped and embossed the front panel with one of the stamps from the Sacred Geometry set and added a little more watercolor to the flowers.


On the inside, I stamped and embossed the Tile Pattern stamp and mounted the fairy on top of it.


Next, I made a simple card.  This one has some colored pencil along with the watercolors.


I also added a little bit of the lilac Pearl Pen to the flowers.  I used the same Tile Pattern stamp as the first card, this time without embossing it and a little bit of lace.


I have a little boy, so boy fairies are an important addition to our fairy line.  I made this super simple Happy Birthday tag by stamping the 5 in the background from the Perfect Numbers set.  The green layer features the Sunburst stamp.  The wording also came off of the Perfect Numbers set.  The fairy image was colored only with the watercolors.


I hope you enjoyed our fairy themed week!

Enjoy the flight!
Carrie


Monday, April 28, 2014

Mixed Media Monday


Happy Monday Paper Wings fans!  Erica here with you today to bring you Mixed Media Monday!  Today I want to share with you my completed Easter Mixed Media album.  But first I want to announce the winner of our April "Get Inky" challenge!  Congrats to Val by Design.  Please email Carrie at paperwingsproductions@hotmail.com to claim your prize!  Thanks so much to everyone who linked up this month!  We hope you will join us again next month!


I shared my album cover with you in my post earlier this month and if you missed it you can check it out HERE.  Now that Easter has passed and my photos have been printed, I was able to complete my journal and fill it will photos and details of our Easter 2014.  I used a variety of products from the Paper Wings Productions online store including the April 2014 Nesting Components Kit.   Here is a look at my completed pages and also a video showing some of my process completing my pages!  I used a ton of stamps from the Paper Wings Productions store including all the Framer Stamp sets that you can find HERE.  These stamp sets are perfect for mini albums, project life and I find myself grabbing these to add to my scrapbook layouts over and over again!  I applied acrylic paint to the edges of my pages, and tons of Hibiscus Rose from Lindy's Stamp Gang.


For the page above I used some of the Golden Regular Gel that comes in the April Nesting Components Kit with a stencil and then sprinkled some Lindy's Stamp Gang embossing powder to add a fun texture to the pattern paper.


 The different papers I used in my album came from two different Paper Wings Productions Nesting Components Kits. The Creative Girl Kit (January 2014) and the December 2013 Kit, these two kits are still
available in the Paper Wings Productions shop and are jam packed with product!


I hope you enjoyed my completed Easter journal.  These journals are great ways to document special moments and memories and they are so fun to create!  Here is a look at my process when I create my mini albums.

Make sure to subscribe to our YouTube Channel for my process videos, tutorials, and releases.  You will also want to follow along on our blog and follow us on Facebook to stay up to date on events, sales, and new releases.  We are also currently looking for a Guest Designer and we would love for you to submit!  You can find all the details HERE!  I hope you all have a fabulous day!  For more inspiration from the Paper Wings Productions Design Team check out Katie's Garden Album and Tutorial!
Related Posts Plugin for WordPress, Blogger...