Showing posts with label Christmas. Show all posts

Wednesday, November 22, 2017

Stamped Clip Art Christmas Ornaments

Stamped-Snowflake-Santa-Clip-Art-Christmas-Ornament-by-Dana-Tatar-for-Paper-Wings-Productions

Hi friends! Dana here today sharing a fun Christmas ornament tutorial featuring Clip Art Sheets. All the Clip Art Sheets from the Paper Wings Productions Store are laser printed on high quality paper, which makes them great for image transfer techniques. I used pieces from the Itty Bitty Christmas Clip Art Sheet more simply for this project. I cut them out and sealed them with a layer of glaze for a festive focal point on some stamped snowflake ornaments.

How-to-Prime-Masonite-Snowflake-Ornaments-by-Dana-Tatar-for-Paper-Wings-Productions

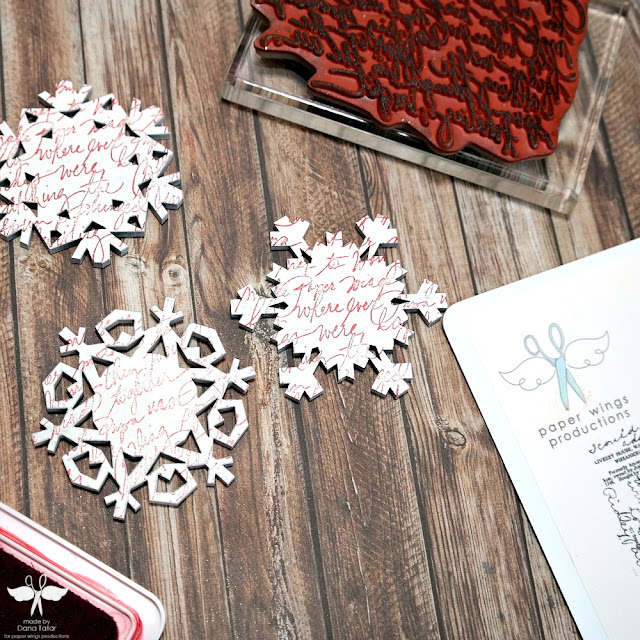
Step One: Prepare Masonite snowflake ornament blanks for stamping by applying a layer of white spray primer. Note: I chose a spray primer to quickly color the inside of the detailed cutouts on my snowflake ornaments. Gesso, acrylic paint, or embossing powder would also work for this step.

How-to-Stamp-on-Masonite-Snowflakes-by-Dana-Tatar-for-Paper-Wings-Productions

Step Two: Use the Writing Backgrounds Cling Stamp Set with red archival ink to add a script print to the snowflake ornaments bases.

Christmas-Clip-Art-Ornament-Assembly-by-Dana-Tatar-for-Paper-Wings-Productions

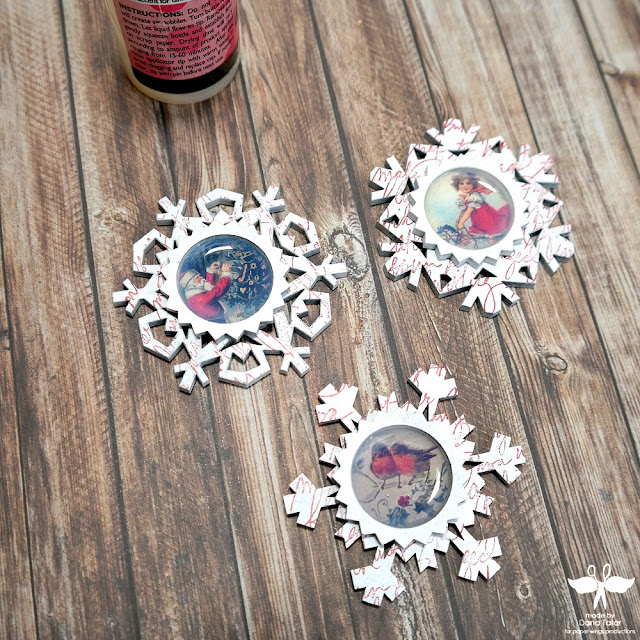
Step Three: Select several images from the clip art sheet and cut them down to size. Glue the clip art into the top layer of the ornaments.

How-to-Glaze-Clip-Art-for-Christmas-Ornaments-by-Dana-Tatar-for-Paper-Wings-Productions

Step Four: Cover the clip art images with a layer of glaze. Glue the clip art rounds onto the center of the snowflake bases.

How-to-Cut-Wire-Hangers-for-Christmas-Ornaments-by-Dana-Tatar-for-Paper-Wings-Productions

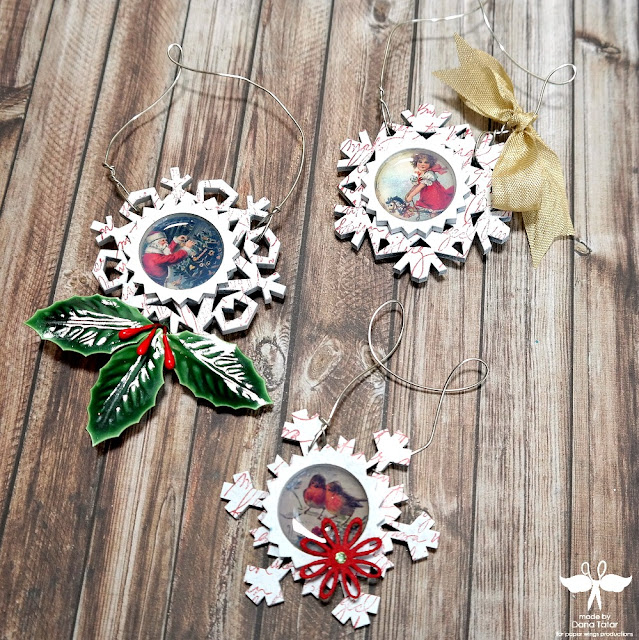
Step Five: Cut several lengths of wire. Bend and twist the wire into hangers and attach to the ornaments.

Stamped-Snowflake-Clip-Art-Christmas-Ornaments-by-Dana-Tatar-for-Paper-Wings-Productions

Step Six: Embellish the ornaments.

These ornaments look great on the tree, but they would also look fantastic as gift toppers. Be sure to visit the Paper Wings Productions Store to see the wonderful range of Christmas, Holiday, and Seasonal stamp sets.

Pin It!

Stamped-Snowflake-Christmas-Ornament-Tutorial-by-Dana-Tatar-for-Paper-Wings-Productions
Thanks for stopping by today and let your creativity take flight!

Tuesday, December 8, 2015

wishing you merry Christmas shaker card

Hi, it's Ashley here today and I'm sharing a Christmas shaker card that I think is super cute! To start, I used a polka dot stencil and distress inks for my card base. Next, I used a circle die to cut out the center of my card.
Then I started working on my sentiment for the inside of the card. I used the Fall Mix It Up stamp set to stamp 'wishing you' and Say It Winter Greetings stamp set for 'merry Christmas.' I heat embossed 'merry' with green embossing powder and I love the font for 'Christmas.'
My final step was to finish the shaker card. Using the Fuse tool makes shaker cards super easy! I added some sequins, a little resin piece, and then I stamped an ornament and some stars from the Winter Wood Cuts stamp set, fussy cut those, and threw them in there too. Here's my finished card:


Thanks for looking! :)

Thursday, December 3, 2015

Merry Christmas

Hello friends. Larissa back with you today. I used a few different stamp sets for this card. Being from San Antonio I thought this was a perfect card for me to send to some of my out of state friends.

I used:
Say it Winter Greetings Clear Stamp Set 
San Antonio Clear Stamp Set 


I stamped the image of the Alamo on the card first and masked it off. I then stamped the San Antonio skyline stamp behind it both of these stamps are from the San Antonio set.  I left the mask on the Alamo and Stamped the two trees from the Build A Scene set. To finish off the trees I took the small light set from Holiday Ad Ons and stamped them across each one. I colored the images using Copic markers.

The greeting is two different sets as well. The Merry Christmas is from the Say it Winder Greetings set and then the "From the Alamo City" came from the San Antonio set. It actually says greetings from the Alamo city. I just cut off the word "greetings".


To finish off the card from I added a few red sequins and matted it on a piece of red cardstock and then adhered it to a white card base, 


I have already stamped a few more of these card fronts to get in the mail. This is a perfect "from San Antonio" card.


Thank you for stopping my today. Don't forget to check back to see what the amazing design team girls create for you.


Have a wonderful day friends.

Larissa
Muffins and Lace 


Wednesday, November 18, 2015

Peace Love Joy

Hello friends. Larissa here today with a Christmas card for you. 

I am using two different sets on my card today. First the sentiment set is

Say it Winter Greetings


So I stamped the images on a piece of white cardstock and colored them with Copic markers. I took my glitter pen and colored in a few places but you can't really see it in the picture.
I cut each image out with a pair of detailed scissors.

I took a piece of watercolor paper and made my background using different yellow and orange watercolors. 

I adhered the images onto the front of the watercolor paper using liquid adhesive and then used foam tape on the back of the angel.

I stamped the sentiments onto the watercolor paper using Versafine Onyx Black ink. 


I hoped you enjoyed my card today.
Have a wonderful week friends. 


Friday, December 19, 2014

Featured Friday- Stamping in my December Album

Hey everyone, Katie here! Today is Featured Friday so I wanted to feature this spread I created in my December Album that I used multiple Paper Wings Productions stamps on!


I started the right side of my album spread spray misting over a circle stencil and then stamping over it as well with the Writing stamp and the small heart from the Holiday Tags stamp set.


After that I removed the stencil, added some doodles and more stamping, then added on my photo and embellishments.


For the left side of the page I started by scribbling some blue gelatos around just to add color. Then I did a lot of stamping using the Holiday Tags set, Vintage Technology set and the Top 10 List stamp set.


 Thanks for stopping by! Are you keeping a December Daily type album this month?

If you haven't yet, be sure to enter our December Challenge!

Monday, December 15, 2014

Mixed Media Monday - Grinch Home Decor

Grinch Stamped Mixed Media Canvas by Dana Tatar for Paper Wings Productions

Hi Paper Wings fans! Dana here today sharing a home décor piece that I created with some of my favorite color mediums and Paper Wings Productions stamps. How The Grinch Stole Christmas is one of my favorite holiday stories and I had a lot of fun creating this project!


I covered a piece of heavy-weight cardboard with gesso and torn pieces of sheet music. I then added color with Gelatos, random stamping with several shades of archival ink and white rub-ons.

Grinch Mixed Media Canvas Background Stamping by Dana Tatar for Paper Wings Productions

I found a fantastic image of a hand holding an ornament printed on a brown paper bag from Trader Joe's that served as a great focal point for this piece. I cut the image from the bag, covered it with a layer of gesso, and then added color using Gelatos and oil pastels.

Grinch Mixed Media Canvas Ornament Closeup by Dana Tatar for Paper Wings Productions

I finished the project with a double-loop bow and a quote.

Pin it!


Grinch Stamped Mixed Media Canvas by Dana Tatar for Paper Wings Productions

If you missed last weeks design posts, be sure to check out Katie's Winter Scene Card Tutorial and Amanda's Mixed Media Scrapbook Layout Tutorial. We'd love it if you found the time to join our December Holiday Challenge!

Thanks for stopping by today!


Tuesday, December 9, 2014

Tutorial Tuesday- Winter Scene Card


Hey everyone, Katie here! Today is Tutorial Tuesday so I wanted to show you guys how I created the wintery scene on my card. I was actually inspired by this card I saw on pinterest, but I changed up the colors a little bit and made it my own.


I used the Holiday Tags stamp set and the Nature stamp set for this card.
I started by stamping and heat embossing the tree from the Nature stamp set onto the bottom of my watercolor paper. Then I heat embossed the stars from the Holiday Tag set up in the "sky" area of my card.


Next I got out my gelatos. I decided to make my sky a blue/yellow color like the sun is setting on a winter day.
I scribbled the colors on in a sort of ombre style and then spritzed them with water so that they blended together.


I finished my card my heat embossing my sentiment from the Holiday Tags stamp and adding white spray mists drops like snow. I also cut some shapes from white cardstock to put at the bottom of my card for snow.


Thanks for stopping by! It was pretty easy to create this dreamy winter scene, I hope I inspired you to get out your stamps!

If you get a chance, take a look around the blog at some of the other PWP designers work!

Related Posts Plugin for WordPress, Blogger...