Showing posts with label holiday tags. Show all posts

Wednesday, March 28, 2018

Easter tags!

Hi PWP friends! Ashley here today sharing two Easter tags I made for our niece and nephew. I've attached these onto their Easter treat bags :) One is pink and girlie and the other is blue and brown for a boy, but I used the Easter cling stamp set for both tags!

For my girlie Easter tag, I added some flowers from the Flower Power cling stamp set. I heat embossed the images onto my tag and then just used some misting + the packaging technique to add some color to the background. The "Easter blessings" sentiment is from the Easter cling stamp set.


With my boy Easter tag, I basically did the same thing. I used one of the bunny stamps from the Easter cling stamp set and heat embossed him with brown embossing powder. I added the sentiment from the same stamp set in blue embossing powder. Then I used some blue mist + the packaging technique for added color and texture to the background.

Thanks for looking!

Thursday, November 12, 2015

"Woolicious" Mittens-Tags

Happy Thursday crafters! Today I have a really fun project featuring the Winter Wood Cuts stamp set. In a couple of weeks my sister and I are going to be selling our handmade wares at a Holiday Bazaar.  My sister makes these amazing "woolicious" mittens that are super warm.  She makes them using recycled wool sweaters. 

So I decided to make some handcrafted little tags to go with the mittens- these tags can also be used for your Christmas presents.


I just love the detail in this stamp.  The mittens were stamped with Versafine Black ink, embossed with clear embossing powder, and colored with Copic markers.
The tags were cut from patterned paper using a Tim Holtz Thinlits die.


Now I have to make 30 more of these tags for all the sets of mittens! I best get busy!

Thanks for joining me today and stay tuned to the Aviary for more great inspiration from the PWP design team!
Embrace Imperfection!
Pam


Friday, December 19, 2014

Featured Friday- Stamping in my December Album

Hey everyone, Katie here! Today is Featured Friday so I wanted to feature this spread I created in my December Album that I used multiple Paper Wings Productions stamps on!


I started the right side of my album spread spray misting over a circle stencil and then stamping over it as well with the Writing stamp and the small heart from the Holiday Tags stamp set.


After that I removed the stencil, added some doodles and more stamping, then added on my photo and embellishments.


For the left side of the page I started by scribbling some blue gelatos around just to add color. Then I did a lot of stamping using the Holiday Tags set, Vintage Technology set and the Top 10 List stamp set.


 Thanks for stopping by! Are you keeping a December Daily type album this month?

If you haven't yet, be sure to enter our December Challenge!

Tuesday, December 9, 2014

Tutorial Tuesday- Winter Scene Card


Hey everyone, Katie here! Today is Tutorial Tuesday so I wanted to show you guys how I created the wintery scene on my card. I was actually inspired by this card I saw on pinterest, but I changed up the colors a little bit and made it my own.


I used the Holiday Tags stamp set and the Nature stamp set for this card.
I started by stamping and heat embossing the tree from the Nature stamp set onto the bottom of my watercolor paper. Then I heat embossed the stars from the Holiday Tag set up in the "sky" area of my card.


Next I got out my gelatos. I decided to make my sky a blue/yellow color like the sun is setting on a winter day.
I scribbled the colors on in a sort of ombre style and then spritzed them with water so that they blended together.


I finished my card my heat embossing my sentiment from the Holiday Tags stamp and adding white spray mists drops like snow. I also cut some shapes from white cardstock to put at the bottom of my card for snow.


Thanks for stopping by! It was pretty easy to create this dreamy winter scene, I hope I inspired you to get out your stamps!

If you get a chance, take a look around the blog at some of the other PWP designers work!

Thursday, September 11, 2014

Tag Trio


Hello everyone! It's Amber here with this weeks Themed Thursday post.With Summer ending soon I've had Fall & Halloween on the brain lately. So today I'm sharing a trio of tags I created with two different PWP stamp sets, Little Halloween and Text.


To create each tag, I stamped my PWP Fall/Halloween images onto three different white die cut tags. I then colored my images with some colorful Close To My Heart markers, adding water to blend. For a soft and subtle background, I inked up one of the text cling stamps and lightly stamped it across my images. To finish I added a vellum tag over each stamped tag and stamped my sentiments. Below is a close up of each tag.


These tags are super easy to make and could easily be made in batches. Thanks for visiting! Don't forget we would love to see what you make with Paper Wings Productions Stamps so add your projects to our Flickr Group,to Pinterest, or leave a comment with a link to your project. You can also check out our Facebook Page and You Tube Page for daily inspiration.


Supplies: Cardstock- White / Paper Wings Productions Clear Stamp Set- Little Halloween  / Paper Wings Productions Cling Stamp Set- Text / Staz-On Ink Pad- Jet Black / CTMH Ink Pads- Bamboo & Grey Flannel / CTMH Markers / Tag Die- Sizzix / Vellum / White String


Wednesday, December 19, 2012

What's Up Wednesday: Little Box Full of Possibilities


Hello there!

It's Shay here today.  Have seen the awe-inspiring altered box by Norma?  She's amazing!

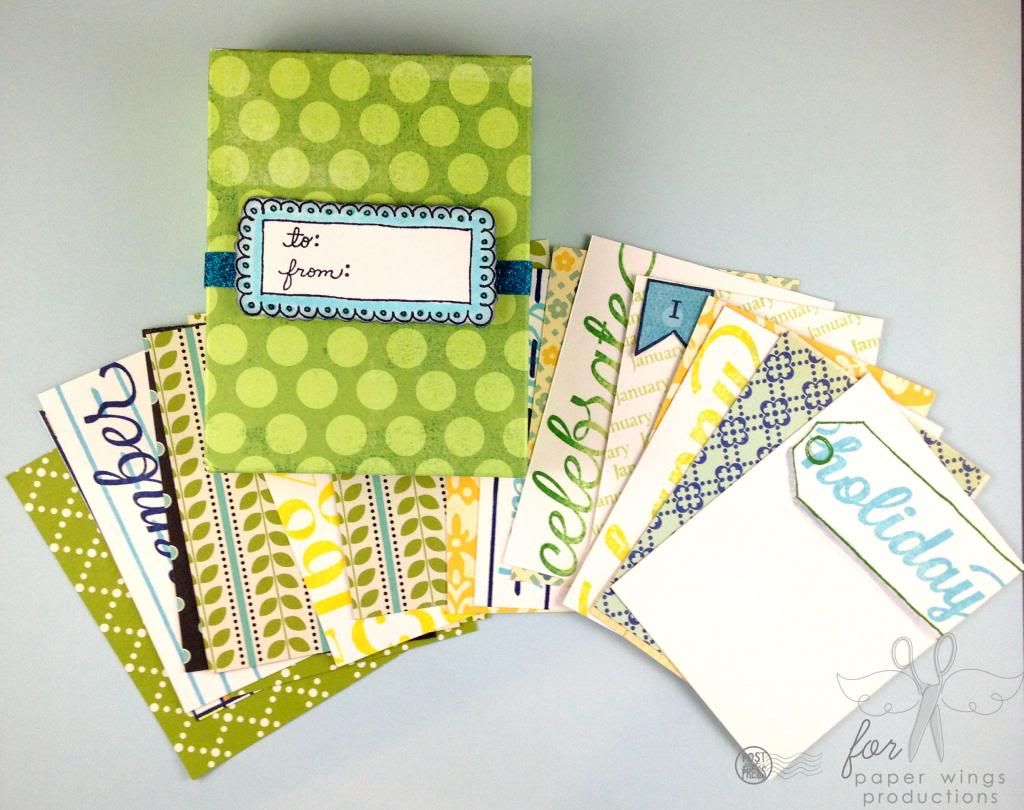
I have something that bridges the gap between Christmas and the coming new year.  Do you have a friend who is crafty or you wish to introduce to stamping and/or memory keeping?  Journaling cards are very popular right now for use in scrapbook layouts, Project Life, minibooks and cards.  They are easy to make and with stamps a breeze to customize.  Why not create a coordinating set as a gift?  It also won't take too much time as we are all going down to the wire with Christmas less than a week away.


I picked out some patterned paper in a color scheme that I liked and cut out a few 3x4 inch rectangles from the papers.  I then cut out some 3x4 inch rectangles from cream cardstock.  I grabbed some stamps and took my ink color cues from the papers.  I also made a little box to hold the cards from patterned paper which I decorated with a tag from Holiday Tags set that I stamped "to: from:" stamp in the same set.  So cute!   And for an extra special gift add a gift card or gift certificate to your favorite stamp company (wink wink) to the gift to encourage them to create their own journaling cards.


I made some super simple journaling cards, but there are so many options out there.  The fun of this project is that you can decorate your 3x4 canvas with any stamps you want.  An alphabet can become a fun monogram (try Whimsical Pattern Alphabet or Funky Alphabet) to stand for a friend's child's name, stamp out words or names with Funky Lower Case or Perfect Alphabet or numbers from Perfect Number stand for a month (imagine doing numbers to mark the month's of life of a newborn).  The Paris or London sets are perfect for travel themes.  If your friend loves angels, for instance, then the Angels cling stamp set would be lovely stamped in a soft ink color that can be written on later.  Go for pretty and elaborate or clean and simple to suit your recipient's tastes.  Round the corners, use different punches on the cards, die cut shapes out of the card or add shapes to the cards.  Change up the colors for their favorites.  There are really so many possibilities!

Journaling Cards can be used to make a minibook or tags by punching a hole, a beginning to a card in addition to being used on scrapbook layouts and Project Life.  They can be as embellished or not as embellished as desired.  They are pretty versatile and awesome!

I hope you ink up some Paper Wings Productions stamps and create some journaling cards!  We would love to see what you make with Paper Wings Productions stamps.  Add your projects to our flickr group, to Pinterest, comment with a link on this post or even email pictures to us!

AND don't forget to enter to the pin it to win it contest to get free Paper Wing Production stamp goodness!

Happiest of holidays to you all!

Shay.

Stamps: Perfect Number, Holiday Tags, Graph Journaling Lines, Holiday, Perfect Alphabet, Remember, School Paper Journaling Lines, Tabs and Banners, Celebrate, Happy (set like Holiday, Remember, Celebrate, Merry and Thankful)
Ink: Jenni Bowlin for Ranger in spice tin, lemon drop, speckled egg, stick candy and seed packet; Memento by Tsukineko in tuxedo black
Cardstock: Neenah Paper
Patterned Paper: October Afternoon, My Mind's Eye
Other: Copic markers; American Crafts glitter tape; washi tape (to close box)

Wednesday, December 12, 2012

What's Up Wednesday - One Layer Cards


Hey peeps! 

I've been on Pinterest a lot lately and I'm SO addicted to looking at pins and searching for ideas. Are you?  [have you pinned your favorite PaperWings stamps yet?] I have been seeing so many great ideas for Christmas cards, and I thought I would try a few ideas using our new and previously released stamps, but I gave myself a challenge.....ONE LAYER CARDS!  I have to say, it was definitely a challenge at first, but when I started thinking about a few card layouts I had seen, plus some techniques I know (but sometimes forget to use), then putting these cards together was easy!


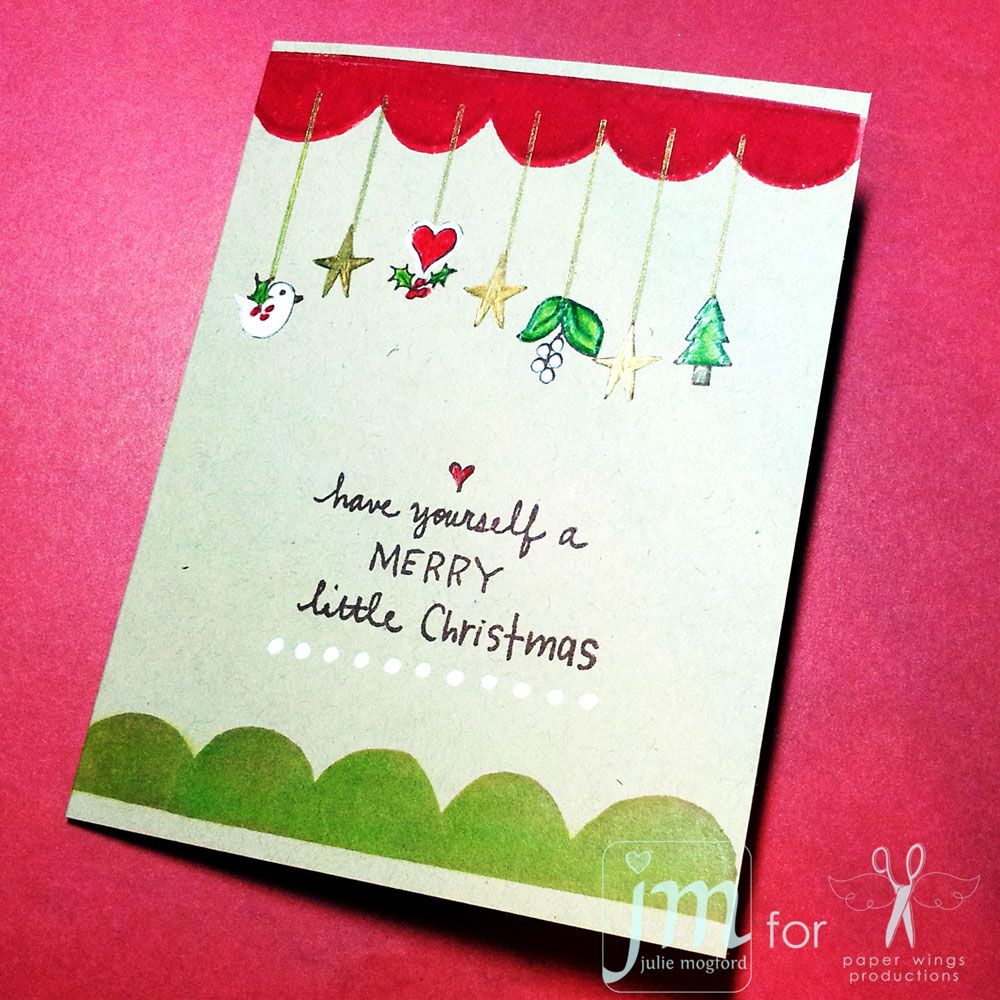
Krafty Christmas - This idea came from to me when I remembered how much I like colored pencil on kraft paper.  I used to do these types of cards with Ms. Liz Allen all the time.  This card reminds me of her!  First I started with the Scallop Border to set my color scheme.  When I started this I made some ink choices that let me down.  I was able to restamp these clear stamp images using chalk inks and line them up perfectly! The green one was not as bright as I wanted, so I went in with a green prisma pencil to bring it up to the perfect shade I wanted to use. Next I stamped the hanger from the Hanging Stars set using gold pigment ink. Then I added the cute elements stamped in Memories Artprint Brown, from the Christmas Mix it Up and Holiday Tags sets. I colored all of the images with prisma pencils and the stars were using a gold prisma pencil - it is a really nice metallic!  Finally, I added the sentiment from the Little Christmas set and added the white dot border from the Louise set, inking only the dots I needed. I could have drawn the dots, but I like using the border so they are lined up and evenly spaced. It takes the guess work out of the equation. Cute, right???  I thought so!


Christmas Collage -  I came across a collage card that had a red Christmas sentiment in the middle of a collage card with green music in the background.  I started thinking, how could I recreate this look with our stamps?  Here is my rendition!  Images from Music Cling, Flourish Fun 2Holiday Greetings  Holiday Greenery Jolly Old St. Nick  /  St. Nick Cling and the Merry clear sentiment. I accented some of the images with prisma pencil, and the sentiment is stamped in Versamark with Festive Berries ink before embossing in red embossing powder.  The Christmas is added with Chestnut Roan chalk ink.  This came out better than I thought.  I am intimidated by collages like this sometimes, but I think it turned out well.  What do you think???


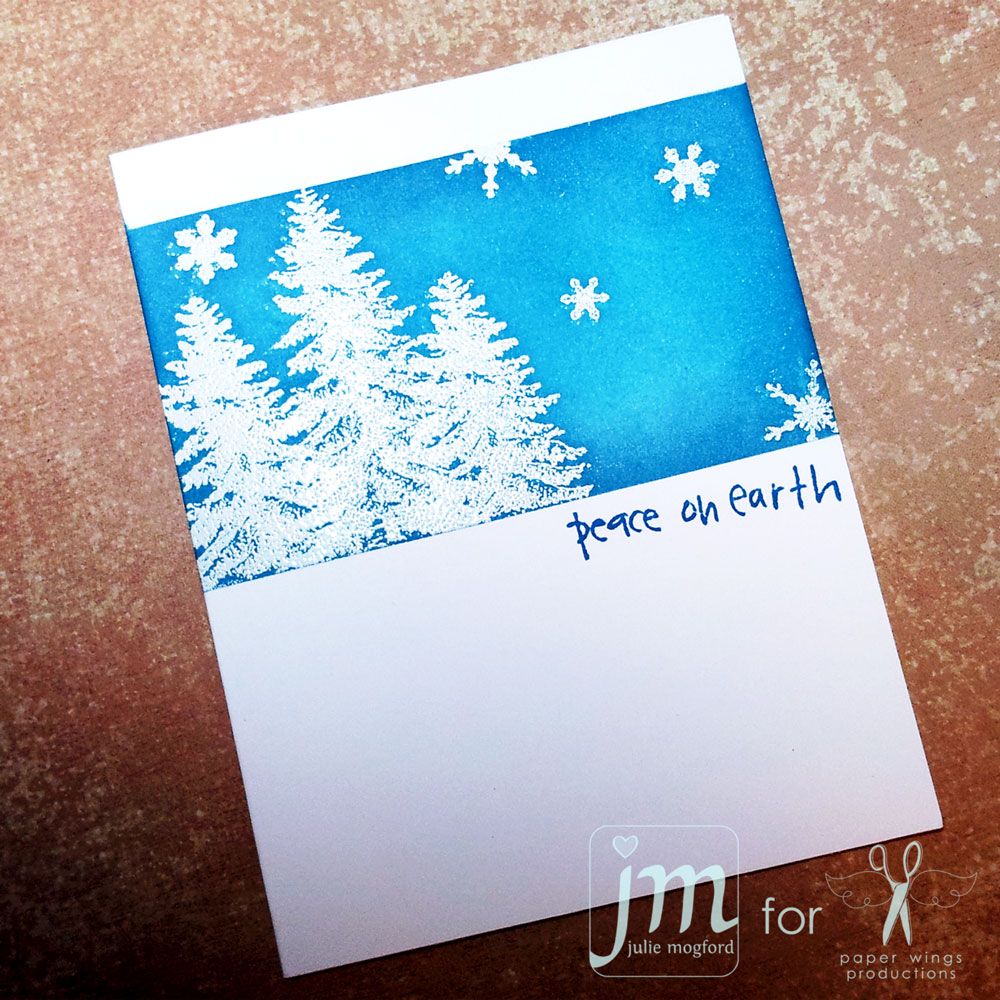
Winter Peace - This one is inspired by a few things.  The new cold weather that we are finally getting down here in Texas, and all of the cute cards I've been seeing that are masked off, stamped and embossed in white and then inked with rich colors.  First, I used some low tack masking paper to mark off the sky scene.  Using Stampin' Up! Whisper White craft ink and embossing powder, my trees from the Pines set and snowflakes from the Winter Mix It Up set come to life in the blue twilight sky.  I used Tumbled Glass, Broken China, Stormy Sky and a little bit of Faded Jeans.  After all of the inking, I wiped the embossed images off to remove any remaining ink and then removed the masking paper.  The handwritten "peace on earth" sentiment from the Little Christmas set is stamped in Faded Jeans and I think it is the perfect way to finish off this card.  I'm pleased at the effect and will be trying this again with other Christmas stamps  - it's really fun when you see the images pop off the card!

So that's my take on One Layer Cards.  I hope you give these techniques a try.  Even though Christmas is going to be here in a blink of an eye, these cards could be put together really quick for a last minute gift, or mass produced in a jiffy!

Hope you have a wonderful holiday season!

Peace

Julie

Friday, November 16, 2012

Feature Friday- Advent Calendar: Part 2

Hello Peeps! 
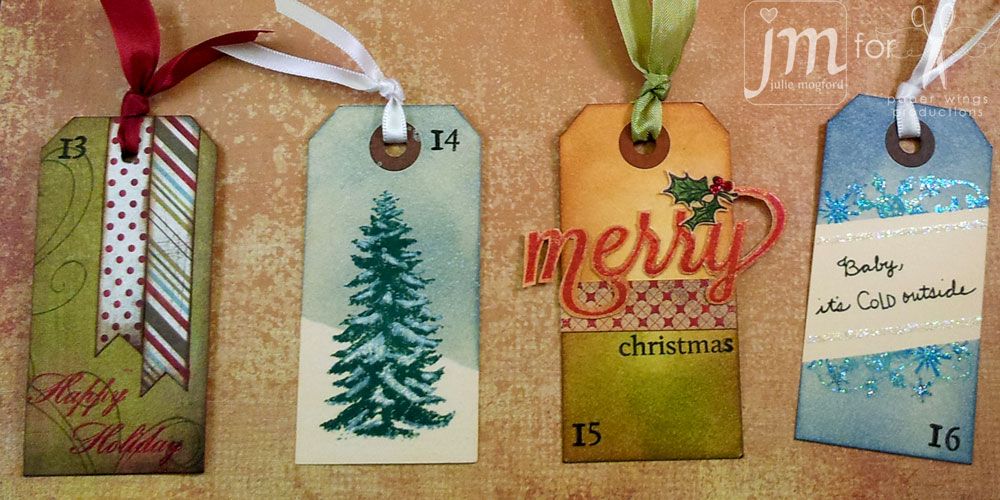
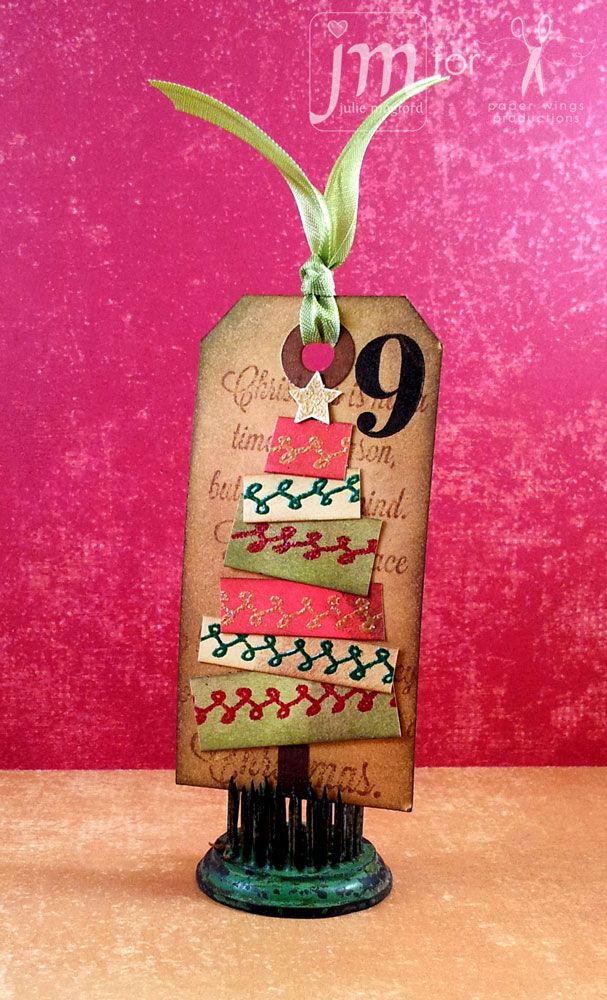
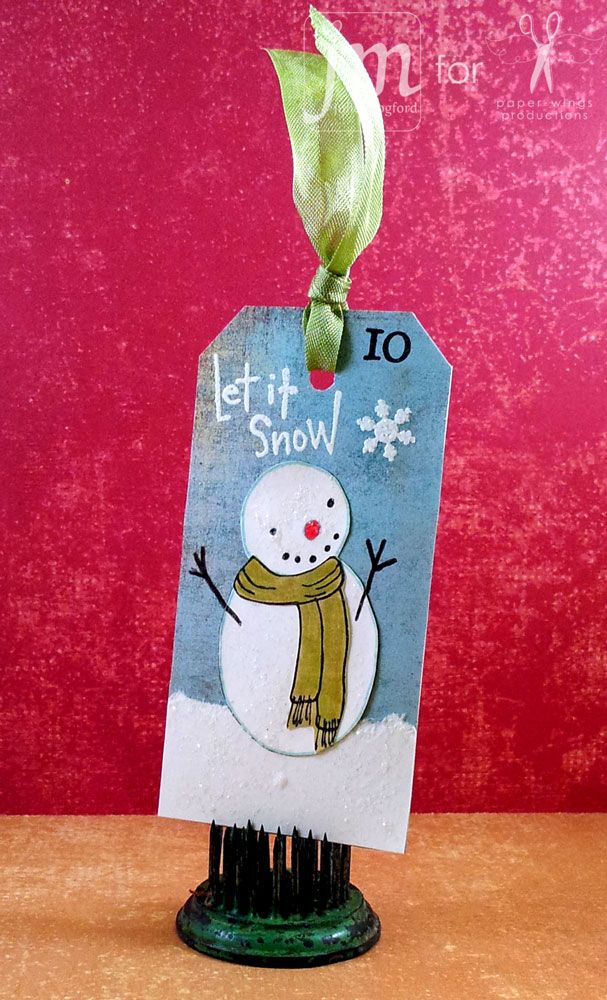
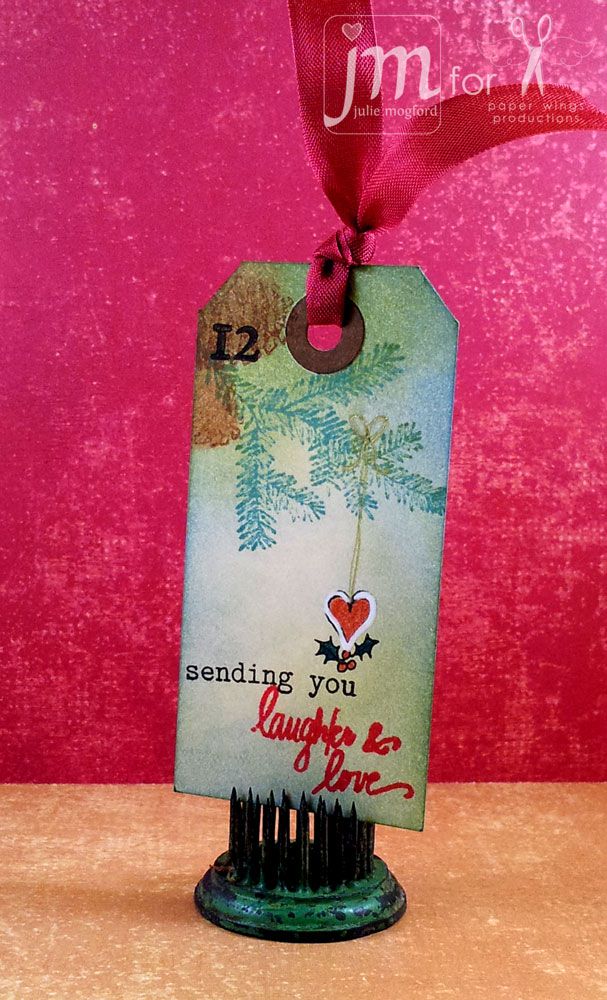
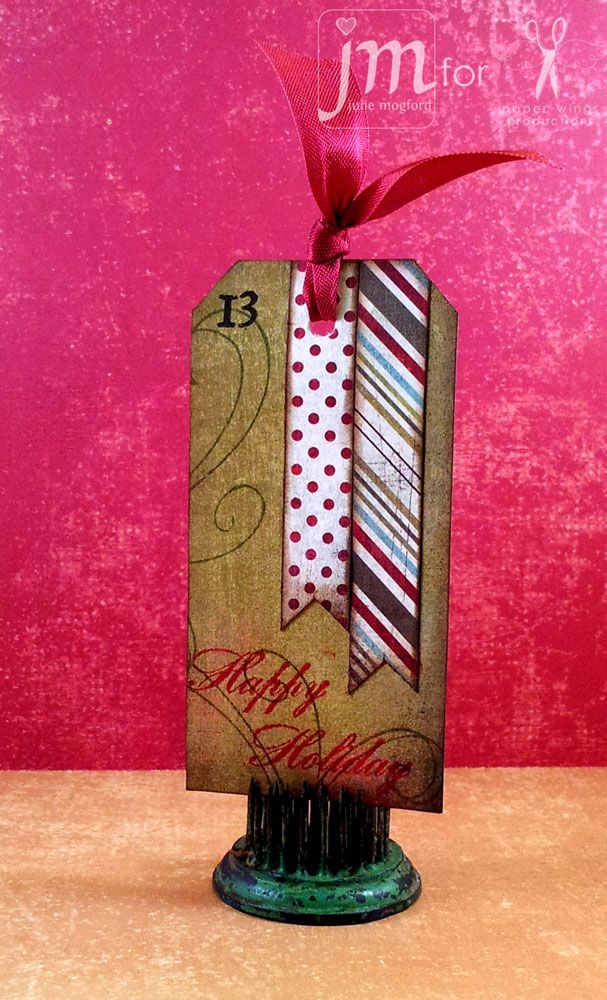
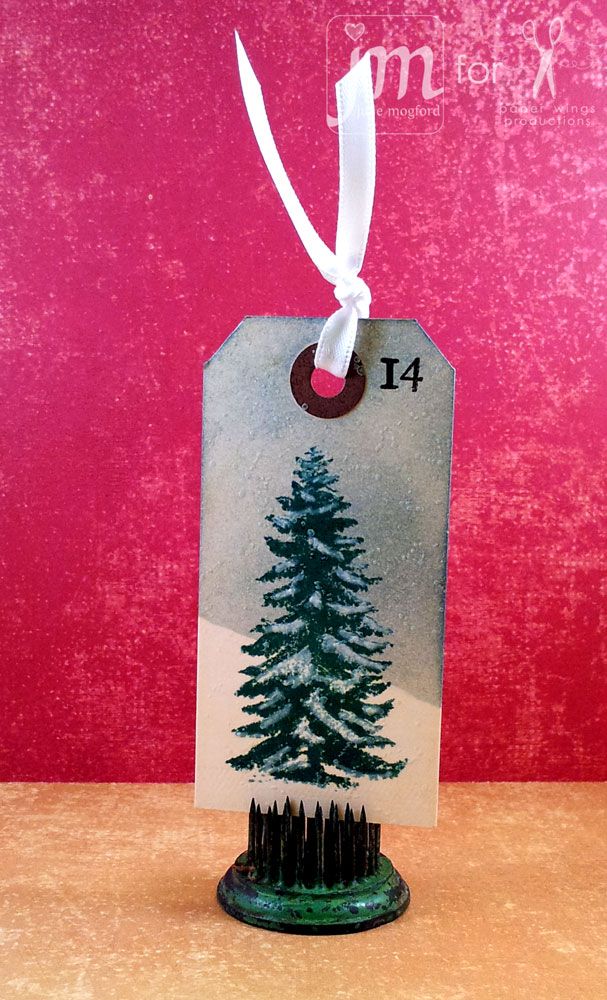
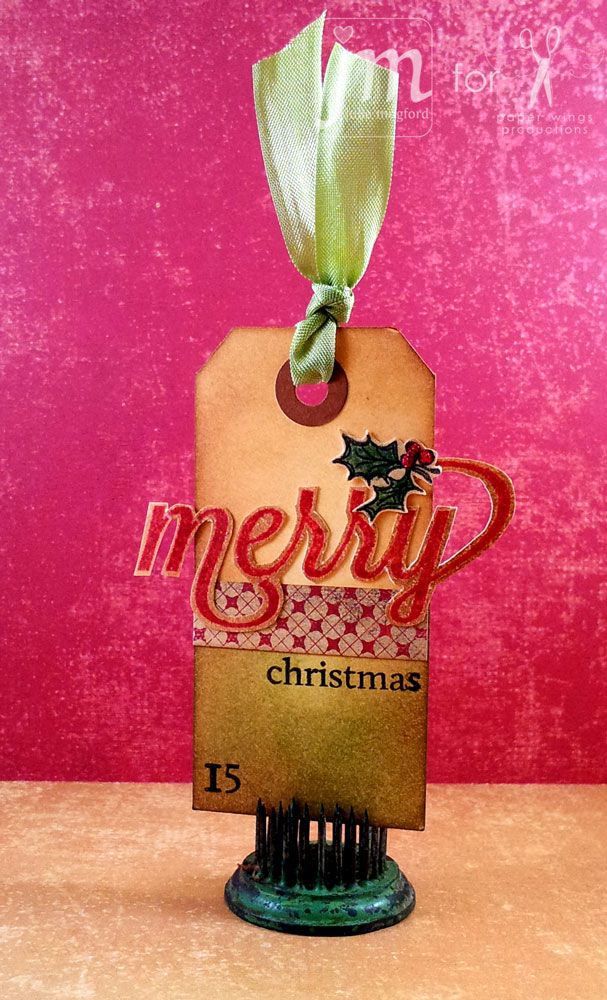
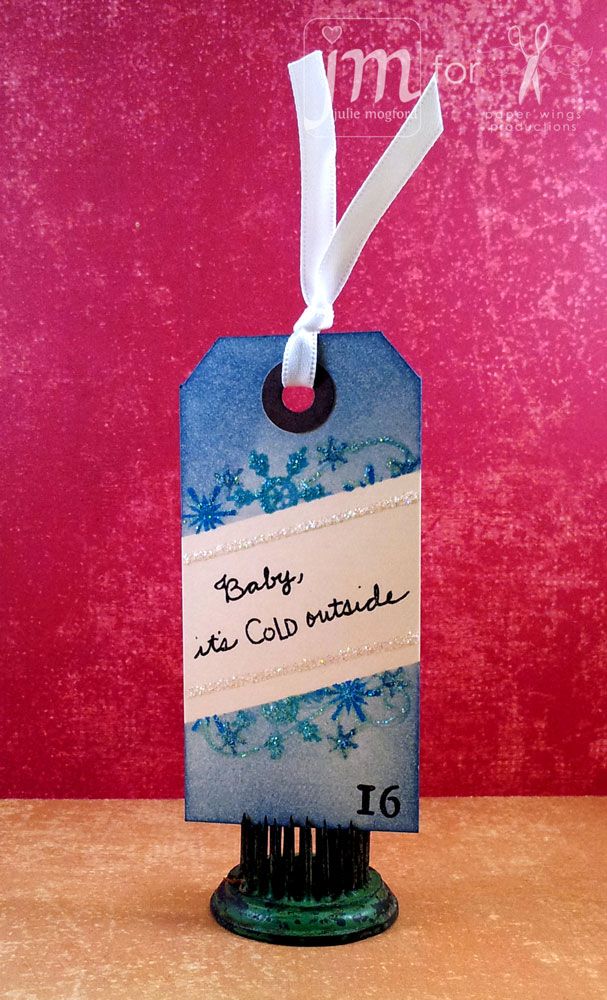
Welcome back to Part 2 of the Advent Calendar!  Today I"m sharing tag 9-16.  Since I used smaller tags for this project, I felt the smaller numbers from the Perfect Alphabet Clear set would be a better choice, and keep the focus on the image. The number 9 is from the Perfect Number Clear Set and all were stamped with Versa Fine Black Onyx.  Let's take a look at them!!


 I've been inspired by so many ideas on Pinterest, Splitcoast, and Online Card Classes Holiday Workshop.  Here are today's tags!


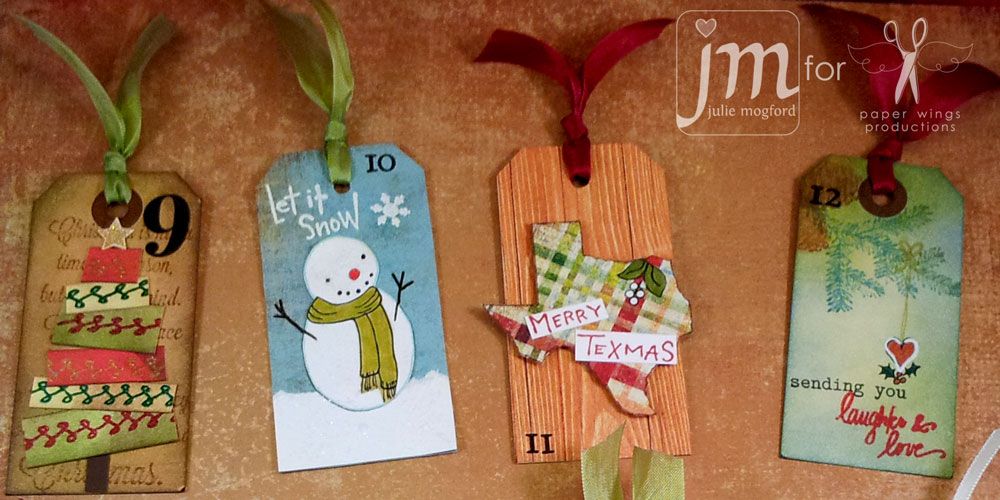
Details:  This tag features one of our Christmas Sentiments stamps in the background, and one of our border stamps from our Life Framer set. I inked cardstock in yellow, red and green, and then embossed the border stamp in a contrasting color and cut the strips to length for the tree shape.  The star is from our Hanging Stars set, and it is also embossed (Egyptian Gold-Judikens)


Details: Cardstock background (Basic Grey), white Neenah Cardstock with a torn edge added for snow and snowman from Snowman Love set and used the cute little scarf for this little guy.  The Let it Snow was stamped to fit the space and embossed with Stampin' Up Whisper White ep.  Since he was looking upward, I had to give him a little snowflake to watch from the Winter Mix It Up set.  And of course, I couldn't resist a little Rock Candy Distress Stickles to make the snow sparkle.


Details:  I'm a Texas gal!  So, I had to pay a little tribute to Texas!  I used the Lone Star State clear stamp and stamped it on this cute Christmas plaid paper and cut it out. I added the cute Texmas sentiment in Festive Berries distress ink. And finally, a sweet little mistletoe from the Holiday Tags clear set. The woodgrain paper is from Studio Calico.  Perfect!!


Details:  I just love this pine bough and pine cones from the Pines Cling Stamp Set. I added another element from the Holiday Tags clear set to create an ornament.  I drew the hanger and bow with a gold pen.  And, I love this sentiment from the Winter Mix It Up set.


Details:  Basic Grey green paper from Figgy is accented here with Flourish Fun 2 stamp and two more strips of BG Figgy paper.  All edges are inked with Walnut Distress ink, and the Happy Holiday Script sentiment added and embossed in red! Simple and Elegant.


 Details: Here is another stamp from the Pines Cling Stamp Set using the large tree and I used a white pen to add snow to the tree and Frosted Lace stickles.  Although it is faint here, I used the small dot stamp from the Art Textures set to create falling snow stamped with SU! Whisper White craft ink and embossed with clear ep.  It reminds me of a trip I took to Wyoming for my first Christmas in snow.  I'll never forget that.


Details:  This one took a little work, but I love how it turned out.  The tag background is inked with two colors of Distress ink plus a little Walnut.  I've added a strip of paper to separate the two areas and give it some interest.  Then I used the Merry Clear stamp with Christmas in black, and merry stamped in Festive Berries on a separate brown inked tag.  I embossed merry ink clear to give it a little shine, and then trimmed the sentiment to expose the background and have the letters hang off the side. The finishing touch is the holly berries and leaves from Holiday Tags stamped and colored with Distress markers, with a touch of Barn Door distress stickles. It feels classic and delicate.


 DetailsI loved seeing this technique from Jennifer McGuire in the Online Card Classes Holiday Workshop.  First I stamped the sentiment from Snowman Love  and using a mask, I have sectioned off part of the tag and stamped a flourish and several snowflakes in a variety of blues along the edge.  Using an ink blending tool, I shaded the exposed areas of the tag.  And, to add that icy look, a touch of Diamond Stickles.  I love how this one turned out! (Flourish Fun 2 , Holiday Mix It Up, and Winter Mix It Up for the snowflakes).


Lots of festive designs here for part 2 of our Advent Calendar.  There will be one more installment of the remaining tags before the end of the month.  I hope you found something today (or several ideas) that will inspire you for your projects. As always, I'd love to see what you create!  Add your projects to our flickr group, to Pinterest, comment with a link on this post or even email pictures to us! See you soon with the final set of tags. 

"Deck the Halls!!!"
Happy Stamping!

Julie

Related Posts Plugin for WordPress, Blogger...