Showing posts with label December Nesting Components Mixed Media Kit. Show all posts

Sunday, December 22, 2013

Spotlight Sunday-Perfect Numbers


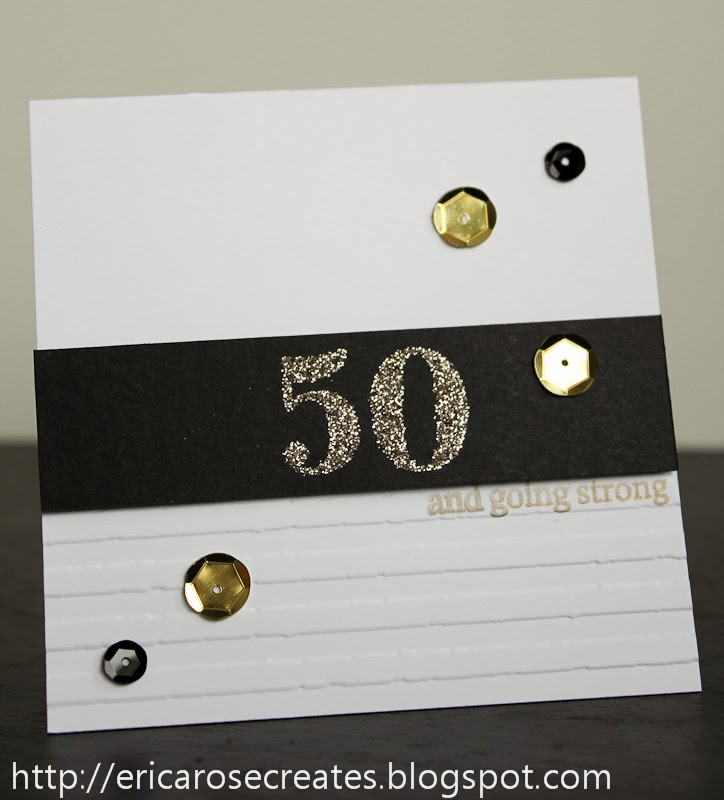
Happy Sunday Paper Wings Fans!  Erica here with this weeks Spotlight Sunday!  I have a huge spotlight this week on a fabulous Paper Wings Productions stamp set called Perfect Numbers!  This stamp set is a must have stamp to add to your collection!  Oh and by the way it is included in our December Nesting Components Kit!!  If you have not purchased a December Kit yet head on over to the shop and pick yours up today HERE!  Everyone needs a good number stamp and this is the one to have!  Not only do you receive the numbers but you also get all 12 months, and a ton of other great sayings and sentiments to customize your projects! The solid number images are the perfect size for all your projects and they stamp out beautifully!!  I have 3 projects to share with you today using this stamp set just to give you a few quick and easy ideas on how to use this great stamp set!  First up I have two simple but fun cards to share.  They are both 4x4 cards and are perfect to add to a gift bag or on top of a gift box!

My first card is using a piece of Pool Party card stock from Stampin Up as the base and then the wood grain pattern paper is from the 8x8 paper pad that comes in our December Nesting Components Kit and is from October Afternoons Silent Night.  I stamped the number 34 all over the pattern paper with VersaMark ink and the sprinkled embossing powder in the same color as the card base all over to create a fun background!  Next I stamped out the Happy Birthday sentiment that is also in the Perfect Numbers stamp set and then die cut it with a banner die .  I added it to the center of my card with some foam squares and then to finish it off I added a couple enamel dots and added a black border around the whole card with my black Smash marker.  The next card I made is a 10 minute card and I love how simple but classic it looks!  I love black and gold together and the glittered 50 is perfect!  I took a white card base and embossed just along the bottom with a striped embossing folder.  Next I stamped out the 50 onto a black strip with VersaMark ink, added some simple stick and heated it with my heat gun to activate it and then added my glitter!  I then added this strip to my card with foam squares and then stamped out the sentiment that also comes in the stamp set in gold ink.  To finish it off I added some fabulous gold sequins in different sizes and that's it!  Easy Peasy! 
The last project I want to share with you is a page out of my Simple Stories Sn@p album.  The photos are from my sons 1st Birthday party and this stamp set is going to be perfect to help document this special day!  Here is the first page completed and I used the stamp set on my journaling card to stamp the date and the Happy Birthday.

 I want to thank you for stopping by today!  I love reading all the comments and they sure do make my day!  For more projects using the Perfect Numbers stamp set please check out this post from Dana  HERE and my Scrapbook Saturday post HERE.  To purchase a December Nesting Components Kit please head on over to the Paper Wings Productions Shop or click HERE!  You do not want to pass this one up because it is a beauty! 

 As always we love to see your projects using our products so please share them with us on FACEBOOK page or in our FLICKR GROUP!   Enjoy your day and let your creativity take flight!

Tuesday, December 10, 2013

Tutorial Tuesday: Stamped and Image Transferred Soaps


 Before we get to our Tutorial Tuesday post, we want to announce the winner of our blog hop.  Congratulations to the winner!  Please contact Carrie at paperwingsproductions@hotmail.com for instructions on how to claim your prize.  

You must be very proud of your team, fantastic holiday treasures! I enjoyed each blog and was so in awe of the beauty of the mixed elements. Loved the HOP! I'm already a follower and will share on FB as well. Happy Holidays!!


Today I'd love to share another fun technique you can use with both Paper Wings Productions Clip Art Images and with their gorgeous stamps, image transferred soaps! I used the gorgeous December Nesting Component Kit clip art images for some of these soaps, along with the stamped one!

To start all you need is the soap, tissue paper and stamps or vintage images, and then some sort of glue and sealer, such as ModPodge, Gloss Gel Medium, or Glue and Seal...


First choose your image and stamp it onto white tissue paper. I chose this gorgeous image from the Winter Cling Stamp Set


Cut around your image to fit it onto your soap.


Using your gel medium, apply a layer onto the soap and place the image onto the gel. Smooth the image over the soap and then seal it onto the soap by layering another coating of the gel medium over the top of the image. You can use this to apply both the stamp tissue paper or vintage clip art.


The gel medium gives a lovely glossy sheen to the soaps and makes the stamped or printed images sink right into the soaps making for a lovely presentation. Now these soaps aren't going to have the images last long when you start using them, but they do make a lovely gift presentation!! I still keep many of my decorative soaps as decor.

These soaps will be given as a gift to a crafty friend of mine, so I had to make a card to go along with them. I used another clip art image from my December Nesting Components kit, Prima Delight paper and buttons from the November Nesting Components kit, and the Snowflake stamps from the Winter Mix it Up Clear Stamp Set.  I hope you will give the soap technique a try, it really is effective and a lot of fun!


There is lots of Christmas inspiration on the blog! Don't forget to check out Dana's gorgeous layout:


Norma has made a gorgeous ornament:


Thanks so much for stopping by!!!


Sunday, December 8, 2013

Spotlight Sunday - December Nesting Components


Hi Paper Wings fans! Dana here with you sharing a layout that I created with the December Nesting Components Mixed Media Kit. Carrie has put together a fantastic mix of products that will keep you crafting all month long...and well into next year! This kit is versatile and can be used to create Winter and New Year's projects, not just Christmas, although that is what I am sharing today.


My layout measures approximately 8.5 x 11 inches. I trimmed a page from an old photo calendar down for the large focal point and had a lot of fun adding embellishments from the kit.


The "Days Until Christmas" chipboard piece caught my eye. Rather than write a number in the space, I stamped numbers from the Perfect Numbers Clear Stamp Set randomly onto a piece of patterned paper underneath the chipboard piece.


I added some white rub-ons to my photo and stamped the year this photo was taken with the Perfect Alphabet Clear Stamp Set.


The image of the girl in the red dress from the Vintage Christmas Clip Art Sheet matched the photo of my daughter in her red dress, so I made that image into a charm embellishment for my layout using a clear tile and some Glossy Accents.


I covered one of the laser-cut snowflakes with Antique Silver Vintage Glass Glitter, which adds a fabulous sparkle to my page!

The December Nesting Components Mixed Media Kit is available from the Paper Wings Productions Store while supplies last, so pick one up soon before they're gone for good!

Here's a closer look at the kit and a full list of the contents:


December Nesting Components Kit Contents:
October Afternoon Silent Night 8x8 Paper Pad
October Afternoon Silent Night Chipboard
Tim Holtz Christmas Rub-Ons (1 Sheet of Black and 1 Sheet of White)
Tim Holtz Metal Border Stickers
2 Snowflake Laser Cuts
6 Prima Wood Shapes
Red/Kraft Wired Ribbon
Clip Art Sheet - Vintage Christmas
Stamp Set - Perfect Numbers

The retail value of this kit is over $42, but you can pick it up for just $32!

Thanks for stopping by today! I want to remind you that the PWP Winter Blog Hop is going on now! Hop along with the Paper Wings Design Team and leave a comment by Monday night for your chance to win a $25 Gift Certificate to the Paper Wings Productions Store!
Related Posts Plugin for WordPress, Blogger...