Showing posts with label October Afternoon. Show all posts

Saturday, December 27, 2014

Scrapbook Saturday-Holiday Cutie


Happy Saturday Paper Wings Fans!  Erica here with you today sharing holiday layout I created using product from the Paper Wings Productions shop!  
I pulled out one of my past Holiday Nesting Components kits, some stamps, gelatos and ink and began to create!  I started with a plain white piece of 12x12 cardstock.  I pulled out a silver colored gelato and added some to a big clear block.  I also added some water to create a nice light watercolor and then applied a piece of clear packaging to the block and picked up some of the color.  I dabbed it all over my white cardstock just to add a little something extra.  Most of it ended up getting covered up but I am ok with that.  I do like the bits and pieces that you can see.  The photo I am scrapbooking is of our daughter last year in front of the Christmas tree.  This is one of my favorite photos of her from last Christmas.  I love the bokeh in the background!


I used the Tim Holtz rub-ons that came in the kit all around my layers and added one of the background texture stamps from the Art Textures stamp set.  I added a few of the chipboard pieces from October Afternoon that also were included in this kit and the cute JOY wood veneer.  For my title Holiday Cutie I used the Holiday Clear stamp set and used the word Holidays.  I masked off the letter S so it would just stamp out Holiday.  I used some red stickers from my stash to spell out cutie!  I love how it turned out and I hope you enjoy it as well!  The items I used today are still available in the Paper Wings Productions shop and some of them are even on sale!  You will find them linked below!  I hope you all have had a wonderful holiday season and I wish you a very blessed New Year!  Thanks so much for stopping today and remember to let your creativity take flight!

Saturday, January 18, 2014

Scrapbook Saturday

Hello Paper Wings Productions fans!  Erica here for this weeks Scrapbook Saturday!  I am using the January Nesting Components kit this week and I am in love with the papers in the 8x8 paper pad from October Afternoon!  For my layout this week I am starting with a piece of white 12x12 cardstock and a handful of patterned papers from the kit that I thought went well with my photo.
I cut one of the patterned papers in half and then added a strip of a different patterned paper in between the two halves and placed it onto my 12x12 base.

Once this was done I started building up my layers and placing embellishments around my layout.  The fabric brads that come in the kit are fabulous and are perfect for so many different projects!

This months kit comes with a great Vintage Lace Background stamp that I knew I wanted to use in my layout as well!  I found a small glassine bag in my stash and stamped the Vintage Lace Background stamp in some StazOn Timber Brown ink onto the bag.


I pulled out a few more of my Paper Wings Productions stamps and added some sentiments from the Detail Framer and the Day Framer to some tags and my layout.
I decided at this point I wanted to get my sewing machine out and add some stitching in gold thread to add a little bit of texture to my layout.
Once my stitching was complete I added my layers back to my layout and adhered them down to finish up my layout.


I hope you enjoyed my layout using the January Nesting Components Kit.  You can purchase you very own kit in the Paper Wings Productions Shop.  For more kit inspiration click HERE to see what Dana created with the wooden shapes included in this months kit!  Remember to also follow us on Facebook and follow our blog!  We have some exciting things coming up they you do not want to miss!  Have a great day and remember to let your creativity take flight!

Thursday, January 9, 2014

Themed Thursday-Tags

Happy Thursday everyone!  Erica with you today to bring you 3 very sweet tags using the fabulous products from the Paper Wings Productions Shop.  
They were all very easy to make and I am going to take you through the process of creating one of them today.  I started with medium sized manila tags and sprayed them all with Lindys Stamp Gang Nantucket Sidekick that you will find in our January Nesting Components Kit.


After I dried the tag with my heat gun I used the stamp set Art Textures to stamp out a few different textures all over my tag to create a nice background.
I hit the tag with my heat gun once again to make sure all the ink was completely dry.  Next I picked one of the great stamps from the Valentine Wishes stamp set and stamped it out in VersaMark ink and heat embossed it in gold embossing powder.
I love the way the gold looks on this tag!  I wanted to add some more gold embossing so I took the small heart stamp that comes in the Snowman Love stamp set and stamped it out so it looked as if the little hearts are floating up to the top of the tag and then I heat embossed them in the same gold embossing powder.
To finish off my tag I added a flower from my stash, some bling and some beautiful hand dyed vintage rayon ribbon from the January Nesting Components Kit.
I hope you enjoyed my tags today and that you were inspired to get out some of your sprays, stamps and ink and get a little creative!  The January Nesting Components Kit is available for purchase in the Paper Wings Productions Shop and do not forget we now have a Stamp of The Month that you can purchase for 40% off and includes a full color print out of sample ideas!  It is a fabulous stamp set that you will definitely want to pick up!  To stay up to date on sales, stamp releases and much more make sure to like us on Facebook and follow our blog!  Thanks so much for stopping today and remember to Let Your Creativity Take Flight!

Sunday, December 22, 2013

Spotlight Sunday-Perfect Numbers


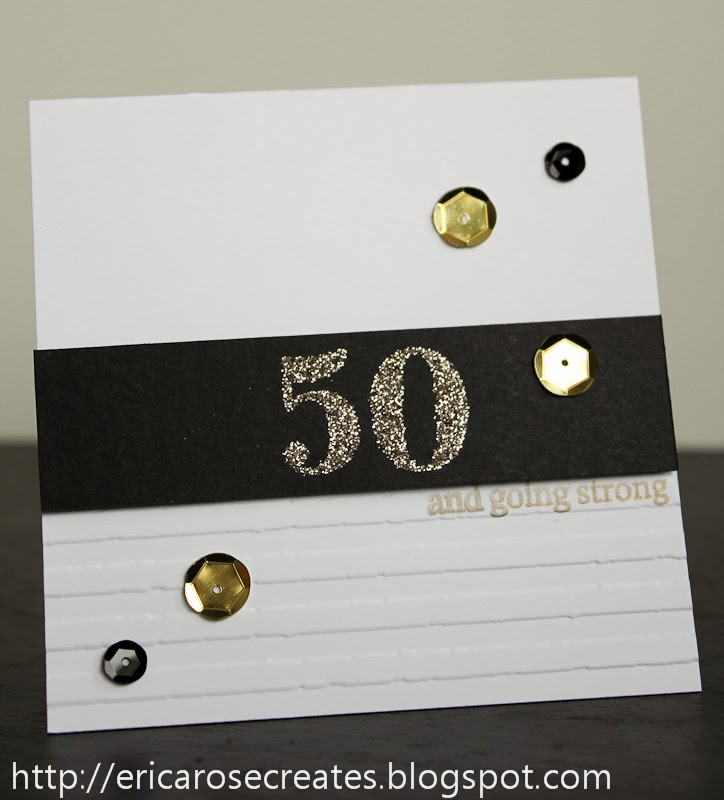
Happy Sunday Paper Wings Fans!  Erica here with this weeks Spotlight Sunday!  I have a huge spotlight this week on a fabulous Paper Wings Productions stamp set called Perfect Numbers!  This stamp set is a must have stamp to add to your collection!  Oh and by the way it is included in our December Nesting Components Kit!!  If you have not purchased a December Kit yet head on over to the shop and pick yours up today HERE!  Everyone needs a good number stamp and this is the one to have!  Not only do you receive the numbers but you also get all 12 months, and a ton of other great sayings and sentiments to customize your projects! The solid number images are the perfect size for all your projects and they stamp out beautifully!!  I have 3 projects to share with you today using this stamp set just to give you a few quick and easy ideas on how to use this great stamp set!  First up I have two simple but fun cards to share.  They are both 4x4 cards and are perfect to add to a gift bag or on top of a gift box!

My first card is using a piece of Pool Party card stock from Stampin Up as the base and then the wood grain pattern paper is from the 8x8 paper pad that comes in our December Nesting Components Kit and is from October Afternoons Silent Night.  I stamped the number 34 all over the pattern paper with VersaMark ink and the sprinkled embossing powder in the same color as the card base all over to create a fun background!  Next I stamped out the Happy Birthday sentiment that is also in the Perfect Numbers stamp set and then die cut it with a banner die .  I added it to the center of my card with some foam squares and then to finish it off I added a couple enamel dots and added a black border around the whole card with my black Smash marker.  The next card I made is a 10 minute card and I love how simple but classic it looks!  I love black and gold together and the glittered 50 is perfect!  I took a white card base and embossed just along the bottom with a striped embossing folder.  Next I stamped out the 50 onto a black strip with VersaMark ink, added some simple stick and heated it with my heat gun to activate it and then added my glitter!  I then added this strip to my card with foam squares and then stamped out the sentiment that also comes in the stamp set in gold ink.  To finish it off I added some fabulous gold sequins in different sizes and that's it!  Easy Peasy! 
The last project I want to share with you is a page out of my Simple Stories Sn@p album.  The photos are from my sons 1st Birthday party and this stamp set is going to be perfect to help document this special day!  Here is the first page completed and I used the stamp set on my journaling card to stamp the date and the Happy Birthday.

 I want to thank you for stopping by today!  I love reading all the comments and they sure do make my day!  For more projects using the Perfect Numbers stamp set please check out this post from Dana  HERE and my Scrapbook Saturday post HERE.  To purchase a December Nesting Components Kit please head on over to the Paper Wings Productions Shop or click HERE!  You do not want to pass this one up because it is a beauty! 

 As always we love to see your projects using our products so please share them with us on FACEBOOK page or in our FLICKR GROUP!   Enjoy your day and let your creativity take flight!

Sunday, December 8, 2013

Spotlight Sunday - December Nesting Components


Hi Paper Wings fans! Dana here with you sharing a layout that I created with the December Nesting Components Mixed Media Kit. Carrie has put together a fantastic mix of products that will keep you crafting all month long...and well into next year! This kit is versatile and can be used to create Winter and New Year's projects, not just Christmas, although that is what I am sharing today.


My layout measures approximately 8.5 x 11 inches. I trimmed a page from an old photo calendar down for the large focal point and had a lot of fun adding embellishments from the kit.


The "Days Until Christmas" chipboard piece caught my eye. Rather than write a number in the space, I stamped numbers from the Perfect Numbers Clear Stamp Set randomly onto a piece of patterned paper underneath the chipboard piece.


I added some white rub-ons to my photo and stamped the year this photo was taken with the Perfect Alphabet Clear Stamp Set.


The image of the girl in the red dress from the Vintage Christmas Clip Art Sheet matched the photo of my daughter in her red dress, so I made that image into a charm embellishment for my layout using a clear tile and some Glossy Accents.


I covered one of the laser-cut snowflakes with Antique Silver Vintage Glass Glitter, which adds a fabulous sparkle to my page!

The December Nesting Components Mixed Media Kit is available from the Paper Wings Productions Store while supplies last, so pick one up soon before they're gone for good!

Here's a closer look at the kit and a full list of the contents:


December Nesting Components Kit Contents:
October Afternoon Silent Night 8x8 Paper Pad
October Afternoon Silent Night Chipboard
Tim Holtz Christmas Rub-Ons (1 Sheet of Black and 1 Sheet of White)
Tim Holtz Metal Border Stickers
2 Snowflake Laser Cuts
6 Prima Wood Shapes
Red/Kraft Wired Ribbon
Clip Art Sheet - Vintage Christmas
Stamp Set - Perfect Numbers

The retail value of this kit is over $42, but you can pick it up for just $32!

Thanks for stopping by today! I want to remind you that the PWP Winter Blog Hop is going on now! Hop along with the Paper Wings Design Team and leave a comment by Monday night for your chance to win a $25 Gift Certificate to the Paper Wings Productions Store!
Related Posts Plugin for WordPress, Blogger...