Wednesday, May 23, 2018

San Antonio's Missions

Hi Scrappers,

This is Veronica from www.vickyscrappingpassion.blogspot.com  sharing with you a Picture frame, which I modified with san-antonio-missions-clear-stamp-set and  Building a Shrine cling stamps:


 This was a very easy project to do. I bought this frame a long time ago thinking about these pictures, we took when we traveled to San Antonio in 2006. The frame was a bargain i got in one of the discount stores. Thus, when I saw the Missions stamps from PWP, I immediately thought about this project.

In short, I cleaned the cobwebs and dust from the frame, and stamped the three corresponding missions on top of the glass using StanzOn. I distressed some chippies using a metallic paste to add some extra interest to the frame. I cut some squares of watercoloring paper to mat the pictures and stamped a border using the Building a Shrine cling stamps and some bronze ColorBox inks. Since, I can't stamp straight for the life of me, I used WeRMemmories stamping tool. To finish the images, I glued the mats to the existing images, added some titles using sharpies, and assembled the frames. And voila, the frame is more personalize and ready to be hung in one of my walls, finally.

Some other views:


The metallic paste gives the sentiments an amazing shine.


My stamping wasn't perfect, but good enough. barely noticeable once hung. 

BTW, I finished my mixed media painting: Yeah... Here, I wanted to share it with you:


the red lines bled through three more times, hopefully after sealing, gessoing them, paint again, it should be fine...


I used:
san-antonio-missions-clear-stamp-set, and Building a Shrine cling stamps
PWP

Shadow Box Frame,
Stanz On Ink, black
Bronze ink, ColorBox
Metallic Paste
Sentiment chippies, Blue Fern Studios
Watercolor Paper


I hope you enjoyed my canvas and visit my blog:  www.vickyscrappingpassion.blogspot.com.


Wednesday, May 16, 2018

Burned Cork Gift Card Tins

Burned Cork Gift Card Tins

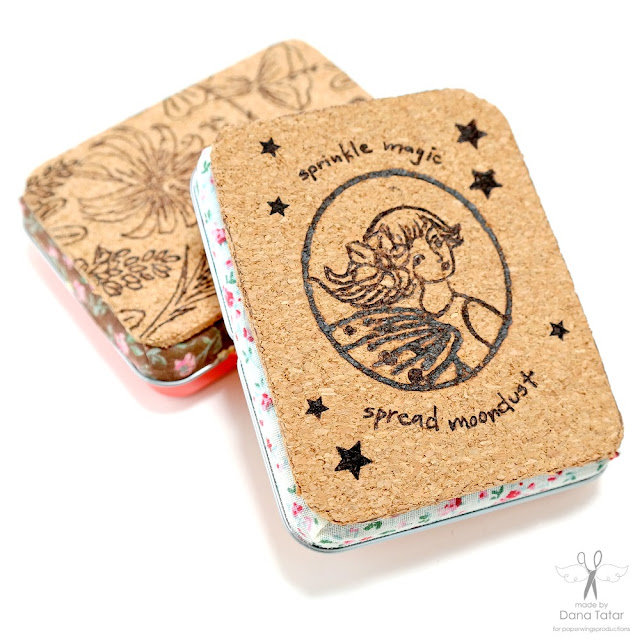
Hi! Dana Tatar here today sharing a fun way to alter metal tins. As both the sports season and school year come to a close, I find myself giving a lot of gift cards to the teachers and coaches that have helped my daughters over the year. Instead of tucking the gift cards into an envelope, I decided to upcycle some metal tins. I used some of my favorite Paper Wings Productions stamp sets and a wood burning tool to embellish pieces of cork. I love using my wood burning tool on soft materials like cork and leather.

Hello Kitty Metal Cookie Tins Before Altering

Here's what my metal tins looked like before I started this project. The bottom half of the tins are a solid color, so I chose to leave that portion of the tin untouched and focus my efforts on covering the top of the tin.

How to Apply Fabric Tape to Metal Tins

Metal can be tricky to cover with paint, so instead I applied a strip of fabric tape around edge of the lid.

How to Stamp on Cork with Archival Ink

Next, I cut pieces of cork to size and stamped designs onto them using archival ink.

How to Use a Wood Burning Tool on Cork

Once I was happy with the designs, I used a wood burning tool to trace over the stamped images.

How to Attach a Burned Cork Piece to a Metal Tin

Finally, I simply used hot glue to attached the burned cork pieces to the top of the metal tins. I love the look of burned cork. I plan to wrap a piece of colorful ribbon around each tin before I give them away. Markers work great on cork, and would be a great way to add color to the burned designs.

Je'Taime Floral Burned Cork Gift Card Tin

Sprinkle Magic Fairy Burned Cork Gift Card Tin


Paper Wings Productions Supplies:
Hanging Stars Clear Stamp Set
Fairies Clear Stamp Set
Paris Clear Stamp Set
Evening Primrose Cling Stamp Set
Mexican Hat Cling Stamp Set
Black Eyed Susan Cling Stamp Set
Bluebonnet Cling Stamp Set

Other Supplies: Metal Tins, Cork Sheet, Archival Ink, Fabric Tape. Wood Burning Tool

Pin It!

Burned Cork Gift Card Tin Tutorial


Wednesday, May 9, 2018

There's Hope Card

Hello friends. Larissa here today with a fun technique card.  It is a very easy technique as well.

I started off stamping the flower stamp on the card along with the sentiment in VersaMark Ink and Heat Embossed with Clear Embossing Powder. It was hard to get on camera since is was clear on white cardstock. You can kind of see the flower below.


I picked several colors of Distress Inks out and grabbed some sponges.
I sponged the color across the card in rainbow order.


I continued down the piece of cardstock making sure to blend each other color into each other. I also used a tiny strip of felt I had laying on my desk to hold the card stock down so I would not smudge it with my fingers. 


Once I was done blending the colors I dropped some water drops on it and wiped them off with a paper towel. 

I adhered the card front onto a mat then on to the card base. To finish off my card I added a few clear drops around the card. Again hard to see. 


Products used for this card: 
Paper Wings Productions Stamp Sets
Always Hope 
Half Flower

Other Products:White and Black Cardstock
VersaMark Ink
Clear Embossing Powder
Heat Tool
Sponges (One for each color)
Distress Inks:
Picked Raspberry, Ripe Persimmon, Lemonade Squeeze,
 Mowed Lawn, Salty Ocean, Dusty Concord
ATG
Nuvo Crystal Drops in Clear

I hope you enjoyed by post today. 


Tuesday, May 8, 2018

May Blog Hop Winner

Hi Paper Wings Fans!

Thank you to all those who participated in our May blog hop! I personally loved all of the THANK YOU ideas, I hope you did too.

Congratulations to Denise Bryant, our blog hop winner!
Denise commented:

 Denise BryantMay 5, 2018 at 11:37 PM
I completed the hop! Lots of great ideas!

Denise Bryant, please contact us at info@paperwingsproductions.com for instructions on how to claim your prize.

Stamps used:

Friday, May 4, 2018

May Blog Hop


Welcome to the Paper Wings Productions May Blog Hop and Giveaway! The theme for the hop this month is Thank You. We hope you will hop through and find inspiration for your own projects.


If you complete the hop, you will be eligible to win a $25 Gift Certificate to the Paper Wings Productions Store!


For a chance to win all you need to do is:

  • Follow the Paper Wings Productions blog.
  • Visit each of the participating designer's blogs and leave a comment.
  • Leave a comment on the PWP blog telling us you completed the hop. 

To increase your chances of winning, like the PWP Facebook page and/or invite your friends to the hop. Be sure to leave a separate comment for each of your additional entries. The winner will be announced here on Tuesday, May 8th.


Let's get hopping!

Ashley
Larissa
Veronica
Dana
Paper Wings Productions

THANK YOU SO MUCH FOR JOINING US TODAY!

~and~

Let your creativity take flight!
Related Posts Plugin for WordPress, Blogger...