Monday, June 30, 2014

Mixed Media Monday - Encaustic Wax Panel


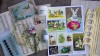
Hi Paper Wings fans! Dana here today sharing a 6x6 encaustic wax panel for this Mixed Media Monday. I'm just beginning my adventures with encaustic wax, which is painting with hot wax. After playing, I definitely want to pick up some more colors of wax, so I'll be back next month with a more in-depth tutorial. Until then, I hope you enjoy this piece that I created!


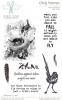
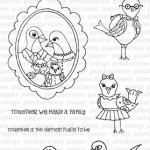
This gorgeous bird is part of the NEW Bird Beauty Cling Stamp Set. (You can pick up this fantastic stamp set for 15% off this month!) I stamped the bird, and circles (Single Dot Border Clear Stamp Set) onto a piece of white tissue paper using black archival ink and then sealed them to my panel between layers of hot wax.


I embellished a small twig with ribbon from a past kit and a glittery flower and then finished this piece with a rub-on.

Thanks for stopping by today! We love to see what you have created with the Paper Wings Productions products so please tag us on Facebook or Instagram and you can always up load your projects to our Flickr gallery. Have a wonderful day and remember to let your creativity take flight!


Saturday, June 28, 2014

Scapbook Saturday

              
*****To join our June Challenge: Chipboard and/or Wood Veneers, CLICK HERE*****


Hello everyone! It's Amber here with a 12 x12 layout for this weeks Scrapbook Saturday Post. I used some of my favorite patterned paper and PWP Stamps for this one.


Before I get to all my layout details I thought I would share a few blog/shop updates Carrie shared a few days ago just in case you missed them. We are having a sale on tons of great stamps and products this month. They are marked down 10%-50% off for a limited time only. You can check it all out HERE. Carrie also announced all the fabulous guest designers that would be joining us over the next couple of months. Check them out HERE and give them a warm Welcome. I think that's about it for all the updates so I will now share a little about my layout. I had lots of fun with this weeks layout! I pulled out a few sheets of patterned paper, some PWP stamps, three colorful ink pads, a few sticker and chipboard embellishments and went to work.


I started by using two different stamps from Paper Wings Productions Text Cling Stamp Set and some colorful CTMH Ink Pads to create my background. I stamped the larger text in a bright pink color and the smaller circle postage stamp is a soft gray.You can see my background stamping a little better in the two photos below.


I used lots of fun sticker/chipboard embellishments along with a small black paper clip to embellish my layout. I also used Paper Wings Productions Snapshot Framer Clear Stamp Set to add a few sentiments to my sticker labels.


Thanks for visiting! Don't forget we would love to see what you make with Paper Wings Productions Stamps so add your projects to our Flickr Group, to Pinterest, or leave a comment with a link to your project. You can also check out our Facebook Page and You Tube Page for daily inspiration.
Supplies: Cardstock- Gray / Patterned Paper-  Crate Paper's On Trend Collection / Paper Wings Productions Cling Stamp Set- Text / Paper Wings Productions Clear Stamp Set- SnapShot Framer / CTMH Ink Pads- Black, Watermelon, Flannel Gray / Chipboard Embellishments- Crate Paper's On Trend Collection /  Sulky Thread- Black / Sewing Machine


Thursday, June 26, 2014

Check out what's happening!

Hey there peeps!  Today we would like to share with you some things that are going on here at Paper Wings Productions.  First, here's something you certainly won't want to miss- we are having a sale on TONS of great products.  They are marked down 10-50% off for a limited time only.  Click here to see what's on sale.


Earlier this month we announced our upcoming guest designers.  Here they are, we can't wait to see what they make with our stamps!  Take a moment to give them all a warm welcome!


Here's the lineup-

In July we will feature

 
Marie
http://gulavillanivallen.blogspot.com/


In August:

Ashley
http://www.marklandandmain.blogspot.com/


Kristie
www.thekristiesessions.blogspot.com


Monica
http://scraps2treasure.blogspot.com 


In September:

Carmen
www.serendipitystudiobycw.blogspot.com


Amanda
www.happyartydays.blogspot.com.au


Zoey
www.scrapsaurus.blogspot.it


In October:

Agnieszka
http://bellaideascrapology.blogspot.ca/


Stephanie
www.stephanie-eaken.blogspot.com


Kathleen
http://kathsdesigns.blogspot.com


Tuesday, June 24, 2014

Tutorial Tuesday

*****To join our June Challenge: Chipboard and/or Wood Veneers, CLICK HERE*****


Hey guys, Katie here! Happy Tuesday! It's tutorial Tuesday here at PWP so I wanted to show you how I stitched my stamp design on this card. I used my favorite Play with your Coffee stamp set that I use so often.


1. Stamp your design onto your piece of paper, I used the Play with your Coffee stamp set. I used a tag that I added watercolor to. I also colored in my design with watercolor pencils.


2. Use a small awl or embroidery needle and punch equally spaced holes along the stamped lines. I also used an embroidery mat that helps your holes come out clean (by Amy Tangerine).


3. Use a needle and embroidery thread to stitch through your holes. If you're new to hand stitching, here's a great resource for learning the basic stitches.


When I was creating my card, I chose a fun piece of patterned paper and then stamped the flower from the Sacred Geometry stamp set onto the background. After that, I just added my stitched tag and some bling!

We love to see what you have created with the Paper Wings Productions products so please tag us on Facebook or Instagram and you can always up load your projects to our Flickr gallery.  Have a wonderful day and remember to let your creativity take flight!

Sunday, June 22, 2014

Spotlight Sunday - Featuring Jill


Hi there peeps,

Carrie here with you today to share a fun project made by my friend Jill.  She sent me this mother's day card in the mail that uses some Paper Wings Productions stamps.


Isn't it cute?  I love all of the little details.  The green stripe background is fabric that has been stitched.  I was so touched by her thoughtfulness!  I love getting cards in the mail.  It's like getting an unexpected present.  Card making (and sending!) is so special.  I challenge all of our readers to send out a card to someone this week.  Here's a tutorial from Jill to get you inspired.


For the background: stamp dots using the dots border in various colors on your card, ink edges
to contrast.


For the background of the frame: Cut your fabric and batting scrap to a small square that will sit
center in your card and provide the background for the frame.


For the frame and the banner: Stamp with Versamark and emboss with a dark color embossing
powder. To give texture to the frame, take your stamp (I used the small dots in the Art Texture set) and
ink with Black Soot Distress Ink. Mist lightly with your Mini-Mister and stamp. Stamp and emboss the
banner and saying in the same dark embossing powder you used for the frame. Trim carefully.
If you're wondering where the frame came from, it's in the Home Tweet Home set – I simply cut out
(very carefully!) the family portrait so that I'd have a blank frame stamp. If you don't want to cut your
frame, no worries! You can stamp/emboss the entire thing and then cut the family portrait out.


For the heart: Cover your chipboard heart with a piece of Sticky Back Canvas and trim. I took the
small swirl stamp from the Louise set and stamped in various colors. Your heart can be any size, as
long as it fits into the center of the frame!


Put it all together: Simply glue your batting and fabric to the card, then glue your frame down. (I just
use regular clear gel glue) Glue down your heart being sure to center it then add your banner over the
top. Use as an ATC for trade or as an adorable card front.

Thanks so much to Jill for joining us today!

Enjoy the flight!
Carrie


Friday, June 20, 2014

Featured Friday-Card Set

Hello Paper Wings fans!  Erica here with you today to bring you this weeks Featured Friday!


Today I am featuring the stamp set Flourish Fun 1 and I have created a card set using a variety of stamps from this set. I started out with 4x4 card bases and a white card front.  I picked a variety of ink colors and then began stamping out different backgrounds and sentiments.  I also used some of the rub-ons from the June 2014 Nesting Components Kit.

There are 6 different stamps in the Flourish Fun 1 stamp set and they great to create beautiful and simple backgrounds for cards.


To finish up my card set I created white envelopes using my envelope punch board and then tied everything together using the beautiful bird ribbon that is included in the June 2014 Nesting Components Kit and put them all inside of a vellum bag.  I used some light molding paste and the birds stencil to add a single bird to the bag.  To close up the bag I added a kraft circle and stamp one of the stamps from the  Handmade stamp set.


Thanks so much for joining me today and I hope you enjoyed my card set!  I think they will make a great a little gift!  For more card inspiration check out this post from Katie using the Play With Your Coffee stamp set.  We love to see what you have created with the Paper Wings Productions products so please tag us on Facebook or Instagram and you can always up load your projects to our Flickr gallery.  Have a wonderful day and remember to let your creativity take flight!
Related Posts Plugin for WordPress, Blogger...