Wednesday, July 31, 2013

New Design Team Introductions


Hi there everyone, Carrie here to help you get to know our new design team better.  I have personally been thrilled with the job our design team has done.  As we reach the end of a design team I feel sentimental about some of our team leaving and excited to see what the new team does with our stamps.  Our new members are all international.  This has been quite an experience for me already!  Without further ado, here's some of our new team.  Be sure and give them a warm welcome!


Irit Shalom
http://iritshalom.blogspot.com/
1. Where do you find inspiration?
I find my inspiration mostly on the web, but not only there. I love to travel and take a lot of photos and nature inspires me as well, with textures, colors and even smells.

2. What 5 craft supplies do you use the most?
First of all I need paper and cardstock, also I can manage with a solid cardstock only. Then I need stamps! A lot of them! And inks too. Now I can make my own design paper. So the next one are my dies. Again, with good dies and some solid cardstock plus inks and stamps you can make your own unique embellishments.And the last one? Adhesive. The more the better.
 3. Describe your style.
This is a very hard question for a designer who jumps from style to style like I do. It depends on my mood, the products I use, my photos and  even the time I have for my crafty project. Usually it's shabby/vintage, but it can move to eclectic, elegant, cute and even to clean and simple. I feel great with any style if I have the right products to use for this style.
 4. What's your favorite color?
If this question is about my favorite outfits color, it sure will be black. But for crafting I love colors, the more the better. I mostly use blues, greens and pinks with a touch of  naturals, but lately I am in love with teals and reds too.
 5. Give us a random fact about you.
English is my third language. I was born in the former USSR and still use Russian with my Mom and Sister. I was grown up in Israel, so  Hebrew is my main language. But then I craft and scrap and make my blogging in English (I even was told that they don't need too much editing when I submit articles for print or web publications).Want  another random fact that maybe is funny? I am a  part time working Dentist and a full free time crafter. 


Cathi O'Neill
I am so excited to be joining the Paper Wings Productions DT!! My name is Cathi O'Neill, and I am an American (Maryland/DC area native) who married an Irishman and have been living here in Ireland since 1997. I live in a beautiful village on the Shannon River with my DH of nearly 18 years (wow, that makes me feel old!) and my two beautiful daughters, Aine (onya) 10 and Aisling (ashling) 8 who are the subject of many of my projects!!

I have always love crafting since I was a little girl. My grandmother taught me to knit and crochet and I remember sewing Barbie doll clothes with her on her front porch! I am a knitter and quilter as well, but have recently in the last two years found cardmaking and scrapbooking, and an obsession was born!! I truly love creating and make vintage cards to sell here in our local village cafe as well as stacks of shabby/vintage style layouts of my girls to keep and share with family! I also love to do tags, ATC and altered projects, barely a day goes by when I haven't done something crafty!!

1. Where do you find inspiration? 
From all around me, from my children, from my beautiful surroundings, from all the talented scrappers that share their work!
2. What 5 craft supplies do you use the most? 
Patterned Paper, distress ink, flowers, modelling paste and stencils!!
3. Describe your style. 
I would say that my style is vintage/shabby chic, but am also experimenting and loving mixed media as well.
4. What's your favorite color? 
Teal and brown are a favorite color combination for me, love earth tones and muted dusty shabby chic colors.
5. Give us a random fact about you. 
I backpacked one summer pre DH and children from England to Egypt via Eastern Europe, Turkey, and Israel. I had the most amazing time and learned so much.


Besides these wonderful new additions to our team, we have the very talented NormaDana, and Shay still on our team.  

We are shaking things up a bit and will be having weekend posts now as well.

You will see everyone's work this Friday for our monthly Blog Hop.  Be sure and check back this weekend for a chance to win a $25 gift certificate to our online store.  

Enjoy the flight,
Carrie

Monday, July 29, 2013

I Must Be A Mermaid - Mixed Media Monday

Hello PWP Peeps, Norma here with you today for Mixed Media Monday!!


I thought I'd have a little more fun with this month's Nesting Components kit so I created this gorgeous (if I do say so myself, lol) canvas.


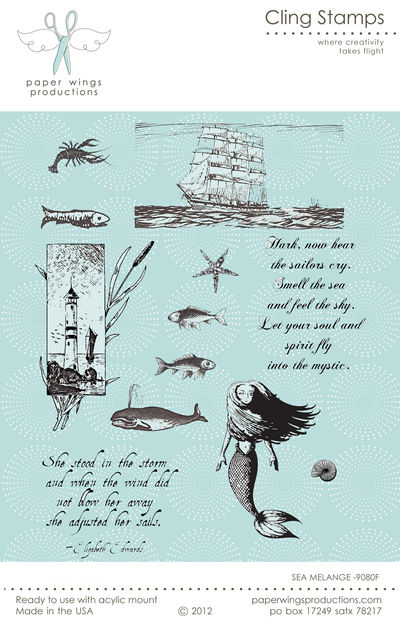
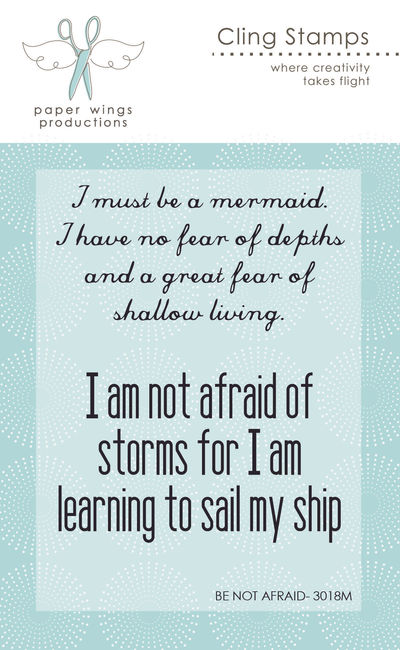
To create this 9x12 canvas, I used a sheet of palette paper, the July Nesting Components kit, Sea Melange stamp set, fabric remnants and the newly released Be Not Afraid stamp set.


The Sea Melange set can also be purchased in smaller sets just like the Seaside stamp set that is included in the July Nesting Components kit.  These sets can easily be found on the new website by simply shopping by theme and clicking on Oceans and Mermaids.


I started out by adhering this beautifully stained sheet of palette paper.  This page is just layers and layers of paint, inks and Pearl-Ex from various projects.  So don't throw those sheets away, they can be used in your next masterpiece and half of the work has already been done for you.  I glued it down using Golden Heavy Duty Matte Medium.  You could you regular matte medium, modge podge or your favorite adhesive.  Next I applied a light layer of modge podge on top to seal in all those beautiful colors.  


I randomly stamped some fish and a mermaid to the background for even more texture and background interest.


I'm all about upcycling materials so when I was ready to begin layering, I grabbed my scrap bin and found more produce netting.  Next I used a linen napkin that I picked up at an estate sale and stamped the sentiment from the Sea Cling Stamp set.  The quote says:  
She stood in the storm and when the wind did not blow her away, she adjusted her sails.
Then on top of that went the Luxe Circles from the July kit.


I used the the beautiful little girl from the July kit's clip art sheet and matted the image with cream colored burlap.  I also inked the edges of the clip art with Tim Holtz Vintage Photo distress ink.


Since you can never have too much texture, I used a torn piece of muslin for the sentiment.  This wonderful sentiment is part of the newly released stamps.  It says:
I must be a mermaid, I have no fear of depths and a great fear of shallow living.
Great sentiment right?!


I rubbed some of the rubons from the July kit here and there.


Then to finish things off, I added some of the gorgeous hand dyed trim, some more burlap and a couple of Recollections roses.

THANKS so much for joining me today, I hope I've inspired you to upcycle some items that you might not have not thought of using in your projects before.  

HAVE A BEAUTIFUL DAY & HAPPY CREATING!!

Thursday, July 25, 2013

Themed Thursday: Mother and Child ATCs


Hi, Cathi here to share with you my first DT post for Paper Wings Productions sneaking in a little early for July!! I decided to use a theme of Mother and Child for this Themed Thursday post. I used gorgeous stamps from the same stamp set, Worldly Women Melange 2 cling stamp set to create two canvas ATCs.


I started by inking the background of both canvas ATCs (received in the May Nesting Components kit that I purchased earlier) with Spiced Marmelade and Peeled Paint distress inks. I then stamped the images of the Native American mother and child and the Madonna and child from the Worldly Women set in black Archival Ink. For a more weathered background look, I took a script stamp from the Text Melange Cling Stamp set and Walnut Stain Distress Ink and stamped all over the ATCs. I used gorgeous chipboard Dusty Attic ATC frames I had and embossed them with Lindy's Stamp Gang Orbit Green Gold Embossing Powder, it really gives them the look of metal!!

I finished off the ATCs by using jewels from the May Nesting Components kit and gorgeous Pink Paislee Luxe metallic rubons on the Native American mother and child ATC from the July Nesting Component kit.


Tuesday, July 23, 2013

Tutorial Tuesday - Embossed Foil


Hi! Dana here today sharing a quick and easy way to add dimension and color to your projects. I created the card with the July Nesting Components Mixed Media Kit. If you love the sand, sun and surf, you're going to want to pick up this kit! I feel home when I'm on the beach, and that was my inspiration for my project.

My favorite items in this kit are the metallic accents from the Pink Paislee Luxe Circles and Rub-Ons and the Lindy's Stamp Gang Madonna Robe Blue Gold Two-Toned Embossing Powder. I thought it would be fun to play up the metallic elements in the kit so I embossed a piece of aluminum and added color with the Madonna Robe Blue Gold Two-Toned Embossing Powder.


Step One: Add watermark ink directly to the inside of the embossing folder, slip the piece of aluminum inside the folder and run the folder through an embossing machine. Remove the aluminum from the folder, sprinkle with embossing powder and heat to set. Note: If you are using an aluminum sheet, the metal will become very hot upon heating, so please be careful! Depending on which side of the embossing folder carried the watermark ink, either the embossed or debossed area will be colored.


Here is what my piece of aluminum looked like after embossing.


Step Two: Using the Seaside Cling Stamp Set from the July Kit, stamp the sentiment onto a piece of cardstock. Punch the sentiment from the cardstock with a shaped frame die. Apply ink to the sentiment using a sponge dauber and the metal die as a guide.


Step Three: Select a piece of patterned paper for the card base, I'm using a piece 6x6 cardstock from the Pink Paislee Hope Chest Collection that I had leftover from my June Nesting Components Kit, and randomly apply circles and stars from the Pink Paislee Luxe Rub-Ons Set.


Step Four: Assemble the base of the card. Add some chipboard pieces from the Pink Paislee Luxe Circles Set across the center of the card.


Step Five: Add an image from the By The Sea Clip Art Sheet, the stamped sentiment from Step Two and other embellishments to finish the card.

Thanks so much for stopping by today! You can pick up the July Kit, as well as the previous June Kit that I used for this project, from the Paper Wings Productions Store while supplies last!


Friday, July 19, 2013

Smile Hello

Hello everyone, it's Amber here with this weeks Feature Friday Post. Today is also my last day and final day with Paper Wings Productions. Over the last six months I have a great time with the ladies and like Tara have found loads of inspiration, been amazed by, and have been inspired by all their skills. The last six months have been wonderful and I wish the best of luck to the new DT members!


For this weeks Feature Friday post I wanted to create some one layer cards using Paper Wings Productions  Vintage Technology Clear Stamp Set. Technically their not really one layer cards because of the banner I added but their pretty close. I used four different stamps from the set and used the same layout for both. For the fist card I repeatedly stamped Hello in three different colors across the bottom and then repeatably stamped Hello for my banner. The second card I have today uses the same stamp set and CTMH Ink pads. I repeatably stamped the little tape cassette across the bottom like I did Hello on the first card and then repeatedly stamped Smile for my banner.


We would love to see what you make with Paper Wings Productions Stamps so add your projects to our Flickr Group, Pinterest, Facebook, or leave a comment with a link to your project. Thanks for visiting!
Supplies For Both Cards: Cardstock- White / Paper Wings Productions Clear Stamp Set- Vintage Technology / CTMH Ink Pads- Cream Burlie, Tulip, Breeze / Staple Gun 


Wednesday, July 17, 2013

What's Up Wednesday - NEW Wildflower Stamps


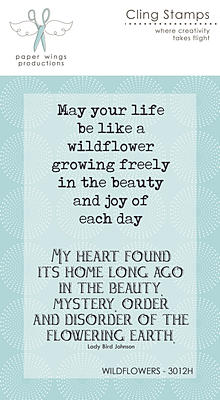
Hello, Hello, Norma here with you today to share "What's Up" this week!!  So did you know that PWP just released a whole NEW batch of cling stamp?!  Well they did and among the newly released stamps are beautiful wildflowers and a large assortment of sentiments that are perfect for cardmaking, ATCs, scrapbooking, art journaling and of course mixed media.

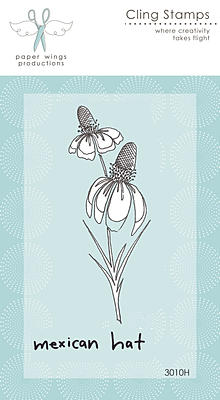
Today, I'm going to be working with these two new stamp sets:


I really love the new sentiments and this flower so I wanted to keep my projects clean and simple.


I made this sweet little card and tag using the same stamps.


I started out with a pre-made card, then simply stamped the Mexican Hat flower.  I used a blending nib and distress inks to color in the image.  After stamping my sentiment, I hand wrote "hello friend" and inked the edges of the card.


Moving onto the tag, I stamped the flowers around the perimeter and then colored them in the same manner.  This time I separated the sentiment into strips to help me place them better in between the flowers.


Super easy right?!  There are several other beautiful flowers and sayings sets among the new release so head on over and check them out!!!!  Here's the link to the NEW RELEASE.

As always, THANKS so much for stopping by for a little visit!  We appreciate all of your comments, so keep them coming ;D

HAPPY STAMPING!!!


Related Posts Plugin for WordPress, Blogger...