Friday, October 31, 2014

Featured Friday - Halloween Hodgepodge Mini Album - Part 2


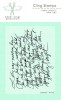
Happy Halloween Paper Wings fans! Dana here today sharing more of my Halloween Hodgepodge mini album. I'm really loving the Halloween Hodgepodge Mixed Media Kit! I used the new kit as well as bits and pieces of previous Nesting Components Kits to create this album. If you missed my first mini album post this month, CLICK HERE. I've added the photos and some more stamping to the pages of my album and am sharing that today.


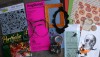
I've been pinning recipes all month long in preparation for my Halloween party and wanted to document some of the treats I'll be serving later tonight. I attached a photo of Black Velvet Cake to the page with Purple Lace Washi Tape. I added a small clip art image (Halloween 2 Clip Art Sheet) and a bat sequin to the corner of the page.


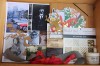
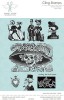
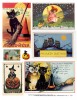
I included photos of my brother's family. Although we don't live close enough to trick-or-treat together, I still wanted to make note of their fantastic costumes! The colors in the image (top) from the Halloween 1 Clip Art Sheet matched my photos perfectly! I used the NEW Hombre Skeleton Cling Stamp and the Fall Add Ons Clear Stamp Set with a White Stamper's Big Brush Pen to dress up a piece of black cardstock (bottom). I added journaling with a White Uniball Pen.


My brother also dressed up his dogs! This is my favorite photo of their Boston Terrier Tobias as a killer whale. I embellished this page with an image from the Halloween 1 Clip Art Sheet, an envelope and label sticker from the Well Dressed Nesting Components Mixed Media Kit and a flower from my stash.


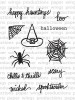
I'm trying to creep up my house for my party tonight. I have a spooky glow-in-the-dark ghost guarding my walkway. I framed him with a pair of ghosts from the Fall Add Ons Clear Stamp Set. and taped him down with a piece of Halloween Striped Washi Tape. I'm happy that I don't have to dust before my guests arrive! I'm adding more cobwebs and spiders to furniture and fixtures inside my home.


I'm looking forward to filling my skeleton cup from my skeleton drink dispenser! The skeleton rub-on I added to this page is from a previous Nesting Components Kit.


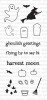
I topped a photo of my daughters in their costumes with this gorgeous purple frame (frames vary from kit to kit). I recorded the year on a hand-dyed tag and stamped "ghoulish" onto the bottom of the page using the Fall Add Ons Clear Stamp Set.


My girls are like night and day. My oldest is dressed as a Monster High character and my youngest is a flying mermaid (her costume idea!). I finished their pages with some leftover Halloween decorations and some journaling. I have a couple pages left to record some candid party pics.

Thanks for stopping by today! I hope you'll pick up the Halloween Hodgepodge Mixed Media Kit! The mix of products in this kit is really fun to work with.

Please come back and visit us next month for the November Nesting Components Mixed Media Kit reveal, the November Challenge and the November Blog Hop. We have more talented Guest Designers joining us and they're sure to inspire you!

Wednesday, October 29, 2014

RockFairy by Agnieszka Bellaidea


Hi!
It's  Agnieszka Bellaidea  again!
Last time I was showing you my layout and card on the 13th, today I have a new scrapbook page.


My style is  a mix of shabby and romantic with a touch of mixed media. I like to use stencils with gesso and modeling paste, mists and of course stamps.


I have already another set of favorite stamps, you can see I used it over and over around the "door" under my photo.
is not going to be put away. I have already some new ideas how to use it.


Stamping with distressed ink gives impression the stamp is part of paper design.
My butterfly in the right corner was stamped and embossed to match my page and colors.


Below you can see how nice can look a little corner stamp from the very same set.


If you would like to see how I design my pages here are 3 steps , all papers by Bo Bunny.


I have to add I really like the way all set of stamps are packed.
I tend to keep my stamps in original packages so this is important to me.
Thank you so much for looking,can not wait to show you my next projects, I hope you will visit me on my blog too.
Thank you again for inviting me to GD for you!
Agnieszka Bellaidea


<!-- inlinkz code start -->

<div class="_InLinkzPMDiv"><table width="95%" border=0 cellspacing=0 cellpadding=2><tr><td style="vertical-align:top"><div style="display:table-cell;text-align: center;float:left; height:189px"><div style="display:table-cell;vertical-align:middle;width:107px;height:104px"><a title="Frames and Flourishes Cling Stamp Set" rel="nofollow" target=_blank href="http://lm.inlinkz.com/go.php?i=425296&c=117696"><img border=0 class=_inlinkzI src="http://lm.inlinkz.com/thumbs/20130906/32055/100/1378467669.53.jpg"></a></div><div style="overflow:hidden;width:107px;line-height:1.1; text-align:center;vertical-align:bottom;"><a title="Frames and Flourishes Cling Stamp Set" rel="nofollow" target=_blank href="http://lm.inlinkz.com/go.php?i=425296&c=117696">Frames and Flourishes Cling Stamp Set<BR></a></div></div></td></tr></table></div><div><a class=_LMLogo target=_blank rel='nofollow' style='font: normal normal normal 10px/normal arial;color: #BBB; text-decoration: none;' href='http://new.inlinkz.com/pm.php?utm_source=prdlist&utm_medium=widget_o&utm_campaign=powered'>InLinkz.com</a></div>

<!-- inlinkz code end -->


Saturday, October 25, 2014

Scrapbook Saturday

Happy Saturday Paper Wings Productions fans!  Erica here to bring you this weeks Scrapbook Saturday post!
I am so excited to be bringing you a scrapbook layout today that I created using the September Mixed Media Kit!  I loved this kit and the 6x6 paper pad from My Minds Eye that was included is filled with beautiful paper!
I also used some of the fabulous stamp sets from the Paper Wings Productions shop and a gold gelato!  All the products I used today from Paper Wings Productions will be linked down below!  I started with a plain white piece of textured cardstock.  I took my gold gelato and ran it across on of my acylic blocks.  I used a paint brush and some water to create a nice gold watercolor and then used the Faber-Castell stipple brush to add some splashes of gold to my white cardstock.  I set this aside to dry and then began cutting squares from the 6x6 paper pad.  I cut them in 3" and 3.25" sizes so they were not all the same.  I also cut a few smaller pieces to use as layers.  Next I laid out all my squares and added embellishments from the My Minds Eye Market Street ephemera pack to the squares.  I then added my 3 photos and started to adhere things down.  Once things were down I pulled out my stamps and my Jenni Bowlin ink and added some stamping!  This layout came together quickly and was inspired by a layout that I recently saw on Pinterest!  I really love the look of grid style layouts and they have been very popular and one of my favorites designs right now!  Here is a look at my final layout!  I also pulled in a few enamel dots from my stash and a brad from a past PWP Mixed Media Kit.


Thanks so much for stopping today!  Please remember that our October challenge is still going on and you can link up to our challenge a total of 3 times!  Using PWP product is not required but will give you extra entries into our challenge!  Enjoy the rest of your day and remember to let your creativity take flight!

Thursday, October 23, 2014

Themed Thursday-Halloween


Hello everyone! It's Amber here with this weeks Themed Thursday post! Today I have a Halloween tag and a matching treat box along with some inspiration from a few of the other DT members to share.


I started by die cutting a large tag out of some patterned paper. Than I stamped and colored my broom riding witch, added a black border with some stitching, and attached it to my large patterned paper tag. For my little box I printed and traced this treat box pattern from Paper Crafts onto some patterned paper, cut it out and assembled it. After I had my little treat box assembled I added some mini strips of tissue paper that I cut by hand to the inside and added my little stamped tag to the front of the box. I stamped the "are you a GOOD WITCH or a BAD WITCH?" sentiment onto the little tag and then added a little strip of matching patterned paper to the bottom half of it before attaching it to my treat box. You can see a close up of the box below.


I hope you enjoyed my little Halloween tag and treat box today. Since Halloween is just around the corner I thought I would also share a few of the design teams latest Halloween projects. Check them out below!


Wednesday Dana shared this fantastic Halloween Hodgepodge mini album. She used this months Nesting Components Mixed Media Kit along with a few other bits and pieces from previously released Nesting Components Kits. You can check out her entire post HERE.


Friday guest designer Kathleen shared three different Halloween cards she created with this months Nesting Components Mixed Media Kit. You can check out how she created these wonderful cards HERE.

Thanks for visiting! Don't forget we would love to see what you make with Paper Wings Productions Stamps so add your projects to our Flickr Group,to Pinterest, or leave a comment with a link to your project. You can also check out our Facebook Page and You Tube Page for daily inspiration.

Supplies: Cardstock- White & Black / Patterned Paper- Glitz Designs & Canvas Corp / Paper Wings Productions Cling Stamp Set- Witchy Halloween / CTMH Ink Pad- Black / Chalk Colored Pencils / Paper Crafts Pattern-  Treat Box / Sizzix Tag Die / Sulky Thread- Black / Sewing Machine


Tuesday, October 21, 2014

Tutorial Tuesday- Stamped Thickers

Hey everyone, Katie here! It's Tutorial Tuesday so today I'm showing you how I stamped on the Thickers I used for the title of my camping mini album. I love camping so you'll always see a lot of camping scrapbook pages on my blog and I love finding new ways to embellish them.


I used the Writing cling stamp and Delicata gold ink by Imagine Crafts for this project. You want to use a background stamp for this technique.

1. Start by placing the thickers you want to use on a piece of plastic or something else that they will easily come back off of.
2. Ink up your stamp.
3. Place your stamp down over your thickers and just lightly press down. Be careful, you don't want to wiggle your stamp or the pattern will smear.
4. Lift your stamp straight off your thickers and let them dry.


It's a pretty easy technique, but a fun one! It adds a little extra embellishment to those fluffy letter stickers!
 

Thanks for reading! If you haven't stopped by the PWP blog lately, here are some of the amazing posts you should catch up on:
Kathleen shared some gorgeous Halloween Cards created with this month's nesting components kit.
Dana shared a spooky yet lovely Hodge Podge Mini Album.
and Agnieszka poster her beautiful mixed media layout as well as a card!

You can also join in on our October Challenge. Create a project using Orange or Black or the theme Halloween and share it with us before the end of the month for your chance to win a $20 Gift Certificate to the Paper Wings Productions Store!

Related Posts Plugin for WordPress, Blogger...