Showing posts with label little halloween. Show all posts

Tuesday, October 10, 2017

Halloween is coming


Congratulations to our Blog Hop winner is Salla Porra. 
Please contact us at paperwingsproductions@hotmail.com to claim your prize!  Thank you to everyone who participated!


Hello friends. Larissa here today with two Halloween cards for you. I am using three stamps sets
today.


I used Paper Wings Productions:
Mujer Skelton Cling Stamp 
Calaveras & Corazons
Little Halloween Stamp Set

I also used:
White cardstock
Only Orange Cardstock
ATG
Distress Inks: Black Soot, Carved Pumpkin, Twisted Citron, Wilted Violet
Mini Mister
Nuvo Drops: Violet Galaxy, Apple Green and Ripened Pumpkin

I smushed the inks on a piece of plastic and misted them with water. I then put the cardstock on top to pick up the inks. I dried them with my heat tool.
I then stamped the images around the card on top of the ink.
To finish off each card I matted it on a piece of Only Orange cardstock and adhered it to a white card base. I also added a few Nuvo drops on the card. I kept it simple and didn't want a lot of bling to take away from the images.

This card used the Mujer Skelton Stamp and sentiment from Calaveras & Corazon.

This card I used Calaveras &Corazons image and sentiment from Little Halloween Set. 


I hope you enjoyed my post today. Have a wonderful day friends.

Larissa Pittman


Monday, September 12, 2016

Fall Coffee Time

Hello friends. Larissa here and I am back with another card using my favorite Coffee stamp set.

 This time I am mixing it up again using the Halloween and Fall theme. I hope you are not tired of seeing these cups because these have to be my favorite set ever. You can do so much with them. I will link a few other post at the end in case you missed the other cards I have done with it.

So I started off cutting my cardstock to 3X6 and scored each at 3. It will make a 3x3 folded note card. I cut pattern paper and black cardstock and adhered it to the card front.
I stamped the coffee cup a few times on a piece of 110 lb white cardstock and then stamped a different image on each. I colored them all with Copic markers and highlighted here and there with a white Gelly Roll pen. After coloring the coffee cups I cut each one out and adhered it to the card front.


These cards are pretty simple to create. They only took me about 15 to 20 minutes. You could drop a Fall Flavored KCup Coffee or Tea in a clear small baggy and attach one of these note cards.
 

Paper Wings Productions Products Used
Little Halloween Clear Stamp Set


Other Products Used:
110 Lb white Cardstock
Basic Black Cardstock From Stampin Up
Halloween Pattern Paper from The Paper Studio
ATG
Tombow Mono Multi
Copic Markers
Detailed Scissors
White Gelly Roll Pen

I hope you enjoyed my post today. I will be back with more cards this week. Have a wonderful day friends. 


Tuesday, October 20, 2015

two (more) Halloween cards

Are ya'll tired of Halloween projects yet?! It's Ashley here today have two final Halloween cards to share. The first one is using one of the new release stamp sets, Build a Wreath.

I stamped my wreath from the Build a Wreath stamp set and die cut it with one of my circle dies that was a close match. Then I started stamping some of the Halloween images from the Little Halloween and the Fall Add Ons stamp sets. I colored the ghosts, the bat, the pumpkins, and the headstone and fussy cut them. I heat embossed the feather with black embossing powder right onto the wreath. I stamped the leaves with VersaMark ink, heat embossed them, and fussy cut them. The sentiment came from the Little Halloween stamp set and I just curved it slightly on my acrylic block so that it would fit nicely in the banner. The sentiment is also heat embossed with black detail embossing powder.
My second card is using the new stamp set, Winter Wonderland. 
First I used distress inks to color my background and then I die cut the grass from patterned paper. Next I stamped the branch and the bird onto my background. Lastly, I used a sentiment from Little Halloween and heat embossed it with silver embossing powder.
Thanks for stopping by today! Now, onto Thanksgiving and Christmas projects for me!

PS You may want to visit my blog today... I may have a giveaway!

Tuesday, September 22, 2015

happy Halloween!

Hello everyone! Ashley here with a Halloween card to share today!
I cut this with my Cricut and then cut a piece of white paper for the background, which I colored with distress ink. I used the Little Halloween clear stamp set from Paper Wings Productions. I think the little pumpkins and the bat are so cute (not scary!) and I love the font too. There's also a similar stamp set - Halloween Mix It Up - that's got a witch hat and spiders!
I colored my bat with Copic markers and adhered only his body to the card base so that his little wings are dimensional. Then I stamped my sentiment with Memento ink. Pretty simple, but really cute for Halloween! For more Halloween inspiration, be sure to check out Pam's Halloween card.

Thursday, September 11, 2014

Tag Trio


Hello everyone! It's Amber here with this weeks Themed Thursday post.With Summer ending soon I've had Fall & Halloween on the brain lately. So today I'm sharing a trio of tags I created with two different PWP stamp sets, Little Halloween and Text.


To create each tag, I stamped my PWP Fall/Halloween images onto three different white die cut tags. I then colored my images with some colorful Close To My Heart markers, adding water to blend. For a soft and subtle background, I inked up one of the text cling stamps and lightly stamped it across my images. To finish I added a vellum tag over each stamped tag and stamped my sentiments. Below is a close up of each tag.


These tags are super easy to make and could easily be made in batches. Thanks for visiting! Don't forget we would love to see what you make with Paper Wings Productions Stamps so add your projects to our Flickr Group,to Pinterest, or leave a comment with a link to your project. You can also check out our Facebook Page and You Tube Page for daily inspiration.


Supplies: Cardstock- White / Paper Wings Productions Clear Stamp Set- Little Halloween  / Paper Wings Productions Cling Stamp Set- Text / Staz-On Ink Pad- Jet Black / CTMH Ink Pads- Bamboo & Grey Flannel / CTMH Markers / Tag Die- Sizzix / Vellum / White String


Thursday, October 17, 2013

Flying By To Say Hi & Some Halloween Inspiration


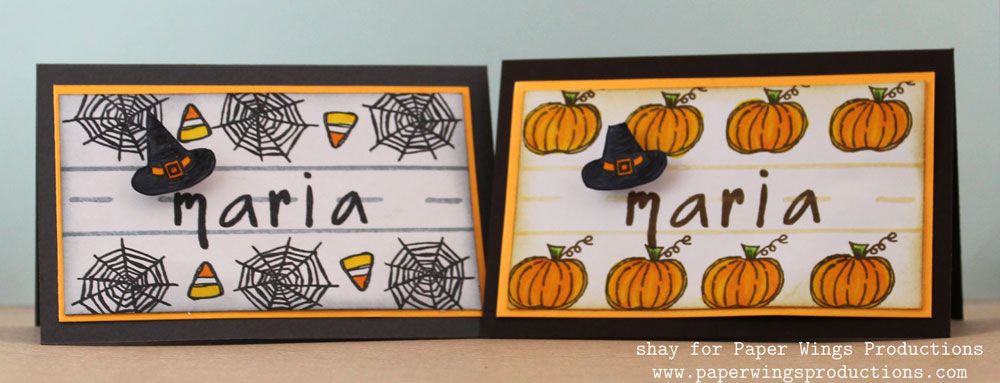
Hello everyone, it's Amber here! Today I have a Witchy Halloween card to share for this weeks Themed Thursday Post. Before I get to my card I thought it would be fun to share some other Halloween themed cards/projects from the other DT members to get your Halloween mojo flowing! First up check out these two fabulous placeholders Shay created last week using Paper Wings Productions Little Halloween clear stamp set, Halloween Mix It Up clear stamp set, School Journaling Lines clear stamp set, and Funky Lower Case Alphabet clear stamp set!


It's a fun post you don't want to miss, she shares how to transform a Witches hat into a Pilgrims hat. How cute is that! You can check out Shay's original post HERE.  Second up is Erica's three fabulous projects! 


Erica created a cute little gift bag, an adorable card, and a fabulous tag last week using Paper Wings Productions Little Halloween Clear Stamp Set. You can check out Erica's original post HERE and if your still in need of some Halloween inspiration you can check out this months Wicked Blog Hop by starting HERE. Now that you have been tricked and treated I have another card for you to check out. Today I am featuring Paper Wings Productions Witchy Halloween cling stamp set, Fall Add Ons clear stamp set, and Text cling stamp set.


For this card I started by stamping the text background in carney yellow onto my white card base. After I had my card base stamped I layered a square piece of patterned paper over my card base, edged it with some black stitching, and added a small square of yellow cardstock towards the top. I then stamped my witch in black onto a piece of orange patterned paper and stamped my sentiment in black onto a yellow strip of cardstock. After I had my image and sentiment stamped I circle punched the witch, matted it to the yellow cardstock,  trimed and cut the ends of my sentiment and added it to the card front.


We would love to see what you create with Paper Wings Productions stamps.... Show us on our Pinterest page, our Facebook page or our Flickr gallery or leave us a comment with a link to your project. Thanks for visiting!
Supplies: Cardstock- White & Yellow / Patterned Paper- Fancy Pants / Paper Wings Productions Clear Stamp Sets- Fall Ad Ons / Paper Wings Productions Cling Stamp Set- Witchy Halloween & Text / Versa Color Ink Pad- Carney/ CTHM Ink Pad- Black / Sulky Thread- Black / Circle Punch- Sizzix


Friday, October 11, 2013

Feature Friday: Easy Halloween and Thanksgiving Fun


Hello there peeps!  It's Shay here coming in to bring you a little festive fun.  Before I do, I wanted to point you to what the rest of the awesome design team are doing recently (if you haven't seen it already of course!).  Dana did this howlin' cool card in which she stamped on felt!  Cathi created this pretty and charming art journal cover with plenty of ideas on how to use layers of stamps to create interest and beauty.  Irit created this happy and loving scrapbook layout to showcase her adorable grandson.  The incomparable Norma created this trio of stupendous ATCs (her first, but who could tell?!?) with a tutorial to create your own.  This month there is are TWO incredible kits...for more information check out this post HERE (don't miss out).  Our guest artist, Diana Rivera, enchanted with this vibrant art journaling page.  Erica's fabulous 2014 journal cover will inspire you to sparkle!

Lastly, but not least, if you were unable to make this month's Wicked Blog Hop still be inspired by our sinfully delightful projects by starting HERE.

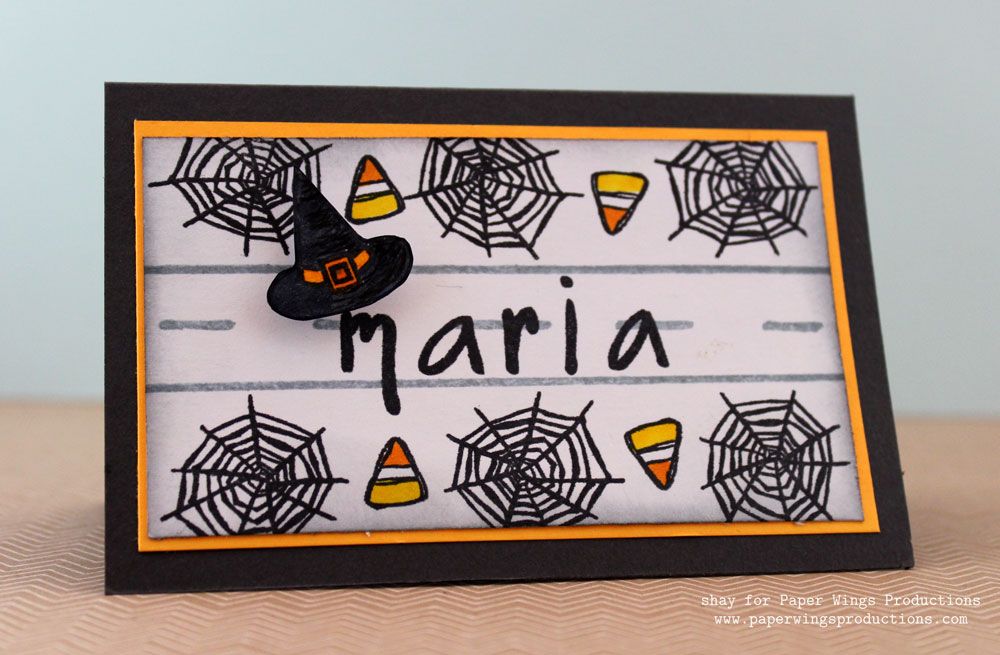
Now that you are dazzled by all you have seen, let's have some more fun.  I am featuring the Halloween Mix It Up and Little Halloween stamp sets today in a very simple way.  If you have little ones this would be a great project to do with them.

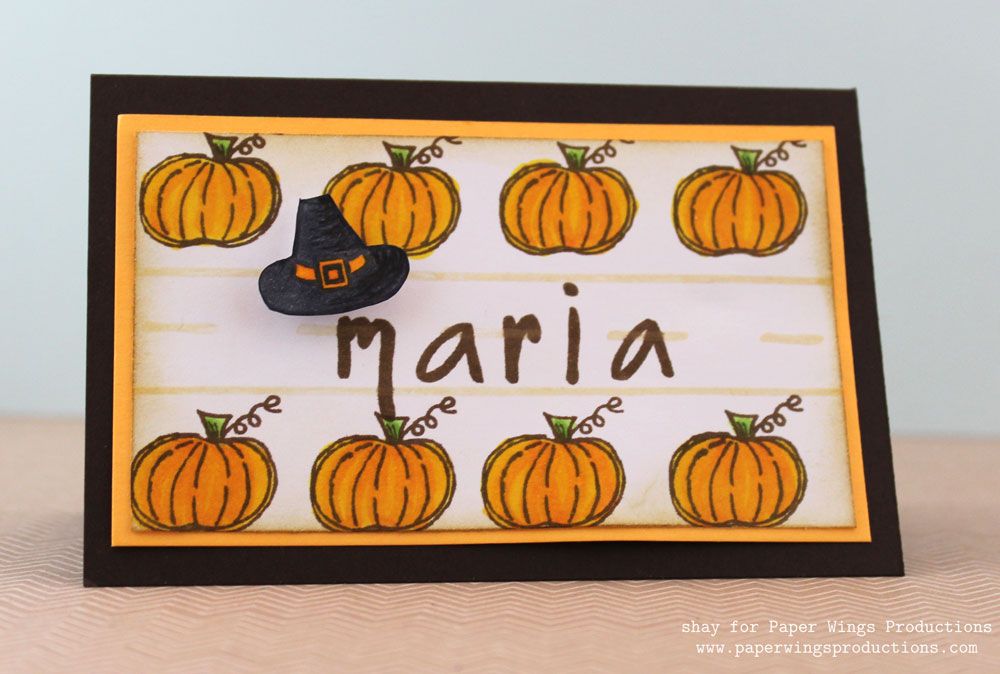
There is a little witch's hat in the Halloween Mix It Up set which actually can be used for another holiday other than Halloween.


See that pilgrim's hat on the right?  Simply cut off at the line of the witch's hat and you have it!
 
Here are the directions of what I did:
  • All you need is some Paper Wings Productions stamps (I used the Halloween Mix It Up, Little Halloween, School Journaling Lines and Funky Lower Case Alphabet, cardstock, your favorite coloring agents (I used Copic markers), scissors, cutting tool and adhesive.   Of course pull out your favorite embellishments too to make them exactly how you want them.
  • Ink up your witch's hat from Halloween Mix It Up with black ink.  Before stamping lightly rub off the line near the tip and stamp upon a scrap piece of white cardstock.  Also stamp another witch's hat in black ink without rubbing off any ink.  Color in.  For the hat with the rubbed off line cut the entire hat out.  For the hat without the rubbed off line cut off the tip of the hat at the line.  Set aside (but don't misplace as I am prone to do).
  • On two pieces of white cardstock (mine measured 4x2.25 inches) I stamped the handwriting practice journaling line from School Journaling Lines in roughly the middle for the Halloween placeholder in grey and soft brown for the Thanksgiving one. 
  • Spell out your guest's name using Funky Lower Case Alphabet.  Stamp over line in black for Halloween and brown for Thanksgiving.
  • Stamp your holiday specific images from Halloween Mix It Up and Little Halloween above and below the line.  Color in as desired.
  • Attach little hats above the name with dimensional foam adhesive.
  • Distress edge of white panels with ink blending tool--black for Halloween and brown for Thanksgiving. 
  • Layer on top of yellow piece of cardstock and then attach to a folded piece of charcoal grey cardstock for Halloween and dark chocolate for Thanksgiving (mine measured 4.5x6 before folding and 4.5x3 after).

A closer look at the Halloween placeholder:


And the Thanksgiving placeholder:


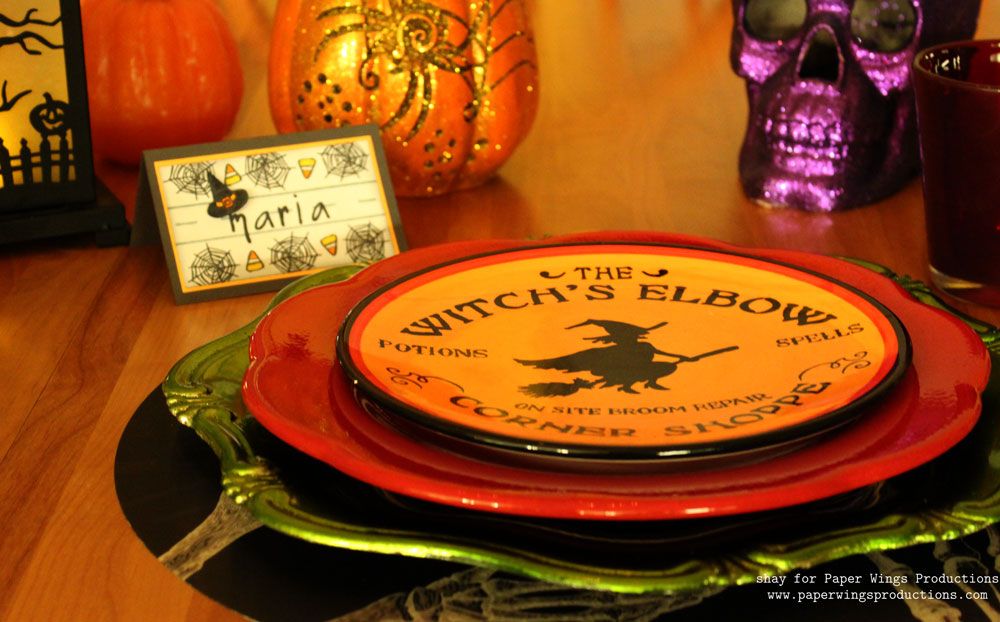
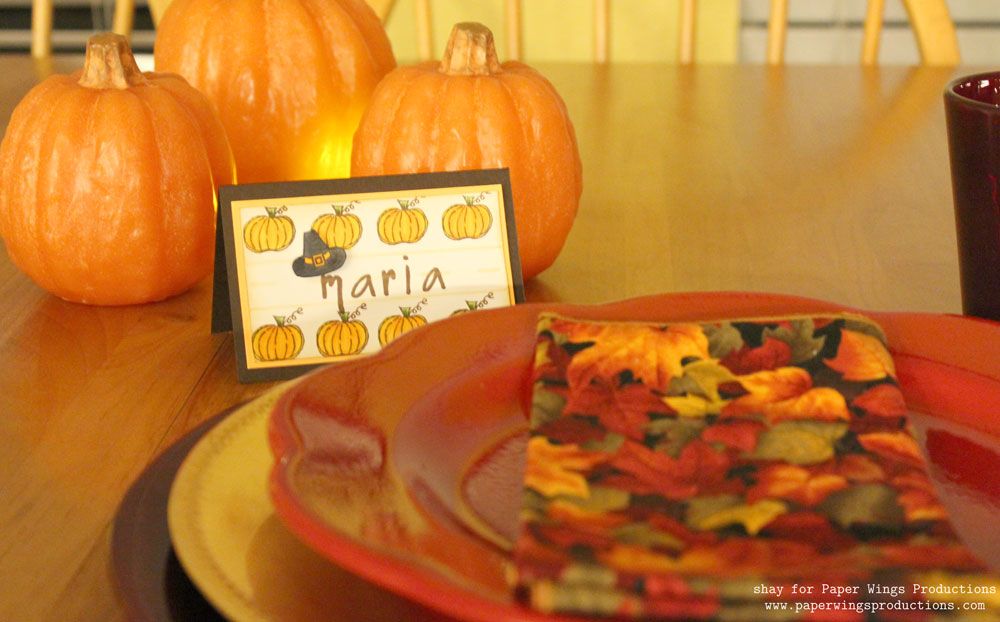
The placeholder added to your Halloween table:


Or on your Thanksgiving table:


Inside the placeholders you can write a note to your guest or even include a gift card.  Who wouldn't be thrilled with a thoughtful treat like that?

I hope you enjoyed today's Featured Friday!  Come back here on The Aviary Sunday for another great project.

We would *love* to see what you make with Paper Wings Productions stamps. Add your projects to Facebook, our flickr group, to Pinterest, comment with a link on this post or even email pictures to us!

Happy creating,
Shay.


Supplies:

Stamps:


Ink: tuxedo black, Memento by Tsukineko; weather vane, malted milk and brown sugar, Jenni Bowlin for Ranger
Cardstock: white, Georgia Pacific; charcoal grey cover and chocolate truffle, The Paper Company; yellow, stash
Other: Inkssentials ink blending tool, Ranger; cool gray no. 7 (C7), lightening yellow (Y18), pumpkin yellow (YR15), chartreuse (YG13) and grass green (YG17), Copic; black precision pen, American Crafts; dimensional foam adhesive

Thursday, September 19, 2013

Themed Thursday:Little Halloween

Hello PWP fans!  Erica here today to share with you a themed post inspired by Amber's recent Feature Friday post that you have to check out HERE!  She used one of my favorite Halloween stamp sets from the PWP SHOP called Little Halloween but there is nothing little about the amount of mileage you will get out of this stamp set!  With 8 different sentiments and great images to go along with them this stamp set is a must have! 
I created three different Halloween projects to share with you today using the Little Halloween Clear Stamp Set!  I had so much fun coloring these images and created with this set I had a hard time stopping!
For my first project I used a small white glassine bag and stamped all the sentiments in black all over the bag for a quick and easy background!  I then took some white cardstock and applied some Distress ink in Black Soot with my ink blending tool until the white was completely covered.  I made sure to keep it pretty light but did add a few darker spots while I was blending the ink.  I then stamped the bat image covering the whole piece of cardstock and then fussy cut them out and saved the left over bats for another project!  I punched out some circles and one scallop circle with my punches, layered them together and then added the bats and a great Happy Halloween sentiment from the stamp set.  I also added some orange tulle behind my piece to give it a little something extra!  I added a small tag to the inside of my bag to go along with some sweet treats!  I added ribbons, tulle and bakers twine to the tag and adhered one of the pumpkin images from the stamp set.
Next up I have a very simple Halloween card I created with the Little Halloween stamp set and some pattern papers form my stash!  I stamped out a handful of the Jack-O-Lanterns on some white cardstock and colored them in with my markers and cut them out and saved the extras for later.  I layered up some of the papers on my card base, added some twine and some enamel dots. I then took a strip of black cardstock and punched out 3 scallop circles to create windows.  I positioned my window strip on my card where I wanted it to go and then stamped out the Trick or Treat sentiment in the center window.  After the image was stamped I added foam squares to the back of the black strip of paper and adhered to my card then I slipped in the Jack-O-Lanterns at the top and the bottom windows.  Easy Peasy!
If you joined us for our Autumn Blog Hop you will know that I created an Autumn tag to add to my journal. ( If you missed the hop please check it out HERE!)   Well Halloween is fast approaching so I will need a Halloween tag to add to my journal as well.  I colored my tag with some Distress Ink and Tattered Angels Glimmer Mist.  We currently have some Glimmer Mist in the PWP Shop on sale HERE!  I used a couple of the Chipboard Nesting Circles for my tag and colored them with my Black Soot Distress Ink.  I adhered them to my tag adding foam squared to the back of the larger on so that it popped of the tag.   I added a piece of cardstock to the center of the smaller chipboard and stamped out some of the Halloween sentiments for an easy background.  I took one of the Jack-O-Lanterns I cut out earlier and popped him up with foam squares and added him to the chipboard piece.  I also stamped out the super cute candy corn image from the stamp set and made a border strip to add to my tag. 
Thank you so much for joining me today and if you are in need of some new fresh Halloween stamps make sure you check out the Paper Wings Productions Shop! 

We would love to see what you have been creating with the Paper Wings Productions products!  Add your projects to our FACEBOOK, PINTEREST, FLICKR GROUP or tag us on Instagram @paperwingsproductions!
Related Posts Plugin for WordPress, Blogger...