Showing posts with label chipboards. Show all posts

Thursday, July 24, 2014

Themed Thursday - Card Set


Hi there sweet friends. Marie Johansson here today showing you a card set made with the Tea Time July Nesting Components Mixed Media kit. Let me first tell you a bit about myself. I live in the north of Sweden with my partner and our two kids (10 & 6 years old). I have been scrapbooking since 2004 and my style has developed over the years to now days more fit under Mixed Media Scrapbooking. I love to use different mediums on my projects mixed up with various sorts of embellishments. You are very welcome to visit my blog to see more of my creations.

Both card has a brown cardstock as it´s base. I choose to use different patterned papers from the paper pad that comes with the kit. To match the cards I choose to use leftovers from one card on the other card. I also used the same ribbons, paints and gesso.


For this card I used one of the pictures from the clip art sheet. I have distressed it a bit on the edges to create texture. I don´t like my cards to flat. The ATC chipboard frame from Um Wow Studios made it´s way up on the top of the card. It´s partly covered with gesso. The Swirl stamps turned out nice stamped and embossed with white embossing powder. I have used the same techniques on the card below, gesso on the chipbard, embossing and splatters of mist and paint. It looks totally different though even though the material is the same.


After finishing my card I had some paper strips left. Instead of throwing them away, used them for a set of tags. I used the same materials on these as on the cards. 


Monday, December 30, 2013

Mixed Media Monday: Surely The Stars...


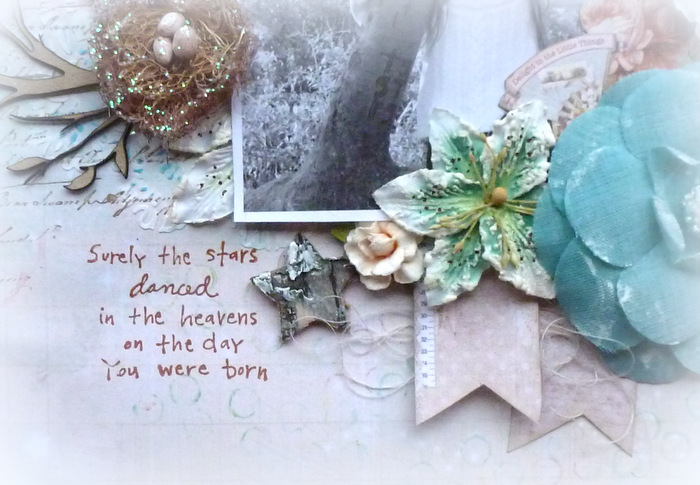
Hi, Cathi here with a layout for Mixed Media Monday! I just recently bought the great Art Textures Cling Stamp Set and have had a great time here trying out my new Tropical Gelatos using the bubble wrap and coffee stain textures on my background! I also used the gorgeous Prima doily mask that was included in the November Nesting Component Kit. I stamped and colored the background with the gelatos, I think I will be using these more often!! I love the soft subtle texture the stamping gives you with the gelatos.


Here you can see more of the gelato coloring and doily masking as well as the gorgeous text stamp from the Text Melange Cling Stamp Set. I have also used the gorgeous Blue Fern Twiggy Branch chipboard in its natural raw state. I have added a gorgeous Prima nest, bird and flowers from my stash! 


For the title of my layout I used the sweet quote from the Stars Cling Stamp Set, adding a few bark stars to my embellishment cluster to add a little extra detail...

There are a lot of new projects up on the blog now that Christmas is gone, we seem to be craving lighter color pallettes!!

Hope you will check out some more mixed media work from Irit:


Amber has done a sweet sea themed mermaid card!

Thanks for visiting today and don't forget we would love to see what you make with Paper Wings Productions Stamps so add your projects to our Flickr Group, to Pinterest, or leave a comment with a link to your project. You can also check out our Facebook Page and You Tube Page for daily inspiration.

Tuesday, October 15, 2013

Tutorial Tuesday

Hello Paper Wings Fans!!  Erica here today for this weeks Tutorial Tuesday.  This week I have a video to share with you showing you how to heat emboss using some tags from my stash and some fabulous chipboard from our PWP Shop.  I know a lot of you out there already know how to heat emboss but there are some that still have not heard of it or tried it yet so I thought I would share a video to show how simple and fun it really is!  Take a look...

I just can not get enough of the Circles Background Stamp I seem to use it on all my projects!  It is definitely a must have stamp!  Once I was done with all the heat embossing I went ahead and embellished my tag adding a beautiful Butterfly Chipboard piece from the PWP Shop.  I also heat embossed this piece and added glitter for some sparkle!   And here is a look at my finished tag! 


I hope you enjoyed my tutorial and that it inspires you to get out your embossing powders, inks and sprays and get a little messy!  If you are looking for some great products to work with make sure you head on over to the Paper Wings Productions shop and check out all the fabulous products available.  Also if you are looking for other ways to heat emboss please check out Norma's tutorial HERE!  Thanks so much for stopping today!  Make sure to visit us on FACEBOOK and share your creations with us in our FLICKR gallery!   

Thursday, September 19, 2013

Themed Thursday:Little Halloween

Hello PWP fans!  Erica here today to share with you a themed post inspired by Amber's recent Feature Friday post that you have to check out HERE!  She used one of my favorite Halloween stamp sets from the PWP SHOP called Little Halloween but there is nothing little about the amount of mileage you will get out of this stamp set!  With 8 different sentiments and great images to go along with them this stamp set is a must have! 
I created three different Halloween projects to share with you today using the Little Halloween Clear Stamp Set!  I had so much fun coloring these images and created with this set I had a hard time stopping!
For my first project I used a small white glassine bag and stamped all the sentiments in black all over the bag for a quick and easy background!  I then took some white cardstock and applied some Distress ink in Black Soot with my ink blending tool until the white was completely covered.  I made sure to keep it pretty light but did add a few darker spots while I was blending the ink.  I then stamped the bat image covering the whole piece of cardstock and then fussy cut them out and saved the left over bats for another project!  I punched out some circles and one scallop circle with my punches, layered them together and then added the bats and a great Happy Halloween sentiment from the stamp set.  I also added some orange tulle behind my piece to give it a little something extra!  I added a small tag to the inside of my bag to go along with some sweet treats!  I added ribbons, tulle and bakers twine to the tag and adhered one of the pumpkin images from the stamp set.
Next up I have a very simple Halloween card I created with the Little Halloween stamp set and some pattern papers form my stash!  I stamped out a handful of the Jack-O-Lanterns on some white cardstock and colored them in with my markers and cut them out and saved the extras for later.  I layered up some of the papers on my card base, added some twine and some enamel dots. I then took a strip of black cardstock and punched out 3 scallop circles to create windows.  I positioned my window strip on my card where I wanted it to go and then stamped out the Trick or Treat sentiment in the center window.  After the image was stamped I added foam squares to the back of the black strip of paper and adhered to my card then I slipped in the Jack-O-Lanterns at the top and the bottom windows.  Easy Peasy!
If you joined us for our Autumn Blog Hop you will know that I created an Autumn tag to add to my journal. ( If you missed the hop please check it out HERE!)   Well Halloween is fast approaching so I will need a Halloween tag to add to my journal as well.  I colored my tag with some Distress Ink and Tattered Angels Glimmer Mist.  We currently have some Glimmer Mist in the PWP Shop on sale HERE!  I used a couple of the Chipboard Nesting Circles for my tag and colored them with my Black Soot Distress Ink.  I adhered them to my tag adding foam squared to the back of the larger on so that it popped of the tag.   I added a piece of cardstock to the center of the smaller chipboard and stamped out some of the Halloween sentiments for an easy background.  I took one of the Jack-O-Lanterns I cut out earlier and popped him up with foam squares and added him to the chipboard piece.  I also stamped out the super cute candy corn image from the stamp set and made a border strip to add to my tag. 
Thank you so much for joining me today and if you are in need of some new fresh Halloween stamps make sure you check out the Paper Wings Productions Shop! 

We would love to see what you have been creating with the Paper Wings Productions products!  Add your projects to our FACEBOOK, PINTEREST, FLICKR GROUP or tag us on Instagram @paperwingsproductions!

Monday, September 9, 2013

Mixed Media Monday: Every little thing


If you are looking for the Fall Blog Hop, please click HERE!

Hello my dear crafty friends, Irit here!
Today is my Mixed Media day on PWP blog and I made a " true" Mixed Media project: with  more mediums than paper and some stamping too.


First I used an old post card as my base. Then I stamped a couple Texture  images over the kraft leftover cardstock with Copper heat embossing (OK, after all possible paints and medium it's hardly seen, but the texture on the left upper corner.
Then I added a bunch of Tando Creative chipboards in steampunk style, both cogs and never used letters. Next all piece was heavily painted with Copper acrylic paint and when it was still wet covered with Turquoise mist for this rusty look.


Then I added some micro beads, glass beads and even red embossing powder and heat embossed all the piece. As the paint was still wet it made this lovely and unique textured look.
More Orange misting was added above the wet piece and them I finally let it dry.
Now the book plate was made with black powder heat embossing and copper paint over it. The stamped in black permanent ink sentiment from Bird Melange  set was misted  too.


And now for a few stamped and hand cut birds from Bird Melange set and an Owl from Owl Panel set: 2 stamp sets were used, stamped with clear embossing powder, heat embossed in black and misted with the same Turquoise mist. All together it made a lovely Mixed Media journal page/wall deco/ anything you want it to be.


You can try this technique of  making your own " add anything possible" backgrounds and it's even better if you use our gorgeous PWP stamps!


Related Posts Plugin for WordPress, Blogger...