Showing posts with label cling stamp. Show all posts

Thursday, June 2, 2016

Thank you

Hello friends. Larissa here with you today. I have a fun card for you. I actually had a video I was taping during the process to share with you but I noticed after I was done and went to turn it off the phone had died. Soooooo I will just tell you. 


I used watercolors for this card. I stamped the images from the Floral Cling Stamp set  using Versamark ink on a piece of watercolor paper. I poured white embossing powder over the top and heat embossed them. I then took a piece of plastic from the stamp set and added different shades of red and orange to it. I also added lots of water. Then I smooshed the card into the plastic a couple of times. I wiped it off and did the same thing with the green and blues and added it to the middle.
I spritzed a few drops of purple and red onto the card as well.
I die cut the Thank You out of black cardstock 4 times to give it some depth.
I adhered it to the card with Tombow Mono Multi Liquid Adhesive. I also used it to adhere the card front to the white card base.

I hope you enjoyed my card today and I promise to have my battery fully charged next time.

Have a wonderful day.
Larissa Pittman
www.muffinsandlace.com

Friday, February 26, 2016

all you have to do is fly

Hi everyone! Ashley here today! I made a card using the With Wings cling stamp set.
I made the background using Ken Oliver color bursts in red and orange. First I spritzed some water onto white cardstock. Then I just puffed the Color Bursts onto the card. They're powder so they literally will puff out and then mix with the water.

I stamped my sentiment using the With Wings red rubber cling stamp set. I knew I wanted to heat emboss the word 'fly' because it is in a different font and stands out. To do this, I mask off the part of the stamp I don't want to ink with some washi tape. Then I ink the stamp, remove the washi tape, and stamp the image.
I love this sentiment. Here's a final look at my card:
 
I have one more thing to share. Almost two years ago as a guest designer for PWP, I made this layout using this same stamp set AND the same masking technique.

Fun, right?

Friday, August 7, 2015

Hello Hello


 Hello PWP fans!  Its Amber here with you today sharing another card featuring one of the Geisha girls from the Geishas Cling Stamp Set and a sentiment stamp from the Vintage Technology Clear Stamp Set. I had lots of fun creating this one. Below I have a step by step tutorial for you to check out.


Step 1. Pick two different coordinating patterned papers. I used a polka dotted paper for the top half and a dark watercolored piece for the bottom half. The top half is larger then the bottom half. 


Step 2. Cut the patterned paper to fit the card base. 


Step 3. Stamp your image and sentiment onto another piece of coordinating patterned paper. I used a pink patterned paper and stamped my images in a blue ink that matched the other patterned papers.


Step 4. Cut out your image and sentiments. I also cut out a little banner to add to the top of my card.


Step 5. Lay out your images, staple your banner to the top left, staple the two hello sentiments to the bottom left, and add some matching ribbon. After you card is assembled add some stitching around the outside edges. You can see a close up below. 


I hope you enjoyed my card today! This will be my last post for Paper Wings Productions. I've had so much fun creating for the blog. Thank you for letting me be apart of your team Carrie.
Supplies:  Cardstock- White / Patterened Paper- Basic Grays Fresh Cuts Collection / Paper Wings Productions Cling Stamp Set- Geisha's / Paper Wings Productions Clear Stamp Set- Vintage Technology / Versa Color Ink Pad- Blue /  Lime Green Ribbon- Fancy Pants / Sulky Thread- White

Wednesday, July 29, 2015

Imagine


Hello PWP fans! Its Amber here with you today sharing a card I created with the Vintage Melange Cling Stamp Set. This stamp set contains 7 different stamps and can be purchased cling mounted or unmounted. I used the unmounted set to create this card. I wanted to make a statement with this card so I used the large round image from the stamp set as my main focal image. This image is another one of my favorites, it can be colored or left uncolored like I did here. I chose to leave my image uncolored because I was using a brightly colored and busy patterned paper for the base of my card. You can check out a close up below. 


Thanks for visiting! Don't forget we would love to see what you make with Paper Wings Productions Stamps so add your projects to our Flickr Group,to Pinterest, or leave a comment with a link to your project. You can also check out our Facebook Page and You Tube Page for daily inspiration.

Supplies: Cardstock- White, Black, Pink / Pattered Paper & Sticker Sentiment- Pink Paislee Bella Rouge Collection / Paper Wings Productions Cling Stamp Set- Vintage Melange / CTMH Ink Pad- Black / Mini Pink Clothespin- Canvas Corp / Offray Ribbon- Yellow / We R Memory Keepers Twine- Black

Friday, July 17, 2015

Little Adventurous Bird

Hi everyone, Steph Ackerman here today with my first post for Paper Wings Productions.  I chose to use a wonderful stamp set called the Bird Panel.  This clear stamp set includes 9 stamps.


I chose to use the sentiment as the focal point of this card.  Once I stamped the sentiment, I die cut into an oval and had room to stamp several birds around the sentiment.


I thought this stamp worked really well with my paper selection.  I finished by stamping a few more birds directly on the pattern paper.

Thanks for stopping by.
 
Steph - my blog
 

Wednesday, June 10, 2015

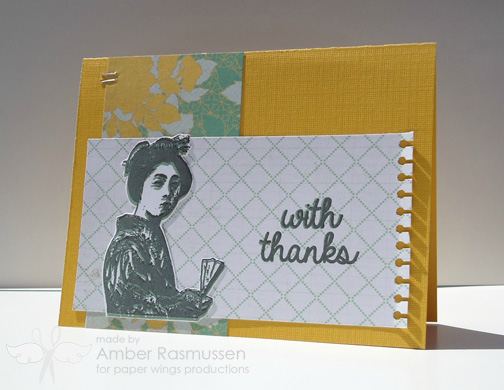
With Thanks


Hello PWP fans! Its Amber here with you today sharing another card featuring one of the Geisha's from the Geishas Cling Stamp Set. This set is quickly becoming another one of my favorites. I started with some colorful floral patterned paper from Crate Paper and used that as my inspiration. I really loved the teal/green color in the patterned paper so I found a matching ink and stamped the Geisha image in it. I then stamped over the same image with some black ink to give it a two toned effect. After my image dried I cut it out and adhered it to my second piece of pattered paper. Using the two same ink colors I stamped my "with thanks" sentiment from the Say It- Thanks Clear Stamp Set to the right side of the geisha. 


Above is a closer look at the stamped geisha and sentiment. Thanks for visiting and don't forget to check back in later this week for Carries Design Team announcement. 
Supplies: Cardstock- Yellow / Patterned Paper- Crate Paper & Lilly Bee Designs / Paper Wings Productions Cling Stamp Set- Geishas / Paper Wings Productions Clear Stamp Set- Say It -Thanks / Versa Color Ink Pad- / CTMH Ink Pad- Black / Stapler / Hole Punch 

Wednesday, May 20, 2015

Congratulations Card

Hello PWP fans! It's Amber here with you today sharing a three toned stamped collage card. Before I get to my card I thought I would remind everyone that Paper Wings Productions is having a design team call. We are looking for dependable, creative rubber stamp designers that have a passion for sharing tips, techniques, and ideas with our followers. If you are interested you can check out the design team call HERE. Okay, onto the card I'm sharing today. Lately I have really begun to like mixing and matching different colors with black.  Usually I'm more of a neutral colored crafter but  its been fun using my everyday go to color black and changing it up with another color. So today its all about mint, black, and white. Below you will find step by step instructions to create your very own card. Check it out. 


1. Add some paint splatters to your card base. I'm using a pre-made card base with a diagonal design from American Crafts but you could create your own with cardstock and stamps.
2. Repeatedly stamp a sentiment onto a square piece of cardstock. I stamped "Oh Happy Day" in two different colored inks and adhered it to the right side of my card base.
3. Die cut a circle out of a colored cardstock, cut one side off, distress the edges and attach towards the bottom part of your stamp sentiment block. You could mix it up and use any shape like a star, triangle or a square.
4. Stamp your main image onto some cardstock in the same matching ink you used for you sentiment. Then cut around the edges and attach it to the die cut shape you added in the step above. I used one of the gorgeous ladies form the Vintage Domino Melange Cling Stamp Set as my main focal image and stamped it the same two matching inks I used for my background sentiments.
5. Cut/die cut a banner out of some cardstock and stamp a second sentiment onto it. Once stamped add it to the left side of your stamp focal image tucking the end of the banner behind it. I used "Congratulations" for my second sentiment to go along with my background "Oh Happy Day" sentiments.
Its that easy. I hope you enjoyed my card today and Thanks for visiting! 


Supplies: Card Base-American Crafts / Cardstock- White & Black / Paper Wings Productions Clear Stamp Set- Happy Day  / Paper Wings Productions Cling Stamp Set- Vintage Domino Melange / Versa Color Ink Pad- Mint / CTHM Ink Pad- Black / Back Paint / CTMH Edge Distresser

Wednesday, April 15, 2015

Stamped Angel Tags


Hello PWP fans and Happy Wednesday! It's Amber here today to bring you two stamped tags I created with lots of fabulous stamp sets from the Paper Wings Productions Shop! Check out the close up photos below along with all of the details.


The first tag I have to share is the pink and black angel themed tag, I started by stamping the larger angel from the Angles Cling Stamp Set right in the middle of my tag at the bottom. After I had the angle stamped I used an old sticker sheet to add some stenciling to the tag base. After my stenciling was done I went back and stamped the text and the swirls to the background. I only added a little bit of the text and I kept the swirls toward the outside edges. 


Here's a closer look at the stamped angel with the stamped and stenciled background. I colored in the squares with Faber-Castell Stamper's Big Brush Pink Madder Pen to bring out some of the pink in the patterned paper. For the sentiment I went with one of the stickers from 7 Dots Studios Illumination collection that reads " lets dance in the rain" and attached it with some mini staples.


I wanted to continue the pink and black color scheme, so I used the same patterned paper and ink pad that I used for the first tag. I started by stamping the angel at the top right off to the side and then I added the star right below her hand. After I had those two images stamped I went ahead and added the clouds and text to the background. 


Here's a closer look at the stamped text, star, and clouds. I thought it would be fun to have the angel reaching out for the star. I was going for a reach for the stars kind of vibe to go along with my 7 Dots Studio "Dream be yourself take a chance" sentiment. I hope you enjoyed my two stamped tags today!  Thanks for visiting!

Tag 1 Supplies: Patterned Paper- Fancy Pants / Paper Wings Productions Stamps- Angels Cling Stamp Set, Vintage Melange, Text Cling Stamp Set / CTMH Ink Pad- Black / Faber-Castell Stamper's Big Brush Pen- PINK MADDER / Sticker Sentiments- 7 Dots Studio Illumination Collection / American Crafts Mini Stapler / White String
Tag 2 Supplies:Patterned Paper- Fancy Pants / Paper Wings Productions Stamps- Angels Cling Stamp Set, Earth & Sky Cling Stamp Set, Text Cling Stamp Set, Hanging Stars Clear Stamp Set / CTMH Ink Pad Black / Sticker Sentiments- 7 Dots Studio Illumination Collection / American Crafts Mini Stapler / White String

Thursday, November 27, 2014

Themed Thursday - Fathers Day Cards


Marie here and todayy theme is Fader´s Day cards. In Sweden we celebrate Fathers Day on November 9 so these cards was made for that occation. I used the same stamps, techniques and material on all four cards. I took photos trough the whole process so you get an idea on how to do quite similar cards that turn out totally different in the end.


 First of all I prepped my card bases with white gesso.

 I used different crayons for each card. Drawing a random pattern over the dried gesso.

 Looks like something my kid would have drawn.....

 To blend the creyons together i sprayed on water.

 After drying I couldn´t resist a bit of ink splattering....

After some more drying time I started to stamp with my Paper Wings Background stamps.
First I placed my cards side by side. Then I staped on two cards at the same time. The finishing toush was to stamp on the coffe ring and the grid pattern.

And this is what the cards look like after a bit of decorating.


Thank you for stepping by today!

♥
Marie Johansson


Thursday, August 21, 2014

Themed Thursday- Halloween Tags


Hello PWP fans! It's Amber here with you today with this weeks Themed Thursday Post. My theme today is Halloween Tags and I've made two very similar tags to share with you. Both of my tags were created with Paper Wings Productions Text & Witchy Halloween Cling Stamp Sets and Paper Wings Productions Fall Add Ons & Banner Day Clear Stamp Set that we have available in our online store.


Both of my tags are almost identical, I just changed up the sentiment and some of the smaller images. Below are a few step by step photos of my process.


I started my tag by stamping one of the text stamps in some black ink onto my tag base. After I had the text stamped in black I added some black ink splatters, a sentiment, and some smaller images to the bottom right and top left of my tag. For the tag above I used the "Flying By To Say Hi" sentiment and the cute little bat from the Fall Add Ons Clear Stamp Set. For the second tag I used the "Witchy Greetings" sentiment and the little crow from the Witchy Halloween Cling Stamp Set.


After I had both of my tag bases stamped I added some black stitching all around the edges. Then I stamped and cut out two broom riding witches from the Witchy Halloween Cling Stamp Set and two banners from the Banner Day Clear Stamp Set. After I had them stamped and cut I layered the broom riding witch over the banner, added some black thread behind the two, and I then added a few large and small black sequins. You can check out a close up below.


Thanks for visiting! Don't forget we would love to see what you make with Paper Wings Productions Stamps so add your projects to our Flickr Group,to Pinterest, or leave a comment with a link to your project. You can also check out our Facebook Page and You Tube Page for daily inspiration.

Supplies: Cardstock- Kraft & Black / Paper Wings Productions Cling Stamp Sets- Text & Witchy Halloween / Paper Wings Productions Clear Stamp Sets- Fall Add Ons & Banner Day / CTMH Ink Pad- Black / Sequins- Black / Black Button String / Sulky Thread- Black / Sewing Machine


Related Posts Plugin for WordPress, Blogger...