Showing posts with label mini album. Show all posts

Wednesday, June 13, 2018

Mini Album with Ruler Binding

Mixed Media Patterned Paper abd Fabric Mini Album with Ruler Binding

Hi friends! Dana Tatar here today sharing a mixed media mini album that I put together. I usually struggle with album binding, so this Tim Holtz Ruler Binding set was a quick and easy way for me to hold my album together. The only tool necessary was a standard hole punch. (The metal screws, washers, and wing nuts are included with the rulers.)

Patterned Paper and Fabric Scraps Cut to Size for a Mini Album

I started this album by cutting up pieces of scrap patterned papers, clip art sheets, acetate, and fabric, to measure 3.25 x 5 inches. To add strength to the album, and to help keep the paper pages from tearing, I used acetate for the front and back covers.

Colorful Mixed Media Mini Album Pages with Stamping and Embellishments

I'm still working on embellishing all the pages in this album. I added handwritten song lyrics, stamping, chipboard stickers, and words cut from patterned papers, to the pages shown above. The fabric pages add fun texture to this album. I used a safety pin to attach a silver foil bird to a fabric page. Stitched beads or charms, or iron-on patches, would also make great embellishments for the fabric pages.

I gathered the punched pages together and placed them onto the screws to bind them together. The album is held together by wing nuts that twist onto the screws. I have 40 pages in this album and still have about 1/4 inch of space on the screws if I decide to add more pages at a later date.

Thanks so much for stopping by today!

Paper Wings Productions Supplies:
Big Textures Cling Stamp Set
Spring Flowers Clip Art Sheet
Silver Foil Bird

Pin It!


Mixed Media Patterned Paper abd Fabric Mini Album with Ruler Binding

Friday, January 30, 2015

Stamped Washi Tape + Mini Album


Hey everyone, Katie here! This is my last post as part of the Paper Wings team. I'll definitely miss you guys, but hopefully I'll be able to guest post sometime in the future!

Today I wanted to share with you this mini album I made. I wanted to embellish it with some scalloped washi tape I had (by Hazel and Ruby) but I decided the tapes were a bit plain and so I grabbed my stamps and embellished them!

I used the Earth and Sky Melange stamp set with stazon inks.


I also use the Funky Lowercase alphabet as well!


Thanks for the wonderful opportunity to design for Paper Wings Productions!

Wednesday, November 19, 2014

What's Up Wednesday: A Stamped Mini Album

*****TO JOIN THE NOVEMBER CHALLENGE CLICK HERE*****


Hey guys, Happy Wednesday! Katie here for today's What's up Wednesday post. The project I wanted to share with you guys today is a fun little mini album I put together!


I kept the front cover fairly simple, because I really wanted the stamped title to stand out. I used the Funky Alphabet to stamp out my title.

For my pages, I used both Sacred Geometry and Sacred Geometry 2 stamp sets and stamped the amazing geometric designs around just the edges of my card stock. I colored them with gelatos and then stitched my papers onto my pages.

This was a little time consuming, stamping around the edges of every page, front and back but worth it!

One my photos were glued on, I used the border stamp from the Tea Time set and stamped it along the edges.


Here's a peek at my pages- I'm sharing all of them on my blog, Punk Projects, if you want to take a look.


Thanks for stopping by today! If you haven't stopped by the blog in a while the rest of the PWP design team ladies have been posting some super inspiring things! You should definitely take the time to hop around and look at them!

Tuesday, October 21, 2014

Tutorial Tuesday- Stamped Thickers

Hey everyone, Katie here! It's Tutorial Tuesday so today I'm showing you how I stamped on the Thickers I used for the title of my camping mini album. I love camping so you'll always see a lot of camping scrapbook pages on my blog and I love finding new ways to embellish them.


I used the Writing cling stamp and Delicata gold ink by Imagine Crafts for this project. You want to use a background stamp for this technique.

1. Start by placing the thickers you want to use on a piece of plastic or something else that they will easily come back off of.
2. Ink up your stamp.
3. Place your stamp down over your thickers and just lightly press down. Be careful, you don't want to wiggle your stamp or the pattern will smear.
4. Lift your stamp straight off your thickers and let them dry.


It's a pretty easy technique, but a fun one! It adds a little extra embellishment to those fluffy letter stickers!
 

Thanks for reading! If you haven't stopped by the PWP blog lately, here are some of the amazing posts you should catch up on:
Kathleen shared some gorgeous Halloween Cards created with this month's nesting components kit.
Dana shared a spooky yet lovely Hodge Podge Mini Album.
and Agnieszka poster her beautiful mixed media layout as well as a card!

You can also join in on our October Challenge. Create a project using Orange or Black or the theme Halloween and share it with us before the end of the month for your chance to win a $20 Gift Certificate to the Paper Wings Productions Store!

Tuesday, September 23, 2014

Tutorial Tuesday-Mini Album

Hello everyone and welcome to another Tutorial Tuesday!  Erica here with you this week to bring you another one of my favorite mini albums to make!  A couple months ago I shared one way to create an accordion mini album using a sheet of 12x12 cardstock and you can see that full post HERE.  This month I want to share with you all how to create a similar mini using a plain old office file folder.
Here is a list of supplies you will need to create and decorate your mini album.


  • file folder
  • scoring board
  • scoring tool
  • wet adhesive
  • variety of pattern papers
  • matching embellishments
  • photos
Instead of listing all the directions with photos I thought I would do a video for you all instead this month.  I hope you can follow along and please leave any comments or questions for me down below and I will answer as soon as possible!


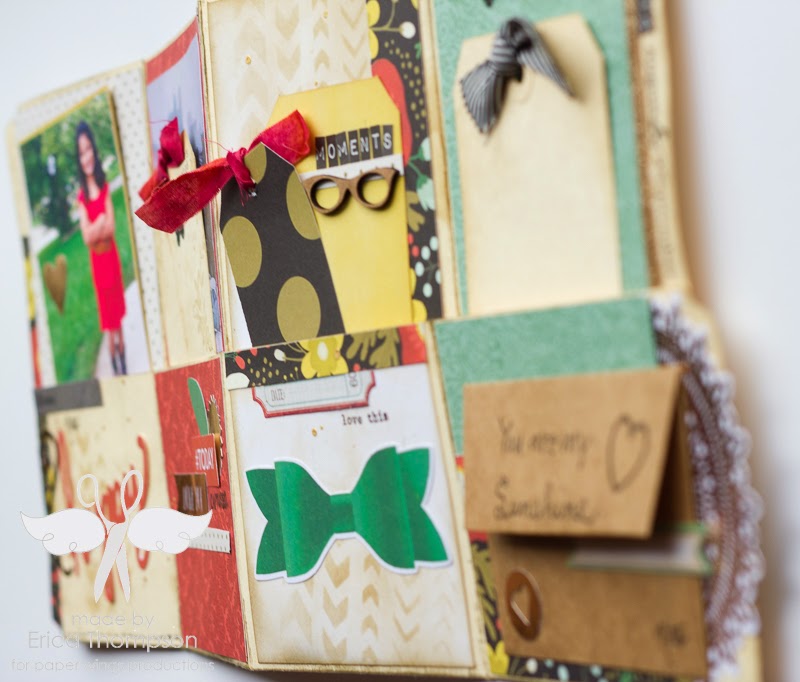
To dress up my mini album I used the September 2014 Nesting Components kit.  I am in love with this beautiful kit!  The paper collection and embellishments from My Minds Eye are gorgeous and Carrie has hand picked some amazing pieces that coordinate beautifully with these two products!  I also pulled out a handful of Paper Wings Productions stamps to add to my album as well including the brand new Say It stamp set!  Here are some photos of my completed mini album.


I love how this album has a ton of pockets that allow you to add more tags, photos and ephemera.  I also added one of the mini envelopes that came in this months Nesting Components kit to the inside of my mini that will house some journaling tags.  I hope you enjoyed my video and my mini album this month.  If you have not already purchased this months kit you can head on over to the Paper Wings Productions shop and get one today!  There are only a few kits left and I think this is my favorite kit so far so act fast!  If you give this mini album I try I would love to see your take on it so leave me the link below or enter it into this months challenge for your chance to win a gift certificate to the PWP shop!  Thanks so much for stopping today and remember to let your creativity take flight!

Friday, July 18, 2014

Featured Friday- Tea Album

*****To Join our July Challenge: Click Here*****

Hey guys, Katie here!For today's Featured Friday post I am featuring this cute mini book I made using the July Nesting Components kit! I am a total tea lover, so of course you can imagine how excited I was when I saw that this months kit was tea themed. 

I used the supplies from this kit combined with the new Tea Time stamps to create this mini book.


I really loved the little tea charms that came in the kit, so I attached those to the binding of my book using some twine I had (not included in the kit).

While you're here, you need to take a peek at Dana's amazing project using this kit! She uses the extra heavy gel medium from the kit to create a unique, mixed media background. Go check it out!

Thanks for stopping by! -Katie

Tuesday, July 8, 2014

Tutorial Tuesday-Accordion Mini Album

*****To Join our July Challenge: Click Here*****

Hey Paper Wings Fans!  Erica here with you today and before I get into my post I want to thank everyone who joined us this past weekend for our July Blog Hop!  We hope you enjoyed the hop and felt inspired!  
Congratulations to the winner of our July Blog Hop prize!  #27, Rhonda Van Ginkel.
Such a super fun and CHEERFUL hop! Loved all the designs in yellow from cards to décor and art journaling as well!!! Super hop with tons of inspiration!

Rhonda, please contact us at paperwingsproductions@hotmail.com for instructions on how to claim your prize.


For today's Tutorial Tuesday I want to share with you how to create a 4x6 accordion mini album out of one 12x12 piece of cardstock!

Let's get started shall we!  Start by cutting your 12x12 in half to create two 6x12 pieces.  


Next score each piece at 4" and 8 " and then fold on the score lines.  


Adhere the two pieces together and you now have your mini album base!  I always love to create extra pockets so I only add adhesive to the sides and the bottom.  Super quick and super simple!

Now it is time to add some fun to this album base so I pulled out my July 2014 Nesting Components kit, my box of Paper Wings Productions stamps and Jenni Bowlin inks!
I took my Tim Holtz scissors to distress the edges and then my Jenni Bowlin Brown Sugar ink to darken them.
I added a variety of Paper Wings stamps to the pages as well.  I know these will more than likely get covered up but just in case I have edges showing I do know what plain cardstock showing.

I used the 6x6 paper pad that came in the July Nestimg Components kit to cover my pages.  This paper is from Marion Smith Designs and it is beautiful!


I also created a couple more pockets to add to my pages by cutting down some pattern paper and using my 1 3/4" circle punch to cut out a half circle in the paper.  Then I adhered down to my page and added a Ranger Tag that was included in one of the past Nesting Components kits.


This paper collection comes with some great cut apart pieces that are great to add to mini albums and you can also add photos to the backs of them.  I cut them apart and distressed the edges and added them throughout my album.

To finish off my album I added some Hand Dyed Ribbon to my tags and some jute and then layered up some pieces onto my cover along with a beautiful ribbon rose!  The July 2014 kit also included some Marion Smith Junque&Gems that I added to my cover as well.


Thanks so much for stopping by today and I hope you enjoyed my accordion mini album!  I hope you will give this album a try and share with us on our Flickr gallery or Facebook page!  You can also tag on on Instagram!  Remember if you use embossing in you mini you can also link your project up to our July Challenge and also to the Creative Embellishments challenge!  Enjoy the rest of your day and remember to let your creativity take flight!
Related Posts Plugin for WordPress, Blogger...