Showing posts with label snapshot framer. Show all posts

Wednesday, April 18, 2018

Stamped Mail Art Envelopes for National Letter Writing Month


Stamped Mail Art Envelopes

Hi friends! Dana here today sharing a set of mail art envelopes that I stamped up for National Letter Writing Month. I have a thing for handwriting, so I really appreciate it when I receive a letter or card in the mail. I have a box full of handwritten letters and cards that I have saved over the years. This is all that I have left from some of my relatives. I thought it would be fun to celebrate National Letter Writing Month by sending some love through the mail in a pretty stamped envelope. The selection of stamps in the Paper Wings Productions Store is amazing, and you're sure to find a great design for any recipient. I chose some of my favorite stamp sets for this project.

Colofully Colored Stamped Fibonacci Sprial Mail Art Envelope

Whenever I get stuck with design, I like to go back to the basics. The Sacred Geometry 2 Clear Stamp Set has classic patterns that are super fun to work with. I chose the Fibonacci Spiral stamp for this envelope. I stamped up the left side of the envelope using black archival ink and then colored in the shapes with Distress Markers. I added a bit of decoration to the edge of the geometric design with the Lace Border Outline Clear Stamp.

Stamped Globe with White Clouds on Kraft Mail Art Envelope

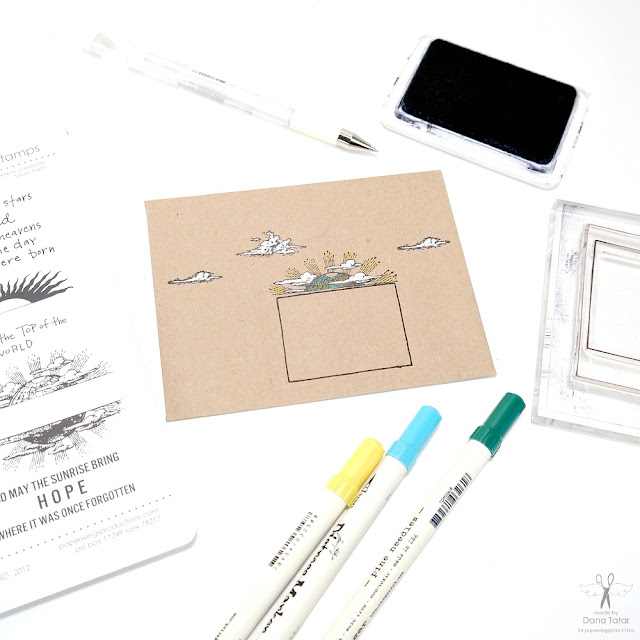
I wanted to use a kraft envelope specifically with a white gel pen. I just love how the white ink really pops off the paper for a 3D-like effect. I used the Earth and Sky Mélange Cling Stamp Set to decorate the top half of this envelope. I added an address box using the inner frame of the polaroid stamp from the Snapshot Framer Clear Stamp Set.

Colorful Stamped Bird Panel Mail Art Envelope

I had to use a stamp featuring something with wings for my last design. The Bird Panel Clear Stamp Set is so beautiful and is an easy way to add a pretty scene using just one stamp. I used the Snapshot Framer Clear Stamp Set again to add an address spot, but this time I used the larger outer frame. After inking up the entire stamp, I removed the ink from the smaller frame using a wet wipe, and then stamped only the larger frame onto the envelope.

Thanks for stopping by today! I hope I have inspired you to send a friend or loved one some happy mail this month.

Pin It!

Colorfully Colored and Stamped Mail Art Envelopes for National Letter Writing Month


Tuesday, July 8, 2014

Tutorial Tuesday-Accordion Mini Album

*****To Join our July Challenge: Click Here*****

Hey Paper Wings Fans!  Erica here with you today and before I get into my post I want to thank everyone who joined us this past weekend for our July Blog Hop!  We hope you enjoyed the hop and felt inspired!  
Congratulations to the winner of our July Blog Hop prize!  #27, Rhonda Van Ginkel.
Such a super fun and CHEERFUL hop! Loved all the designs in yellow from cards to décor and art journaling as well!!! Super hop with tons of inspiration!

Rhonda, please contact us at paperwingsproductions@hotmail.com for instructions on how to claim your prize.


For today's Tutorial Tuesday I want to share with you how to create a 4x6 accordion mini album out of one 12x12 piece of cardstock!

Let's get started shall we!  Start by cutting your 12x12 in half to create two 6x12 pieces.  


Next score each piece at 4" and 8 " and then fold on the score lines.  


Adhere the two pieces together and you now have your mini album base!  I always love to create extra pockets so I only add adhesive to the sides and the bottom.  Super quick and super simple!

Now it is time to add some fun to this album base so I pulled out my July 2014 Nesting Components kit, my box of Paper Wings Productions stamps and Jenni Bowlin inks!
I took my Tim Holtz scissors to distress the edges and then my Jenni Bowlin Brown Sugar ink to darken them.
I added a variety of Paper Wings stamps to the pages as well.  I know these will more than likely get covered up but just in case I have edges showing I do know what plain cardstock showing.

I used the 6x6 paper pad that came in the July Nestimg Components kit to cover my pages.  This paper is from Marion Smith Designs and it is beautiful!


I also created a couple more pockets to add to my pages by cutting down some pattern paper and using my 1 3/4" circle punch to cut out a half circle in the paper.  Then I adhered down to my page and added a Ranger Tag that was included in one of the past Nesting Components kits.


This paper collection comes with some great cut apart pieces that are great to add to mini albums and you can also add photos to the backs of them.  I cut them apart and distressed the edges and added them throughout my album.

To finish off my album I added some Hand Dyed Ribbon to my tags and some jute and then layered up some pieces onto my cover along with a beautiful ribbon rose!  The July 2014 kit also included some Marion Smith Junque&Gems that I added to my cover as well.


Thanks so much for stopping by today and I hope you enjoyed my accordion mini album!  I hope you will give this album a try and share with us on our Flickr gallery or Facebook page!  You can also tag on on Instagram!  Remember if you use embossing in you mini you can also link your project up to our July Challenge and also to the Creative Embellishments challenge!  Enjoy the rest of your day and remember to let your creativity take flight!

Saturday, June 28, 2014

Scapbook Saturday

              
*****To join our June Challenge: Chipboard and/or Wood Veneers, CLICK HERE*****


Hello everyone! It's Amber here with a 12 x12 layout for this weeks Scrapbook Saturday Post. I used some of my favorite patterned paper and PWP Stamps for this one.


Before I get to all my layout details I thought I would share a few blog/shop updates Carrie shared a few days ago just in case you missed them. We are having a sale on tons of great stamps and products this month. They are marked down 10%-50% off for a limited time only. You can check it all out HERE. Carrie also announced all the fabulous guest designers that would be joining us over the next couple of months. Check them out HERE and give them a warm Welcome. I think that's about it for all the updates so I will now share a little about my layout. I had lots of fun with this weeks layout! I pulled out a few sheets of patterned paper, some PWP stamps, three colorful ink pads, a few sticker and chipboard embellishments and went to work.


I started by using two different stamps from Paper Wings Productions Text Cling Stamp Set and some colorful CTMH Ink Pads to create my background. I stamped the larger text in a bright pink color and the smaller circle postage stamp is a soft gray.You can see my background stamping a little better in the two photos below.


I used lots of fun sticker/chipboard embellishments along with a small black paper clip to embellish my layout. I also used Paper Wings Productions Snapshot Framer Clear Stamp Set to add a few sentiments to my sticker labels.


Thanks for visiting! Don't forget we would love to see what you make with Paper Wings Productions Stamps so add your projects to our Flickr Group, to Pinterest, or leave a comment with a link to your project. You can also check out our Facebook Page and You Tube Page for daily inspiration.
Supplies: Cardstock- Gray / Patterned Paper-  Crate Paper's On Trend Collection / Paper Wings Productions Cling Stamp Set- Text / Paper Wings Productions Clear Stamp Set- SnapShot Framer / CTMH Ink Pads- Black, Watermelon, Flannel Gray / Chipboard Embellishments- Crate Paper's On Trend Collection /  Sulky Thread- Black / Sewing Machine


Wednesday, June 18, 2014

What's Up Wednesday

*****To join our June Challenge: Chipboard and/or Wood Veneers, CLICK HERE*****


Hi guys, Katie here for What's Up Wednesday!


Today I wanted to share with you these 2 cards I made using my *favorite* Paper Wings Productions stamp- the Play with your Coffee stamp. I did a post here back in January sharing some cards I made with this stamp, which you can see here.

For these 2 cards, I wanted to stick to a certain color scheme, so I found this one on pinterest. The cup of tea on it is perfect, right? I love the color scheme and I tried to use only those colors on my cards.
I used the borders from the Snapshot Framer stamp set to create a "surface" to stamp my cups onto to, almost like a table.


Thanks for stopping by! While you're here, take a minute to read some of the other posts by the design team and enter our current monthly challenge!


Monday, June 16, 2014

Mini Album-Sea Notes


Hello everyone! It's Amber here today sharing a fun little canvas mini album for this weeks Mixed Media Monday. A few months ago Dana shared this fabulous little Bird Canvas Mini Album and I just loved it. So I thought it would be fun to create one of my vary own with a few different stamp sets from the PWP Shop.


I started by taking the mini album apart and laying each page flat onto an old piece of cardboard. After I had all my pages laid out I took two different Close To My Heart Ink Refills and added a few drops to my spray bottle that had some water in it. I mixed the colors in the water bottle and then randomly sprayed each of my pages. After all my pages were completely dry I added my stamping and embellishments.


For the front page of my little mini album I used the little mermaid from the Sea Melange Cling Stamp Set and the Sunburst Pattern Clear Stamp Set for my background. After I had my images stamped I added a little label that I stamped with "Notes" from the Snapshot Framer Clear Stamp Set and attached it with some washi tape and a staple.


For the second page of my mini album I just stamped the wonderful quote "She stood in the storm and when the wind did not blow her away she adjusted her sails" from the Sea Melange Cling Stamp Set. It's a little hard to see but I also added some background stamping with the Scared Geometry Clear Stamp Set. 


For the third page of my mini album I stamped the ship in black and added some washi tape and a little heat embellishment.


For the forth page of my mini album I took this cute little frame from Elle's Studio Love You More Collection and added a little photo and journaling to it. I also added some background stamping to this page as well but its really hard to see in this photo.


For the fifth page of my mini album I stamped the quote "Hark, now hear the sailors cry. Smell the sea and feel the sky. Let your soul and spirit fly into the mystic." from the Sea Melange Cling Stamp Set.


For the last page of my min album I took a few of the little fish from the Sea Melange Cling Stamp Set and randomly stamped them across my page. The little air bubbles are from the Mermaid Clear Stamp Set, I thought it would be cute to make it look like they were under the sea. Thanks for joining me today and I hope you enjoyed my little mini album today!
Supplies: Classic Label Canvas Album- Maya Road / Paper Wings Productions Cling Stamp Set-  Sea Melange / Paper Wings Productions Clear Stamp Sets- Mermaid, Snapshot Framer, Sunburst Pattern, Sacred Geometry / CTMH Ink Pads- Black / CTMH Ink Refills- Ocean & Breeze / Embellishments & Photo Frame- Elle's Studio Love More Bits & Pieces Collection / Black Marker / Washi Tape / Staple Gun


Related Posts Plugin for WordPress, Blogger...