Showing posts with label Erica Thompson. Show all posts

Wednesday, December 17, 2014

What's Up Wednesday


Hello Paper Wings fans!  Erica here with you today for What's Up Wednesday!  

Well I will tell you what has been up here on the blog so far this month!  The designers have been sharing amazing projects using the fabulous Paper Wings Productions products!  You do not want to miss Dana's Grinch Home Decor post or Amanda's amazing Scrapbook Saturday post.  Her background using the tropical gelatos and texture paste is amazing!  Our December Nesting Components Kit has been a huge hit this month and we only have a few left in stock so make sure to pick yours up today here!


Today I have a 8.5 x 11 layout to share with you using a variety of product from the Paper Wings Productions shop and some of my past Nesting Components Kits!  The paper I am using for my layers came from the September Kit and it is from My Minds Eye.  My base is a white piece of cardstock and I also used some smaller pieces of white cardstock to build up more layers.  I added some background stamping and used stamps from the Art Textures stamp set.  

This is a must have stamp for everyone!  If there was one stamp set out of all my Paper Wings stamps this is the one that I find myself going for over and over again!  I also used the Say It Thanks stamp set and used the sentiment You Make Me Smile for my title.  

I stamped it out on some white cardstock and created a banner piece.  The stamped heart is also from Say It Thanks and it is the perfect little heart stamp!  Here is a look at my finished layout.
  
I added a strip of pattern paper at the top and bottom of my page to add another punch of yellow to go along with the color of my title.  A couple Tim Holtz rub ons from the one of my past Nesting Components Kits and my layout was complete!  I love how it turned out and I hope you enjoy it as well!  Our December challenge is still going on so I hope you will link up for your chance to win a gift certificate to the Paper Wings Productions shop!  Thank you so much for stopping by today!  I hope you enjoy the rest of your day and remember to let your creativity take flight!

Saturday, October 25, 2014

Scrapbook Saturday

Happy Saturday Paper Wings Productions fans!  Erica here to bring you this weeks Scrapbook Saturday post!
I am so excited to be bringing you a scrapbook layout today that I created using the September Mixed Media Kit!  I loved this kit and the 6x6 paper pad from My Minds Eye that was included is filled with beautiful paper!
I also used some of the fabulous stamp sets from the Paper Wings Productions shop and a gold gelato!  All the products I used today from Paper Wings Productions will be linked down below!  I started with a plain white piece of textured cardstock.  I took my gold gelato and ran it across on of my acylic blocks.  I used a paint brush and some water to create a nice gold watercolor and then used the Faber-Castell stipple brush to add some splashes of gold to my white cardstock.  I set this aside to dry and then began cutting squares from the 6x6 paper pad.  I cut them in 3" and 3.25" sizes so they were not all the same.  I also cut a few smaller pieces to use as layers.  Next I laid out all my squares and added embellishments from the My Minds Eye Market Street ephemera pack to the squares.  I then added my 3 photos and started to adhere things down.  Once things were down I pulled out my stamps and my Jenni Bowlin ink and added some stamping!  This layout came together quickly and was inspired by a layout that I recently saw on Pinterest!  I really love the look of grid style layouts and they have been very popular and one of my favorites designs right now!  Here is a look at my final layout!  I also pulled in a few enamel dots from my stash and a brad from a past PWP Mixed Media Kit.


Thanks so much for stopping today!  Please remember that our October challenge is still going on and you can link up to our challenge a total of 3 times!  Using PWP product is not required but will give you extra entries into our challenge!  Enjoy the rest of your day and remember to let your creativity take flight!

Thursday, October 9, 2014

Themed Thursday-Say It-Thanks

Hello Paperwings fans!  Erica here with you today with 3 cards featuring the new stamp set that was released in September Say It-Thanks!


I fell in love with this stamp as soon as I saw it and I knew I had to have it!  It was the perfect stamp to go along with the 6x6 paper pad that is included in the September mixed media kit!


The three cards I created included some kind of embossing. To start I ran my cardstock through my big shot to emboss the bottom half of my card with a wood grain embossing folder.  For the top I added the "thank you" sentiment and the beautiful floral accent and heat embossed in white!  I then tied a bow with this fabulous ribbon also included in the September kit.


 My next card uses 2 papers from the My Mind's Eye paper pad that is included in the September kit.  I die cut them with a tag die cut and added a sentiment and another floral accent to one of the cards.  I head embossed the sentiment in white and the accent in gold to create this pretty thank you card.


My last card also uses more paper from the My Mind's Eye paper pad and this fun sentiment from the Say It-Thanks stamp set.  I love the fun font with this sentiment and I think it can be used in so many ways!


I hope you enjoyed my cards to day featuring the Say It-Thanks stamp set.  This is one stamp set you will not want to pass up!  We all need to thank you cards and this set will help you create an amazing assortment of cards!  Thanks so much for stopping and spending some time with me today.  For more inspiration using the September kit checkout Carmen's Mixed Media Monday post HERE.   Enjoy your day and remember to let your creativity take flight!

Tuesday, September 23, 2014

Tutorial Tuesday-Mini Album

Hello everyone and welcome to another Tutorial Tuesday!  Erica here with you this week to bring you another one of my favorite mini albums to make!  A couple months ago I shared one way to create an accordion mini album using a sheet of 12x12 cardstock and you can see that full post HERE.  This month I want to share with you all how to create a similar mini using a plain old office file folder.
Here is a list of supplies you will need to create and decorate your mini album.


  • file folder
  • scoring board
  • scoring tool
  • wet adhesive
  • variety of pattern papers
  • matching embellishments
  • photos
Instead of listing all the directions with photos I thought I would do a video for you all instead this month.  I hope you can follow along and please leave any comments or questions for me down below and I will answer as soon as possible!


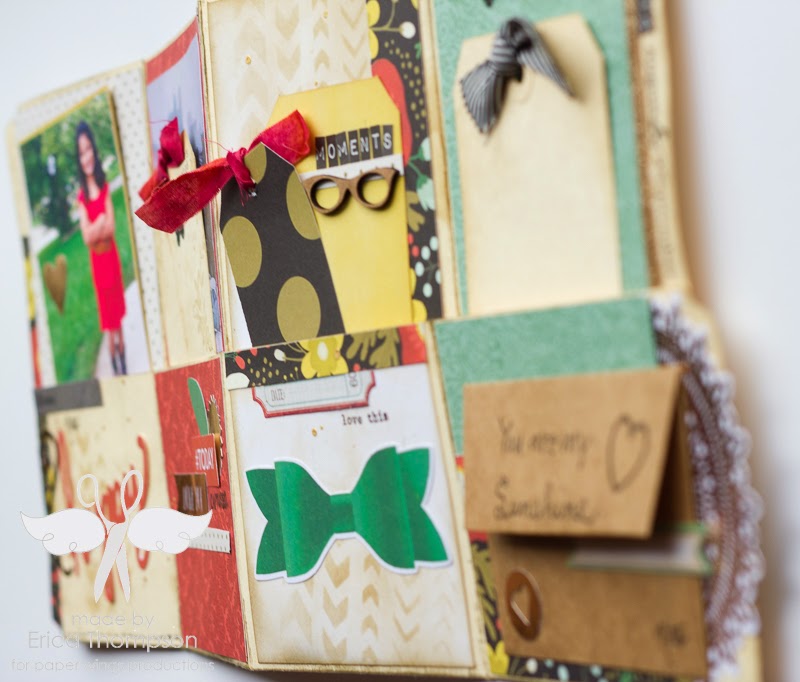
To dress up my mini album I used the September 2014 Nesting Components kit.  I am in love with this beautiful kit!  The paper collection and embellishments from My Minds Eye are gorgeous and Carrie has hand picked some amazing pieces that coordinate beautifully with these two products!  I also pulled out a handful of Paper Wings Productions stamps to add to my album as well including the brand new Say It stamp set!  Here are some photos of my completed mini album.


I love how this album has a ton of pockets that allow you to add more tags, photos and ephemera.  I also added one of the mini envelopes that came in this months Nesting Components kit to the inside of my mini that will house some journaling tags.  I hope you enjoyed my video and my mini album this month.  If you have not already purchased this months kit you can head on over to the Paper Wings Productions shop and get one today!  There are only a few kits left and I think this is my favorite kit so far so act fast!  If you give this mini album I try I would love to see your take on it so leave me the link below or enter it into this months challenge for your chance to win a gift certificate to the PWP shop!  Thanks so much for stopping today and remember to let your creativity take flight!

Tuesday, September 2, 2014

Tutorial Tuesday-Alcohol Inks


Hello Paper Wings Productions fans!  Erica here with you today to bring you a fun tutorial using alcohol inks.  Now I hit the jack pot about 2 years ago and found someone selling a huge lot of alcohol inks and accessories!  To be honest they have been sitting untouched for a very long time until last night!  I had so much fun getting my hands dirty and creating some fun backgrounds for my cards!  I can not wait to try some more techniques with these inks so stay tuned for more alcohol ink post from me!

Now lets get started shall we!  Here is a list of materials you will need.


  • various colored alcohol inks
  • glossy cardstock
  • alcohol blending solution
  • Ranger blending tool with a felt pad
  • paper trimmer
  • Paper Wings Productions stamps
  • craft mat
I started by trimming down my 8.5 x 11 glossy card stock to 5.5 and then again at 4.25.  This game me 4 pieces of glossy card stock to work with.  


I pulled out a variety of alcohol inks to create two different color palettes.  

I applied one to two drops of alcohol ink onto my felt pad and just an FYI a little bit goes a long way!

Next I took the blending tool and began to stamp it down onto my glossy cardstock making sure to cover up most of the cardstock but also leaving a little bit of white showing through.

Once my cardstock was covered I added a little bit of the Adirondack Alcohol Blending Solution to my felt blending tool and then again stamped it down onto my glossy cardstock to help the colors blend together.


The finished background looks amazing and I just love how the colors blend together!  This technique can be used on any non-porous surface and I hope you will give it a try!  Once my backgrounds were complete I trimmed them each down to 5.25 x 4.  I pulled out a few of my favorite sentiment stamps from Paper Wings Productions and stamped them onto some vellum cardstock with VersaMark ink.  Next I  heat embossed them in white embossing powder and adhered them to my background panels.  The stamp sets I used were Thankful, Celebrate, and Happy and I just love the beautiful font of these stamp sets.  Here is a look at my completed cards using this alcohol ink technique.


I hope you enjoyed my tutorial today and I would love for you to give it a try and share with us on Facebook, Instagram or in our Flickr Gallery!  We love to see what our fans our creating so make sure to tag Paper Wings Productions!  The September mixed media kit was released yesterday and you are going to love this months kit!  I am extremly excited about this months kit and I can not wait to start creating with it!  To purchase a kit or to see the kit contents click here!  We also released two new stamp sets that you are going to love!
Say It - Thanks

Sacred Geometry 2
You can pick these great stamp sets up in the Paper Wings Productions shop HERE.  Our September challenge kicks off this week and you do not want to miss the blog hop happening this Friday!  Thanks so much for stopping today!  Enjoy your day and remember to let your creativity take flight.

Friday, August 15, 2014

Feature Friday-Sayings and Sentiments

*****To join our August Anything Goes Challenge Click Here*****


Happy Friday Paper Wings fans!!  Erica here with you today to bring you this week Feature Friday post and this week I am featuring the fabulous stamp set Saying and Sentiments!


The Sayings and Sentiments stamp is is available in the Paper Wings Productions shop and includes 12 red rubber stamps!


I created 3 cards for you today showcasing a few different sentiments from this stamp set.  The August 2014 Nesting Components Kit came with a handful of card bases so I pulled 3 of them out along with some of the papers I had left from the July Nesting Components kit.  I also used some ribbon from my stash along with some circle punches and dies to create my cards.  My first card is very simple but I still love how it turned out.  I punched out a circle in the lower right corner and then stamped the sentiment inside the circle.  I added a scallop frame to the circle and also added some ribbon to complete this card.


For my next card I decided to add some texture to the card base using an embossing folder.  Once it was embossed I punched out some circles using my circle punch and a few different pattern papers from the July kit.   I adhered the circles all over my card letting some go off the edges.  I cut off the excess with my scissors and then added my sentiment.


My last card uses the last piece of 6x6 paper from the July kit and a few strips of pattern paper.  I covered the card base with this beautiful paper and distressed the card base edges with some Tim Holtz Vintage Photo Distress Ink.  I die cut a stitched circle and then punched a 2 more circle to layer on top.  I stamped out the thanks sentiment onto the cream cardstock and also sponged some distress ink around the edges.  To finish this card off I added some seam binding and some May Arts twine.


Thank you so much for joining us today!  I hope you enjoyed my cards using the stamp set Sayings and Sentiments!  This is one of my favorite sentiments stamps from the Paper Wings Productions shop!  To purchase your own set click here!  We also have a couple August and July Nesting Components kit for purchase!  You can find them HERE in the Paper Wings Productions shop.  We would love to see what you are creating with the Paper Wings Productions products!  Link up to our August Anything Goes challenge, post your projects to our Facebook page or our Flickr Gallery and always remember to let your creativity take flight!
Related Posts Plugin for WordPress, Blogger...