Showing posts with label April Mixed Media Kit. Show all posts

Saturday, August 10, 2013

Toujours Paris!

I just love the vintage image sheets they carry at Paper Wings Productions. I decided to do a vintage Parisian themed layout using the gorgeous April in Paris Clip Art Sheet. I had a lot of fun arranging the gorgeous Parisian images into a collage. I love that my paper has a hot air balloon on it tying in with the vintage image!!


I added the title "Toujours Paris" using the Perfect Alphabet Clear Stamp Set  For the background of the layout I used the Royal Melange Cling Stamp Set repeating the fleur de lys and script stamps throughout the background using Walnut Stain Distress Ink. I used the dots mask from the April Nesting Components Kit as well as the gorgeous velvet ribbon and some die cuts from Pink Paislee Cottage Farms from the May Nesting Components Kit.


These kits come in very limited supply, there is only one left of each of them and after that they are gone, so grab them while you can! I love the fact that there is always a stamp set, and image sheet, some sort of art medium or tool and great embellishments, you shouldn't miss them, I always make a point to buy mine early before they run out!!!!


I got out the sewing machine and did a black stitched frame around the central collage to add some texture and interest.To finish off the layout, from my own stash I added the flowers and the chipboard Eiffel Tower and the tags.


Monday, July 1, 2013

Mixed Media Monday - Mystic Assemblage Piece with Dana

Hi PWP fans! Dana here today sharing a fun assemblage piece I created with the July Nesting Components Mixed Media Kit. If you love the sand, sun and surf, you're going to want to pick up this kit! I feel home when I'm on the beach, and that was my inspiration for my project.


My favorite items in this kit are the metallic accents from the Pink Paislee Luxe Circles and Rub-Ons and the Lindy's Stamp Gang Madonna Robe Blue Gold Two-Toned Embossing Powder.


Like all 
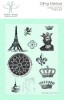
Nesting Components Mixed Media Kits, a fabulous Paper Wings Products Stamp Set is part of the kit! The Seaside Cling Stamp Set is beach themed and features a gorgeous script quote. I used a portion of that stamp on my piece.


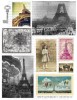
I created my own embellishments with glass beads and images from the clip art sheet. I built up layers of circle elements with the Pink Paislee Luxe Circles and gold circle rub-ons from the Pink Pailsee Luxe Rub-On Set. I also used the Studio Calico Huey's Circles Mask and Prima Glitter Gems from previous kits.


I mixed up my own mist using a Gelato and the Misting Bottle from the Faber-Castell Essential Tool Kit from the kit.

One of my favorite features of the PWP Kits is how well they all work together. I started this project with a piece of cardboard packaging and leftover supplies from my April, May and June Mixed Media Kits.


I was thrilled to find a Faber-Castell Essential Tool Kit in the July Kit! These tools came in handy for this project in a big way! I primed my cardboard with a light coat of Gesso, which I had leftover from the April Kit. I then added circles using the Mr. Huey's Mask and some cloud rub-ons, leftovers from the April Kit, and a piece of torn patterned paper from the Pink Paislee Hope Chest collection, from the June Kit, for a pop of color.


I used the foam wedge from the tool kit to apply VersaMark ink to random places around the edge of the cardboard and then sprinkled the Lindy's Embossing Powder from the kit over the ink. Applying heat to the powder reveals the fantastic two-toned finish! To create the mist, I cut a small portion from the Gelato and used a palette knife to blend the Gelato with warm water until I had a smooth mixture, which I then transferred to the misting bottle from the tool kit.


I used the Background Writings Cling Stamp Set and the Memento ink from the June Kit to add script to several areas on my background.


I added color to the canvas bird from the May Kit with a Gelato and the water brush from the tool kit. Once that was dry I added a layer of Stickles, which was leftover from the April Kit. I created some fun embellishments with clip art images and glass beads. I simply applied a small amount of Glossy Accents over the clip art images, pressed the glass beads over the images, and once dry, trimmed the excess paper from each bead.


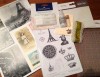
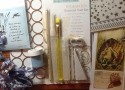
My favorite part of every project is adding the embellishments and finishing touches! Everything shown to the left of my cardboard piece are items from the July Kit. Supplies from past kits and my personal stash are to the right of my cardboard piece. I added supplies from both piles to finish my piece.


Thanks so much for stopping by today! You can pick up the July Kit, as well as the previous kits that I used for this project, from the Paper Wings Productions Store while supplies last! Be sure to visit us again this week for Amber's What's Up Wednesday post and join the PWP Team on Friday for our monthly Blog Hop!


Monday, May 6, 2013

Mixed Media Monday - Mother's Day Tag

Happy Monday! Dana here today sharing a tag that I created with bits and pieces from the March and April Mixed Media Kits. Before I share my tag, I want to mention that the Paper Wings Productions Design Team is currently having their May Blog Hop! If you could use an extra dose of mojo this morning and you want the chance to win a gift certificate to the Paper Wings Productions Store, scroll down to click through the blog hop and let your creativity take flight!


With Mother's Day coming at the end of the week, I thought I would make a pretty tag that is perfect for adding to a special gift.


I started this tag with the gorgeous piece of Blue Fern Studios Blooming Foliage chipboard and its beautiful packaging from the March Mixed Media Kit. I loved the pale shade of blue and the subtle fleur-de-lis pattern. I highlighted the design by embossing several white fleurs-de-lis with the fleur-de-lis stamp from the Royal Melange Cling Stamp Set from the April Mixed Media Kit.


I altered the chipboard by first adding a coat of gesso. I added the text with the Writing Cling Stamp from the Background Writings Cling Stamp Set. I colored the chipboard with Distress Ink and added glitter to select areas with Star Dust Stickles. I added glaze to the birds, which I cut from the clip art sheet from the March Kit, for some dimensional shine. Note: The April Mixed Media Kit contains a package of Textural Accents by Faber-Castell that contains gesso, gel medium and glaze and a bottle of Star Dust Stickles!


This glass vial comes in the April Mixed Media Kit. I thought it would be fun to add a secret message to this tag. I tied a piece of twine around the cork stopper of the vial, then attached it to my tag with a mini clothespin.


I'm terrible at keeping secrets so I'll share the message! I took this sentiment from a portion of a stamp from the Door Clear Stamp Set and stamped it onto a paper strip cut from a vintage book page. I just love the look and color of old paper.


I finished the tag with a sentiment from the Handmade Clear Stamp Set.

Thanks for stopping by today! I hope I have convinced you to purchase a March and/or April Mixed Media Kit! Both are available in the Paper Wings Productions Store while supplies last. Either kit would make a great Mother's Day present!


Monday, April 22, 2013

Altered Train Case - April In Paris Mixed Media Kit

Happy Monday Everyone!  Did you have a great weekend?  Well I hope you did!  Today is one of my very favorite days, Mixed Media Monday!!


I've been so excited about each and every kit that Carrie has put together and this month's kit is no exception.  These kits offer such a gorgeous assortment of items and I just loved what Dana did with it last week.  If you missed her post, you can check it out HERE.  Today I'm sharing my spin  on this gorgeous kit!


I've had this vintage case that I picked up at a local antiques mall for awhile now.  I knew that I wanted to refinish it but really had no idea how, until I saw April's Mixed Media kit.


This is what it looked like before.  I peeled off the alligator paper and sanded the box down.


Next I applied a layer of gesso and then a layer of fluid acrylic paint.


Once the paint was dry, I just went to town stamping.  I literally used every single stamp in the Royal Melange stamp set included in the kit.  After I was done stamping, I gave the case a light white wash with the Tim Holtz Distress Stain from the March Mixed Media kit.


To create this collage, I used a combination of items from the March and April Mixed Media Kits. I used a library card and some book text from the March kit, images from the April kit and the Faber Castell gel medium to adhere them to the case.  I created additional texture with the Mr. Huey stencil and molding paste.


I combined the key trim from the March kit with the beautiful May Arts ribbon in the April kit.  To create the king charm, I added a layer of book text from the March kit to an unfinished wood charm and stamped the king.  Then I applied a layer of the Faber Castell glaze for some shine.  To alter the crown charm included in the April kit, I painted it with the Faber Castell gesso then applied a layer of fluid acrylic in Raw Umber, rubbing the excess off of the raised parts.  The rest of the beads are from my stash.


To finish off the case I rubbed a little of the Raw Umber fluid acrylic to all of the edges.


All of the sides received the same treatments as the front.


This beautiful kit made altering this vintage case so easy and it blended so well with March kit.  To get a closer look at the April kit, please visit the PWP Online Store and I think you might still be able to pick up the March Mixed Media kit too (but don't quote me on that).  


Well I hope Dana and I have inspired you to get creative with these gorgeous Mixed Media kits!  Feel free to share pics of your PWP projects with us on Facebook, we'd love to see what you're creating!!  Have a Wonderful week and THANKS for joining me today!!


Related Posts Plugin for WordPress, Blogger...