Showing posts with label Glimmer Mist. Show all posts
Wednesday, January 28, 2015
Altered Art Journal
Hi! Dana here today sharing a journal that I altered for a friend who just gave birth to her first child, a sweet baby girl. I was asked to put together a book by her mother, something that was colorful, a bit non-traditional and totally unique, that this new mother could use to document the special moments that she shares with her child.
I had a blast creating this project with a little help from Carrie, owner of Paper Wings Productions. If you've been following Paper Wings for a while you know that in addition to running Paper Wings, Carrie also teaches classes, many of which include book binding techniques. (If you live in the San Antonio, Texas area you should definitely try to catch one!) Carrie created this 5x7 journal for me. You can find more of her journals in her Etsy Shop from time to time.
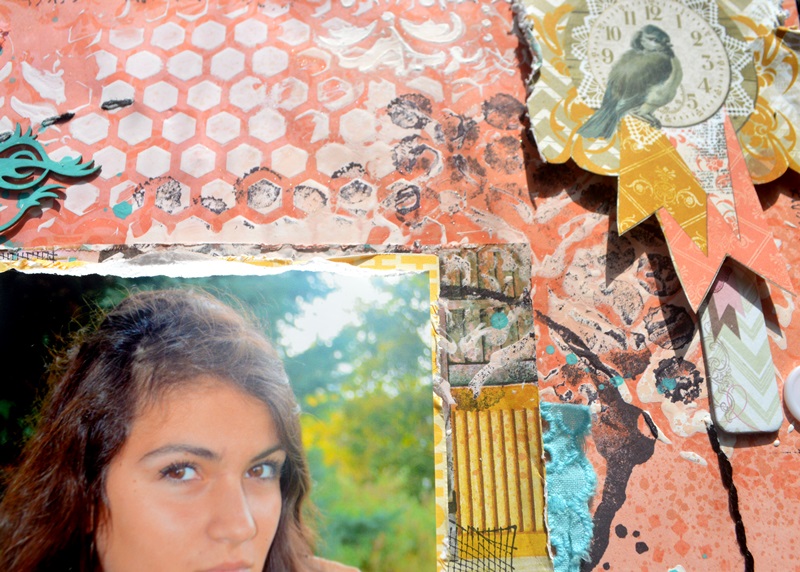
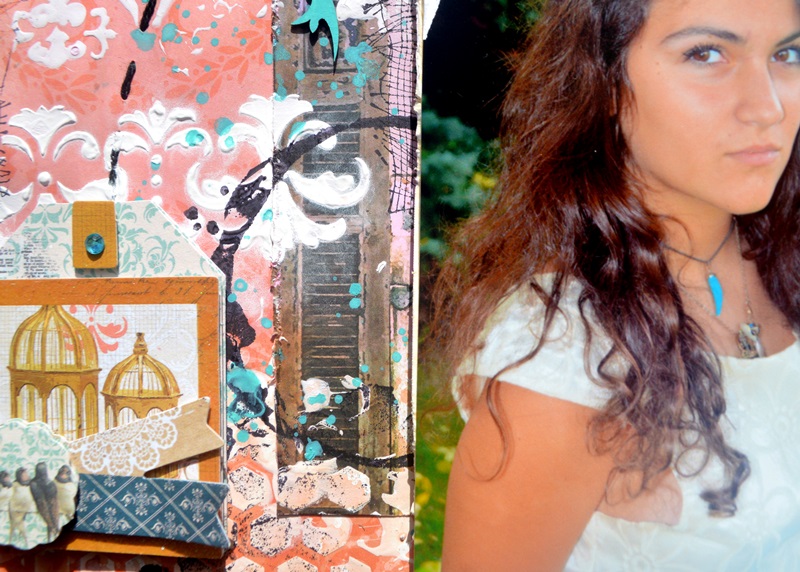
The pages of this journal are made from beautiful thick watercolor paper. I wanted to leave room for journaling, so I used mist, washi tape, stencils and my favorite Paper Wings Productions stamps to add color and patterns to the edges of each page.
I used my favorite Perfect Alphabet Stamp Set on the first and last page of the album to start a letter that the new mother can write to her daughter, one letter at the begging of the book and one letter at the end.
I'm so happy with how this journal turned out!
Thanks so much for stopping by today! I hope I have inspired you!
Paper Wings Productions Supplies:
Perfect Alphabet Stamp Set
Text Melange Cling Stamp Set
Fringe Lace Clear Stamp
Circle Background Cling Stamp
Writing Backgrounds Cling Stamp Set
Art Textures Cling Stamp Set
Leaf Border Clear Stamp Set
Double Dot Border Clear Stamp Set
Scallop Border Clear Stamp Set
Single Dot Border Clear Stamp Set
Indian Blanket Cling Stamp Set
Bird Panel Clear Stamp Set
Earth & Sky Melange Stamp Set
Under The Sea Cling Stamp Set
With Some Sparkle Cling Stamp Set
Domino Printed Washi Tape
Uniball Pen White
Tattered Angels Hummingbird Paint System
Monday, October 13, 2014
Moments by Agnieszka Bellaidea
Hi!
My name is Agnieszka Bellaidea and I have a pleasure to GD today here.
I was very happy to be able to create with such a beautiful set of stamps and I made two projects for today.
I like to create scrapbook pages and canvases the most buy of course I also have fun with cards, tags and OTP projects.
I design for several producers from USA, Canada, Poland, I like to mix romantic style with shabby touch and I am addicted to Mixed Media. I also teach classes.
My first project, a scrapbook page was created using Bo Bunny papers and for stamping I used one of my favorites . Do you know this one?
Big Textures Cling Stamp Set can be used for layouts, cards, journaling, canvas.
Royal Melange Cling Stamp Set is the one and only stamp used here but with a embossing powder in Magenta color makes a striking statement.
I can only hope you liked my project, next time I will show you another scrapbook page with different stamps!
Have a great day!
Thank you for looking
Agnieszka Bellaidea
Thursday, September 19, 2013
Themed Thursday:Little Halloween
Hello PWP fans! Erica here today to share with you a themed post inspired by Amber's recent Feature Friday post that you have to check out HERE! She used one of my favorite Halloween stamp sets from the PWP SHOP called Little Halloween but there is nothing little about the amount of mileage you will get out of this stamp set! With 8 different sentiments and great images to go along with them this stamp set is a must have!
I created three different Halloween projects to share with you today using the Little Halloween Clear Stamp Set! I had so much fun coloring these images and created with this set I had a hard time stopping!
For my first project I used a small white glassine bag and stamped all the sentiments in black all over the bag for a quick and easy background! I then took some white cardstock and applied some Distress ink in Black Soot with my ink blending tool until the white was completely covered. I made sure to keep it pretty light but did add a few darker spots while I was blending the ink. I then stamped the bat image covering the whole piece of cardstock and then fussy cut them out and saved the left over bats for another project! I punched out some circles and one scallop circle with my punches, layered them together and then added the bats and a great Happy Halloween sentiment from the stamp set. I also added some orange tulle behind my piece to give it a little something extra! I added a small tag to the inside of my bag to go along with some sweet treats! I added ribbons, tulle and bakers twine to the tag and adhered one of the pumpkin images from the stamp set.
Next up I have a very simple Halloween card I created with the Little Halloween stamp set and some pattern papers form my stash! I stamped out a handful of the Jack-O-Lanterns on some white cardstock and colored them in with my markers and cut them out and saved the extras for later. I layered up some of the papers on my card base, added some twine and some enamel dots. I then took a strip of black cardstock and punched out 3 scallop circles to create windows. I positioned my window strip on my card where I wanted it to go and then stamped out the Trick or Treat sentiment in the center window. After the image was stamped I added foam squares to the back of the black strip of paper and adhered to my card then I slipped in the Jack-O-Lanterns at the top and the bottom windows. Easy Peasy!
If you joined us for our Autumn Blog Hop you will know that I created an Autumn tag to add to my journal. ( If you missed the hop please check it out HERE!) Well Halloween is fast approaching so I will need a Halloween tag to add to my journal as well. I colored my tag with some Distress Ink and Tattered Angels Glimmer Mist. We currently have some Glimmer Mist in the PWP Shop on sale HERE! I used a couple of the Chipboard Nesting Circles for my tag and colored them with my Black Soot Distress Ink. I adhered them to my tag adding foam squared to the back of the larger on so that it popped of the tag. I added a piece of cardstock to the center of the smaller chipboard and stamped out some of the Halloween sentiments for an easy background. I took one of the Jack-O-Lanterns I cut out earlier and popped him up with foam squares and added him to the chipboard piece. I also stamped out the super cute candy corn image from the stamp set and made a border strip to add to my tag.
Thank you so much for joining me today and if you are in need of some new fresh Halloween stamps make sure you check out the Paper Wings Productions Shop!
We would love to see what you have been creating with the Paper Wings Productions products! Add your projects to our FACEBOOK, PINTEREST, FLICKR GROUP or tag us on Instagram @paperwingsproductions!
Monday, February 18, 2013
Mixed Media Monday - Sun and Stars
Hi All! Tara C. here with another Mixed Media Monday post. I love mixed media - it means I get to pull out paint and sprays and do a lot more of the 'messy' stuff that I don't do normally on my cards. For today's project I incorporated all of the above into a cool and masculine birthday tag!
I started with a kraft tag cut with my Cricut and then started in with the fun stuff. I first sprayed the right hand side of the tag with Tattered Angel Glimmer Mist in Creme de Chocolat for a bit of dimension and then added some fun stamps in acrylic paints. The focal point is the blazing sun image at the top and bottom of the tag from the 'Earth and Sky' cling set and then I added my favorite polka dots, some sets of lines and triple stamped happy birthday.
I added a gift card holder on the front along with a sweet but not too mushy sentiment. Painted, glittered and sprayed stars along with a few metal studs accent the rest of the tag. Fun to make, more fun to give!
One of my favorite mixed media projects is to stamp on ribbon. This is ivory twill that has been stamped with the double dot border in Staz-On ink. Love it! You can use other dye inks, like Memento, for a softer, fuzzier look. Staz-On or other solvent inks go on darker and more permanently.
There you have it - a bold, vibrant tag for those special men in your life! thanks so much for stopping by and be sure to visit again this week for more beautiful inspiration from my fellow design team members.
Subscribe to:
Posts (Atom)


