Wednesday, August 15, 2012

What's Up Wednesday: Masterboard

Hello there peeps!

This week I wanted to explore a way to use your Paper Wings Productions stamps in a fun and easy way to create your own patterned paper (masterboard).

Using some black Memento ink I picked out the Bird Melange, Flower Power and Bird Lyrics stamp sets and then stamped them randomly on a piece of white cardstock.  Another fun thing would be using different color inks or stamping onto an already patterned paper.


After that I used some Dylusions sprays in yellow, orange, and pink to add bold bright color.  I should mention that the ink I used does react to water so if you don't like your ink to bleed, choose a permanent ink like Archival ink by Ranger.  You could also use paints (especially watercolors), inks, shimmery sprays/mists, markers and the like to add color.


Now I have a custom piece of cardstock that I can do anything with.  If you really love your masterboard you can scan it in or copy it and save the original and use copies made on cardstock to make work out of.

I pulled out some dies and punches and a couple more stamp sets:  Wings and Sayings & Sentiments to create 3 simple cards.


1. Cut out butterfly from your masterboard using die.  Outline butterfly with black marker.
2. On a white card base stamp butterfly wings from Wings in black once and twice more without reinking.
3. Add a piece of twine under die cut butterfly.  Adhere die cut butterfly over middle wings.
4. Stamp Be Happy once in black and then two more times without reinking.  Add little touches of embellishments to background.  I used some leftovers sitting on my table from another project.  Sequins, confetti, punches, wood veneer, brads and the like would also be fun.


1. Punch out butterfly trim from masterboard.
2. Adhere butterfly trim to white card base.  Add the leftover strips from the punch on the bottom and top of butterfly trim.
3. Stamp wings (I stamped off the wings before stamping onto the card).  Over wings stamp Thinking of You.


1. Cut out a piece from the masterboard to cover the full front of card (4.25 x 5.5 inches).  Attach to white card base.
2. Wrap baker's twine around top of card.  Adhere black button.  Add strip of washi tape.
3. Round bottom corners of card.

You could make a whole set of cards to give as a gift or just to have on hand when the need arises.

I hope you will try making your own masterboard and cut, punch, die cut it to make different pieces of art!

Take flight,
Shay.


Supplies:
Stamps: Bird Melange, Flower Power, Bird Lyrics, Wings and Sayings & Sentiments
Ink: Memento ink in tuxedo black, Tsukineko
Cardstock: Georgia Pacific
Other: Dylusions sprays, Ranger; butterfly die, Tim Holtz/Sizzix; punches, Martha Stewart Crafts; button, Papertrey Ink; baker's twine, Divine Twine by Whisker Graphics; washi tape; pen, American Crafts; Corner Chomper, We R Memory Keepers


Monday, August 13, 2012

Mixed Media Monday 8/13


Hey there peeps,

Today, I am going to share with you a project we did earlier this month at Stamp Antonio, stamping on dominos.  We made two different kinds of books in the class, an accordion and a coptic stitch book.  Besides making books, dominos can be made into all kinds of jewelry.  Do you use dominos in your art?  Try it and let us know what you think!


Dominos have always been one of my favorite surfaces to stamp on.  Add to that my fierce love of bookbinding and I found myself looking at ways to turn dominos into book covers.  With a little imagination, there are countless ways to turn a domino into a book.  

I have found that in most cases you want to stamp and embellish the dominos before turning them into a book.  You can use any of your favorite stamps on the domino, you may even look at the stamps you have a little differently.  The image does not need to be the same size as the domino.  You can use bits and pieces of a design.  Once you choose and image, you will want to stamp it with Staz-On ink. I have seen tons of different ways and ideas on how to stamp on dominos.  This way is my own personal favorite.  I’ve done it this way for about 10 years, so I can say that the color holds over time.

1.   Stamp your domino with Staz-On and allow to dry. 
2.   Color with water based markers (Tombow, LePlume, Tim Holtz Distress Markers).  Yes, I said water based markers.  You can layer colors for a more vibrant appearance.  You can also blend colors nicely with the use of a light shade.  The color will not be set (read will smear and can be removed!) until it has been sealed.
3.   Seal with a spray sealer.  My favorite is Workable Fixtif from Krylon.  You MUST use a sealer that is made to seal water based media!  Read labels!  I found that sprays meant for clayboard also work well.  You can use this in between layers of color if you need to.  This spray does not leave a finish (matte or gloss).  Allow to dry.


Now you have all kinds of choices as to what to do with your domino.  Books covers, jewelry, embellishments...the possibilities are unlimited.

I will leave you with one more sample.  This one, the talented Robin Nowak did using our stamps.  Gorgeous!


Enjoy the flight!
Carrie

Friday, August 10, 2012

Feature Friday


Hey there peeps!

Today, I thought I would share some of the places you can find Paper Wings Productions on the web.

Pinterest:
Paper Wings Productions has it's own Pinterest board.  If you are a member, follow us!  If you need an invitation to join, shoot us an email!  On Pinterest you will find some great ideas and sample cards using our stamps.


Etsy:
We want you to use our stamps!  You are welcome to use our stamps on merchandise you sell.  If you can figure out a way to give us credit for our designs, we would really appreciate it.  The only no-no is that we do not allow mechanical reproduction of our images.  We would love to support any artists out there who use our stuff.  If you make stuff for resale, we hope you will share a link to your work.  Our good friend, Collected Mess has a great Etsy store.  She occasionally uses our stamps in her work.  Check out these adorable little books that are so simple!  


Facebook:
I'm sure most of you already know, but we have a Facebook page.  Our Facebook page will let you know when we have new blog posts and any upcoming events.  If you're on Facebook, we hope you'll stop by and "Like" us.


Where ever you are on the web, we hope you'll stop in and visit us.  As a new company we value your support.  Share us with your friends, like us on your personal pages, and share our sites with your friends.  Again, if you use our stuff we hope you'll share your site with us.

New holiday stamps are in production and our new release will be available next month.  Besides that, we are revamping our website making it more powerful and user friendly.  We will also be having several guest appearances here on the blog.  Lots of good stuff coming up!  We hope you will keep checking back with us to see the latest and greatest.  

Enjoy the flight!
Carrie

Wednesday, August 8, 2012

What's Up Wednesday - Background Fun!


Hello Peeps!

Today I'm sharing a card using one of our new background stamps.  I wanted to try something different with the damask pattern Backgrounds stamp, and I love circles.  Using some Versamark ink, I stamped the pattern several times on raspberry colored paper, and embossed the pattern in white.  Then, I punched 12 circles and added them to the background of the card.


This pattern feels French to me, so why not pair it with the Eiffel Tower from the Paris set.  I used markers to color in the image, and added it to the card with foam dots.  The 'merci beaucoup' is also in this set, and I wanted to make sure it would stand out against the background.  I picked out the curved ribbon from the Banner set and stamped it on the same raspberry paper.  Since the sentiment is from a clear set, it can be curved a little, and when placed on the acrylic block, it will hold its shape. With a little more foam tape, this card is complete.


Try this background technique with a variety of stamps, such as the small flowers from the Flower Power set, or handwritten text like our Script stamp or Background Melange, any of the new Borders sets, and even flourishes from Flourish Fun 1 and Flourish Fun 2. 

We would love to see what you create using our stamps.  Please share your creations with us by leaving a comment and linking to your image, or you can upload it to our Flickr gallery, or even on our Facebook page.


I hope these ideas inspire your creativity!
Take Flight,

Julie


Stamps: Backgrounds, Paris and Banner
Ink: Versamark and Memento Tuxedo Black by Tsukineko
Cardstock: Neenah Solar White and raspberry pink color from my stash
Tools: Circle punch (Stampin' Up!), foam tape, Distress Makers (Ranger)
Embellishments:  Embossing Powder in Whisper White (SU!)


Monday, August 6, 2012

Mixed Media Monday: Resist with Sprays


Good Monday peeps!

I find using mists and sprays to be a whole lot of fun.  I recently bought some of the Dylusions Ink Sprays by Ranger and have been delighting in their intense colors and reactivity to water ever since.

Using just a few supplies you can make a mini book cover, small piece of art, card, or art journaling page.


1. Heat emboss big bold flower from Flower Power in white onto a piece of cardstock.

2. Spray Dylusions spray in yellow and orange.  Pat off excess moisture with paper towel.

3. Using a mask spray water over color misted area through mask.  Flip wet mask over and stamp the wet mask onto another section of color misted area for a reverse image of mask.  Pat off excess moisture with paper towel.  Wipe any ink off embossed flower.  Let dry or blow dry with heat gun.

4. Stamp background in grey ink with music from Text Melange.  Wipe any ink off embossed flower.

5. Stamp Your Soul bird from Bird Lyrics in black ink.  Wipe any ink off embossed flower. Adhere panel onto larger panel of black card stock.

From here this panel can be used however you want!


I hope this inspires you to pull out your stamps, sprays and embossing powders to make a little mess, have fun and create a piece of art.

Take flight,
Shay.

Your Soul 
Stamps: Bird Lyrics, Flower Power and Text Melange
Cardstock: solar white and black by Neenah Papers
Ink: Versamark by Tsukineko and Memento in tuxedo black by Tsukineko and weather vane by Jenni Bowlin for Ranger
Sprays: Dylusions Ink Sprays by Ranger; water
Other: white embossing powder by Judikins; intertwined circles Huey's mask by Studio Calico

Friday, August 3, 2012

Feature Friday--Flight Plan: Mission 004 Winner


Hello Peeps!


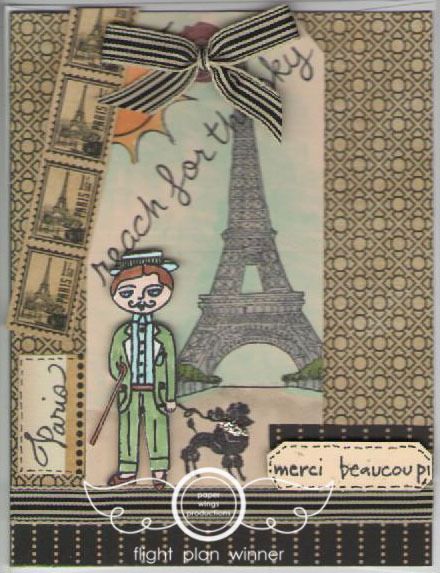
 I'm here to announce our Flight Plan: Mission 004 Winner today!  Mindy Miller's precious card has won this month's challenge, and it is so adorable.


There are so many things I love about this project. The pattern paper mix and muted color pallette really takes me back in time. I think Marcel is fantastic here with the poodle in front of the Eiffel Tower from the Paris set.  The sentiments are used on cute little labels that follow the sketch elements, and a row of postage stamps creates an excellent type of border strip here. And, what a great idea to put the focal image on a tag as part of the sketch plan.  Mindy this is so great!!! Thanks for playing along with us.

Mindy, please contact Shay at shay@paperwingsproductions.com with the name of your choice of stamp set. Congratulations!


That's all for today!  Have a great weekend and Happy Stamping!

Julie


Wednesday, August 1, 2012

8/1 What's up Wednesday


Happy Wednesday Peeps!


Today I am going to share a scrapbook page that I made.  I wanted to challenge myself to make an entire layout with just one sheet of paper.  All other patterns and textures had to be done with stamps.  


 I started with a sheet of Glitz paper.  I love Glitz papers, this one is from their Laced with Grace collection.
 

I decided where I wanted my photo to go on the layout and traced around the picture.  This gave me a guide to make a frame.


I started with one of the flower stamps from the Flower Power cling set.   I used a Memento ink pad, Rich Cocoa and stamped all around the line I traced.


 Using the same color, I stamped the flower spray from the Flower Power set.


 Next, I stamped the right edge of the cardstock with a stamp from the Text Melange cling set.


I did not reapply the ink and just kept stamping down the page.  The made the image appear lighter and lighter every time I stamped.

 On the left side I stamped some images from the Art Textures cling set.


I did end up using one small little tag from the Tim Holtz Idea-ology line.  I stamped the word "cherish" from the Banner clear set at the bottom edge of the tag.


I layered on the photo on the tag and decided that I needed a little depth in my stamping


 I decided to add more stamped images with a black Memento pad.


I added text with the Funky Alphabet clear set.  The best thing about clear stamps is that you can see where you are going to stamp!  Makes adding words to your project a breeze!


The final touch was the one of the big flowers from the Flower Power set that I stamped in opposite corners. 


I have to say that I am pleased with my challenge.  Could you create a layout with just stamps?  I challenge you to make a card or scrapbook layout with only stamps.  If you make one, I hope you will share!


Enjoy the flight!
Carrie


Stamps: Art Textures, Flower Power, Funky Alphabet, Banner, and Text Melange
Ink: Memento Ink Pads: Rich Cocoa and Tuxedo Black from Tsukineko
Paper: Glitz paper
Cardstock: Neenah Solar White and Chocolate Chip from Stampin' Up!
Embellishments:  Journaling Tag from Tim Holtz
Related Posts Plugin for WordPress, Blogger...