Showing posts with label tutorial. Show all posts

Wednesday, April 18, 2018

Stamped Mail Art Envelopes for National Letter Writing Month


Stamped Mail Art Envelopes

Hi friends! Dana here today sharing a set of mail art envelopes that I stamped up for National Letter Writing Month. I have a thing for handwriting, so I really appreciate it when I receive a letter or card in the mail. I have a box full of handwritten letters and cards that I have saved over the years. This is all that I have left from some of my relatives. I thought it would be fun to celebrate National Letter Writing Month by sending some love through the mail in a pretty stamped envelope. The selection of stamps in the Paper Wings Productions Store is amazing, and you're sure to find a great design for any recipient. I chose some of my favorite stamp sets for this project.

Colofully Colored Stamped Fibonacci Sprial Mail Art Envelope

Whenever I get stuck with design, I like to go back to the basics. The Sacred Geometry 2 Clear Stamp Set has classic patterns that are super fun to work with. I chose the Fibonacci Spiral stamp for this envelope. I stamped up the left side of the envelope using black archival ink and then colored in the shapes with Distress Markers. I added a bit of decoration to the edge of the geometric design with the Lace Border Outline Clear Stamp.

Stamped Globe with White Clouds on Kraft Mail Art Envelope

I wanted to use a kraft envelope specifically with a white gel pen. I just love how the white ink really pops off the paper for a 3D-like effect. I used the Earth and Sky Mélange Cling Stamp Set to decorate the top half of this envelope. I added an address box using the inner frame of the polaroid stamp from the Snapshot Framer Clear Stamp Set.

Colorful Stamped Bird Panel Mail Art Envelope

I had to use a stamp featuring something with wings for my last design. The Bird Panel Clear Stamp Set is so beautiful and is an easy way to add a pretty scene using just one stamp. I used the Snapshot Framer Clear Stamp Set again to add an address spot, but this time I used the larger outer frame. After inking up the entire stamp, I removed the ink from the smaller frame using a wet wipe, and then stamped only the larger frame onto the envelope.

Thanks for stopping by today! I hope I have inspired you to send a friend or loved one some happy mail this month.

Pin It!

Colorfully Colored and Stamped Mail Art Envelopes for National Letter Writing Month


Wednesday, November 22, 2017

Stamped Clip Art Christmas Ornaments

Stamped-Snowflake-Santa-Clip-Art-Christmas-Ornament-by-Dana-Tatar-for-Paper-Wings-Productions

Hi friends! Dana here today sharing a fun Christmas ornament tutorial featuring Clip Art Sheets. All the Clip Art Sheets from the Paper Wings Productions Store are laser printed on high quality paper, which makes them great for image transfer techniques. I used pieces from the Itty Bitty Christmas Clip Art Sheet more simply for this project. I cut them out and sealed them with a layer of glaze for a festive focal point on some stamped snowflake ornaments.

How-to-Prime-Masonite-Snowflake-Ornaments-by-Dana-Tatar-for-Paper-Wings-Productions

Step One: Prepare Masonite snowflake ornament blanks for stamping by applying a layer of white spray primer. Note: I chose a spray primer to quickly color the inside of the detailed cutouts on my snowflake ornaments. Gesso, acrylic paint, or embossing powder would also work for this step.

How-to-Stamp-on-Masonite-Snowflakes-by-Dana-Tatar-for-Paper-Wings-Productions

Step Two: Use the Writing Backgrounds Cling Stamp Set with red archival ink to add a script print to the snowflake ornaments bases.

Christmas-Clip-Art-Ornament-Assembly-by-Dana-Tatar-for-Paper-Wings-Productions

Step Three: Select several images from the clip art sheet and cut them down to size. Glue the clip art into the top layer of the ornaments.

How-to-Glaze-Clip-Art-for-Christmas-Ornaments-by-Dana-Tatar-for-Paper-Wings-Productions

Step Four: Cover the clip art images with a layer of glaze. Glue the clip art rounds onto the center of the snowflake bases.

How-to-Cut-Wire-Hangers-for-Christmas-Ornaments-by-Dana-Tatar-for-Paper-Wings-Productions

Step Five: Cut several lengths of wire. Bend and twist the wire into hangers and attach to the ornaments.

Stamped-Snowflake-Clip-Art-Christmas-Ornaments-by-Dana-Tatar-for-Paper-Wings-Productions

Step Six: Embellish the ornaments.

These ornaments look great on the tree, but they would also look fantastic as gift toppers. Be sure to visit the Paper Wings Productions Store to see the wonderful range of Christmas, Holiday, and Seasonal stamp sets.

Pin It!

Stamped-Snowflake-Christmas-Ornament-Tutorial-by-Dana-Tatar-for-Paper-Wings-Productions
Thanks for stopping by today and let your creativity take flight!

Wednesday, October 18, 2017

Los Animales Stamped Clay Trinket Dishes

Los Animales Cat Stamped and Painted Clay Trinket Dish by Dana Tatar for Paper Wings Productions

Hello! Dana Tatar here today sharing a fun tutorial that features the fantastic Los Animales Cling Stamp Set and ACTÍVA Hearty Air Dry Clay. I love crafting during the month of October. I already assembled a Halloween Mini Album, so I thought it would be enjoyable to create some trinket dishes for the Day of the Dead.

How to Stamp Air Dry Clay by Dana Tatar for Paper Wings Productions

Step 1: Roll out the clay into a flat disc. Firmly press a Los Animales cling stamp into the center of the clay. Press the stamped clay into a small dish and remove the excess clay. Carefully remove the wet clay from the dish and let dry overnight. Note: I used a glass dish as a mold for my clay. A free-form dish would also look amazing!

How to Paint Air Dry Clay with ColoriQue by Dana Tatar for Paper Wings Productions

Step 2: Paint the dishes and let dry. Note: I used ColorBox ColoriQue by Lisa Marie Jimenez to paint the inside of the dishes. I highlighted the edge of my dishes with Gold Lamé Smooch Accent Ink. Any ink or paint will work for this step.

How to Seal Air Dry Clay by Dana Tatar for Paper Wings Productions

Step 3: Seal the dishes. Note: I like a spray sealant for a smooth finish. Find Rust-Oleum Triple Thick Glaze in the hardware store.

Los Animales Dog Stamped and Painted Clay Trinket Dish by Dana Tatar for Paper Wings Productions

I really love these stamped animals! I hope I have inspired you to try working with a new medium. Air dry clay is easy to work with and is also great for beginners (like me!). Stop by the Paper Wings Productions Store to view the full selection of Day of the Dead Stamps.

If you used PWP products to create art, we'd love to see it! Share your creations with us on the Paper Wings Productions Facebook Page, in the Paper Wings Productions Facebook Share Group, or leave a link to your work here in the comments section.

 Day of the Dead Los Animales Trinket Dishes by Dana Tatar for Paper Wings Productions

Wednesday, September 20, 2017

Wearable Art: Stamped Tchotchke Pin

Artsy To The Bone Tchotchke Pin by Dana Tatar for Paper Wings Productions

Hi! Dana Tatar here today sharing a fun piece of wearable art. I've been working on adding patches and studs to my battle jacket. I'm really loving this form of expression with colorful patches and pins from my favorite bands and artists. I wanted to add some handmade flair to the jacket, for a bit more originality, so I created this one-of-a-kind tchotchke pin.

Artsy To The Bone Stamped Paper by Dana Tatar for Paper Wings Productions

I pulled the Meurtos Clear Stamp Set from my Paper Wings stash. I think rock-and-roll and skulls go pretty well together! I stamped one of the skeletons and the words 'artsy to the bone' onto a piece of white cardstock using black archival ink.

Stamped Pendant Tray Charm Assembly by Dana Tatar for Paper Wings Productions

Next, I cut the stamped images from the paper to fit into round pendant trays. I used a piece of floral print patterned paper as the base for the stamped text.

Meurtos Stamp Set Pendants by Dana Tatar for Paper Wings Productions

I attached the stamped papers to the pendant trays with Diamond Glaze. (Any liquid glaze will work for this step!) Once dry, I applied a small amount of glaze over the image in each pendant and pressed a glass cabochon over the top to seal and magnify the designs.

Battle Jacket Tchotchke Pin by Dana Tatar for Paper Wings Productions

I added both pendants and some more charms to a 5-loop pin. I'm seriously ready to rock!

This pin is great for wearing and also giving! There is an amazing selection of stamps in the Paper Wings Productions Store that are small enough to fit onto jewelry bases and pins. If you used PWP products to create a piece of wearable art, or any art, we'd love to see it! Share your creations with us on the Paper Wings Productions Facebook Page, in the Paper Wings Productions Facebook Share Group, or leave a link to your work here in the comments section.

Thanks for stopping by today!

Pin It!

Wednesday, September 13, 2017

DT: Lady of Guadalupe Shrine


Hi everyone! 
Veronica (A.K.A. Vicky) here sharing with you a DT inspiration project today:
A Lady of Guadalupe Shrine, made using Virgen de Guadalupe stamp set and build-a-shrine-cling-stamp-set, some wooden die cut pieces, some lace ribbon (last three included in the natural-mixed-media-kit), and some other goodies from my stash:


Here you can see more details:


The top:


Open:


I made my first video tutorial to show the steps of this project and the materials, I used. Please bear with my strong accent and hesitations, I'm still learning this method:


I hope you enjoyed this mixed media project and visit me at my blog for more details here.

Many blessings,

Vicky

Wednesday, January 21, 2015

Stamped Fabric Tutorial

Hey everyone, Katie here! Today I wanted to share with you this stamped fabric I made! I made a bunch of hand printed fabrics like this for my Mom for Christmas (she's a quilter!) and they turned out so awesome, I wanted to show you how I made them.


I used the Tea time stamp set and the Play with your Coffee stamp set to create this tea themed fabric.

You'll need fabric paint (or a good ink that is permanent on fabric), a stamp, acrylic block and a palette.


1. Spread out a little fabric paint onto your palette and press your stamp into it like you would an ink pad.


2. Stamp your design onto your fabric just like you would paper!


I started by stamping my largest stamp (the big teacup) a few times around my fabric, and then filling the blank areas in with smaller stamps.


Thanks for stopping by, remember- let your creativity take flight!

Tuesday, September 23, 2014

Tutorial Tuesday-Mini Album

Hello everyone and welcome to another Tutorial Tuesday!  Erica here with you this week to bring you another one of my favorite mini albums to make!  A couple months ago I shared one way to create an accordion mini album using a sheet of 12x12 cardstock and you can see that full post HERE.  This month I want to share with you all how to create a similar mini using a plain old office file folder.
Here is a list of supplies you will need to create and decorate your mini album.


  • file folder
  • scoring board
  • scoring tool
  • wet adhesive
  • variety of pattern papers
  • matching embellishments
  • photos
Instead of listing all the directions with photos I thought I would do a video for you all instead this month.  I hope you can follow along and please leave any comments or questions for me down below and I will answer as soon as possible!


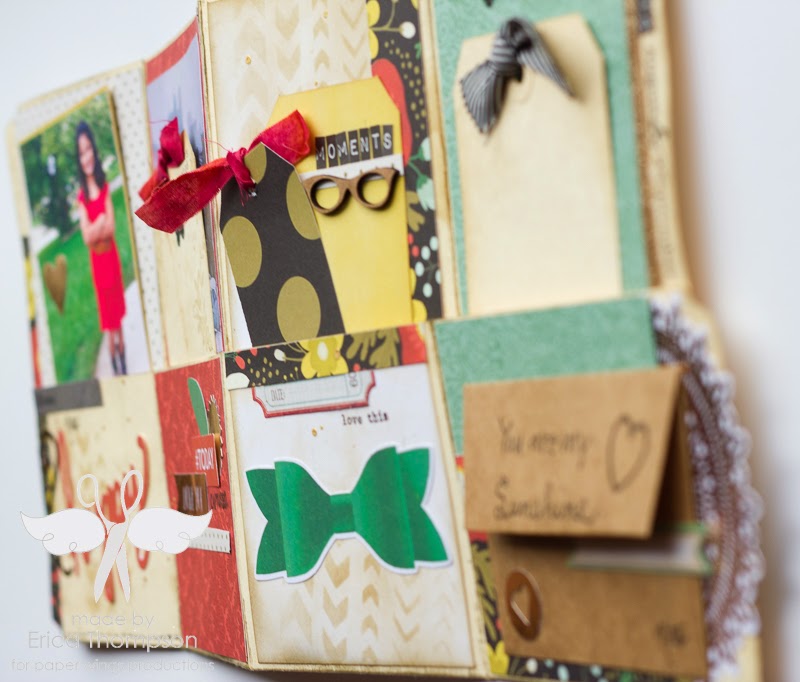
To dress up my mini album I used the September 2014 Nesting Components kit.  I am in love with this beautiful kit!  The paper collection and embellishments from My Minds Eye are gorgeous and Carrie has hand picked some amazing pieces that coordinate beautifully with these two products!  I also pulled out a handful of Paper Wings Productions stamps to add to my album as well including the brand new Say It stamp set!  Here are some photos of my completed mini album.


I love how this album has a ton of pockets that allow you to add more tags, photos and ephemera.  I also added one of the mini envelopes that came in this months Nesting Components kit to the inside of my mini that will house some journaling tags.  I hope you enjoyed my video and my mini album this month.  If you have not already purchased this months kit you can head on over to the Paper Wings Productions shop and get one today!  There are only a few kits left and I think this is my favorite kit so far so act fast!  If you give this mini album I try I would love to see your take on it so leave me the link below or enter it into this months challenge for your chance to win a gift certificate to the PWP shop!  Thanks so much for stopping today and remember to let your creativity take flight!
Related Posts Plugin for WordPress, Blogger...