Showing posts with label Rubber stamps. Show all posts

Wednesday, June 5, 2019

It's time...


Hello, my friends-

I started this business 7 years ago after selling the retail store I ran with my family. I have always loved rubber stamps and the paper craft industry. Paper Wings was a great way for me to stay in the industry while also working from home so that I could care for my two small children. Those children aren't so small anymore. Once they became school aged, I decided to go back to school and finish a degree I started so long ago. After finishing my bachelor's degree, I was interested in teaching art- something I had grown to love. I knew I didn't want to be a classroom art teacher and began exploring options. I discovered art museum education and fell in love. Last summer I took a full-time job in art museum education, I was halfway through graduate school. Last month I finished my master's degree in art education. Paper Wings has been floating along in the background despite the declining time and effort I was able to put into it. Now that I am regaining the ability to think beyond my thesis, I see that my path continues to move away from Paper Wings. It is time for me to officially be done with Paper Wings and move on to the next chapter in my life.

I think about all of the amazing people I have met through this business- design teams, customers, friends, and especially those of you who I met in person at stamp shows and workshops. I thank each and every one of you from the bottom of my heart. I thank you for supporting this business and letting this mama have a dream job while raising babies. I still love teaching workshops and will continue to look for avenues to share my passion for creating art.

Everything at Paper Wings will start off at 25% off, this includes items already on sale. I will update inventory levels as often as possible. If you purchase something that is out of stock, I will refund your payment. The discount will continue to grow as the inventory dwindles. I do not have an official close date yet, but I hope to be done in the next few months.

Use coupon code GOING for 25% off your total purchase when you check out.

Here's a direct link to start shopping.

Please email or comment if you have any questions.

Kindly,
Carrie

Wednesday, November 8, 2017

hello Gorgeous

Hi everyone! Leslie here to share a DT inspiration project with you today, a fun accordion birthday book with a twine bow closure. I used the Vintage Domino Melange, Vintage Melange and Sayings and Sentiments stamp sets. All of these are just amazing!


I cut the accordion base from kraft cardstock. I cut the cover pieces with a stitched rectangle die and stamped the large flourish from the Vintage Melange stamp set on the front and back covers in brown ink. I heat embossed the front sentiment in gold, cut the words apart and affixed them to the front cover just above and below the twine line.


I stamped all nine domino-sized images from the Vintage Domino Melange stamp set on kraft cardstock and colored them in a very basic fashion with Spectrum Noir markers. I cut the images with a slightly smaller stitched rectangle die and layered them on brown die cuts. The birthday sentiment on the last panel is also from the Sayings and Sentiments stamp set.


For more details and additional photos, please see my blog post at Love To Scrap 2.

I hope you’ve enjoyed today’s project! Be sure to check out all the fun stamps and other goodies at Paper Wings Productions! Thanks so much for stopping by today – we’ll see you next time!

Scrappy hugs,
Leslie

Wednesday, October 25, 2017

you make life sweet


Hi! Ashley here today, sharing a card I made with the Hey Cupcake stamp set. I chose the little cupcake to stamp, heat emboss, and watercolor.


I like to use distress inks + my Tim Holtz watercolor brush to color my images. After I heat embossing the cupcakes with white fine detail embossing powder, I fussy cut them and did the same technique with the cupcake stand. I didn't want the whole cupcake stand - it was too large for my cupcakes! - so I fussy cut just the top part of the cupcake stand for my card. Always be on the look out for ways to make your stamps go further and work for your needs!


My sentiment is also from the Hey Cupcake stamp set, which I heat embossed with a coordinating pink embossing powder. I added a spot of watercoloring to my base using the same distress inks I used on the cupcake frosting. I think it helps to ground my sentiment.


Then I adhered the cupcake stand and my cupcakes with pop dots.


Thanks for looking!

Saturday, August 22, 2015

Exciting week coming up

Happy Saturday, friends!  

I hope you are having a fantastic weekend!  Carrie here with you today to tell you about an exciting week we have coming up!  We have some super, duper EXCITING news to share with you on Monday, so be sure and check back to find out what it is.  We will also be showing off some sneak peeks of NEW STAMPS that are coming soon!  On top of all of that we will also be doing some fabulous giveaways!  We hope you will keep checking back here on the blog to hear all of our latest news!


Here's a card I made with some scrap paper left over from a Gelli plate printing session.  It features the stamps from the sets: Be Not Afraid and Sea Melange.  What have you been working on?  We LOVE to see what you create!  Share with us on Facebook or tagging us on Instagram or Twitter (@paperwingsproductions).

Enjoy the flight!
Carrie

Wednesday, June 10, 2015

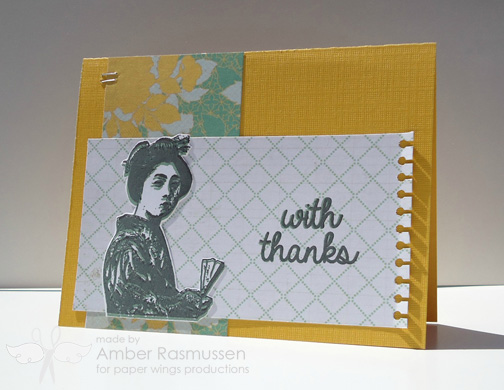
With Thanks


Hello PWP fans! Its Amber here with you today sharing another card featuring one of the Geisha's from the Geishas Cling Stamp Set. This set is quickly becoming another one of my favorites. I started with some colorful floral patterned paper from Crate Paper and used that as my inspiration. I really loved the teal/green color in the patterned paper so I found a matching ink and stamped the Geisha image in it. I then stamped over the same image with some black ink to give it a two toned effect. After my image dried I cut it out and adhered it to my second piece of pattered paper. Using the two same ink colors I stamped my "with thanks" sentiment from the Say It- Thanks Clear Stamp Set to the right side of the geisha. 


Above is a closer look at the stamped geisha and sentiment. Thanks for visiting and don't forget to check back in later this week for Carries Design Team announcement. 
Supplies: Cardstock- Yellow / Patterned Paper- Crate Paper & Lilly Bee Designs / Paper Wings Productions Cling Stamp Set- Geishas / Paper Wings Productions Clear Stamp Set- Say It -Thanks / Versa Color Ink Pad- / CTMH Ink Pad- Black / Stapler / Hole Punch 

Friday, May 29, 2015

You Are Special


Hello PWP fans! Amber here, and I'm super excited to be here sharing my colorful Geisha card with you today. This one has lots of color and stamping. I started by stamping my card base with the large paisley image from the Vintage Melange cling stamp set in black. After I had my card base stamped I pulled out some white cardstock and cut a small square for stamping. I created the background behind my geisha image by blending three different colored inks. I just took the ink pads and swiped them across the white cardstock to get the blended look above. You could also achieve this look with some ink and an ink dabber or some watercolors. To finish off my vertical panel I  added a small strip of  pink cardstock to the top of my stamped piece and a larger piece of pink cardstock to the bottom. I also stamped some text in black to the upper and bottom pink cardstock strips along with a "you are special" sentiment and some twine.


Above is a closer look at the stamped geisha with the blended background. I hope you enjoyed my card today. Thanks for visiting and don't forget to check out Paper Wings Productions current Design Team Call! Please submit your applications by June 1st to Carrie at paperwingsproductions@hotmail.com.
Supplies: Cardstock- White, Neon Purple, & Pink / Paper Wings Productions Cling Stamp Sets- Vintage Melange, Text, & Geisha's  / Paper Wings Productions Clear Stamp Set- Dragonfly Fairy / CTMH Ink Pad-Black / Versa Color Ink Pads- Helitrope, Hyacinth, & Boysenberry / WeR Memory Keepers Twine-Black

Saturday, December 27, 2014

Scrapbook Saturday-Holiday Cutie


Happy Saturday Paper Wings Fans!  Erica here with you today sharing holiday layout I created using product from the Paper Wings Productions shop!  
I pulled out one of my past Holiday Nesting Components kits, some stamps, gelatos and ink and began to create!  I started with a plain white piece of 12x12 cardstock.  I pulled out a silver colored gelato and added some to a big clear block.  I also added some water to create a nice light watercolor and then applied a piece of clear packaging to the block and picked up some of the color.  I dabbed it all over my white cardstock just to add a little something extra.  Most of it ended up getting covered up but I am ok with that.  I do like the bits and pieces that you can see.  The photo I am scrapbooking is of our daughter last year in front of the Christmas tree.  This is one of my favorite photos of her from last Christmas.  I love the bokeh in the background!


I used the Tim Holtz rub-ons that came in the kit all around my layers and added one of the background texture stamps from the Art Textures stamp set.  I added a few of the chipboard pieces from October Afternoon that also were included in this kit and the cute JOY wood veneer.  For my title Holiday Cutie I used the Holiday Clear stamp set and used the word Holidays.  I masked off the letter S so it would just stamp out Holiday.  I used some red stickers from my stash to spell out cutie!  I love how it turned out and I hope you enjoy it as well!  The items I used today are still available in the Paper Wings Productions shop and some of them are even on sale!  You will find them linked below!  I hope you all have had a wonderful holiday season and I wish you a very blessed New Year!  Thanks so much for stopping today and remember to let your creativity take flight!

Thursday, October 9, 2014

Themed Thursday-Say It-Thanks

Hello Paperwings fans!  Erica here with you today with 3 cards featuring the new stamp set that was released in September Say It-Thanks!


I fell in love with this stamp as soon as I saw it and I knew I had to have it!  It was the perfect stamp to go along with the 6x6 paper pad that is included in the September mixed media kit!


The three cards I created included some kind of embossing. To start I ran my cardstock through my big shot to emboss the bottom half of my card with a wood grain embossing folder.  For the top I added the "thank you" sentiment and the beautiful floral accent and heat embossed in white!  I then tied a bow with this fabulous ribbon also included in the September kit.


 My next card uses 2 papers from the My Mind's Eye paper pad that is included in the September kit.  I die cut them with a tag die cut and added a sentiment and another floral accent to one of the cards.  I head embossed the sentiment in white and the accent in gold to create this pretty thank you card.


My last card also uses more paper from the My Mind's Eye paper pad and this fun sentiment from the Say It-Thanks stamp set.  I love the fun font with this sentiment and I think it can be used in so many ways!


I hope you enjoyed my cards to day featuring the Say It-Thanks stamp set.  This is one stamp set you will not want to pass up!  We all need to thank you cards and this set will help you create an amazing assortment of cards!  Thanks so much for stopping and spending some time with me today.  For more inspiration using the September kit checkout Carmen's Mixed Media Monday post HERE.   Enjoy your day and remember to let your creativity take flight!

Saturday, May 17, 2014

Spotlight Saturday

***** Join our May "Anything Goes" Challenge HERE *****


Happy Saturday everyone!  Erica here with you today to bring you a special Spotlight Saturday post!
 I want to share some of the cards I have made with the new Paper Wings Productions stamp set that was released this month.


This months new stamp set is called Under the Weather and features adorable get well images and 7 sentiments!  You can pick this new stamp set up for 25% off for the rest of May!


Here are a couple cards I made using this great new stamp set!  The first card is super simple and uses one of the band-aid images.  I stamped it out on some fun colorful paper, cut them out and popped them up in the center of my card.


My next card uses another one of the band-aid images in this set and I love the little heart on this one!  Perfect to send to someone who is a feeling a little Under the Weather!


Earlier in the week Dana also created a card using this same stamp set so make sure to check out her post here!  Thanks so much for joining me today I hope you enjoyed me cards using our new May stamp release!  To pick up this super cute stamp set please head on over to Paper Wings Productions shop and pick yours up HERE!

Wednesday, December 18, 2013

Merry & Bright & Two Christmas Tags


Hello Everyone! It's Amber here with this weeks What's Up Wednesday Post! Today I am sharing this Merry and Bright Christmas card featuring Paper Wings Productions Jolly Old St. Nick Cling Stamp and some wonderful patterned paper from ChicTags Good Tidings collection!


  I really wanted to play along with all the gold accents that are in the patterned paper so I stamped my Jolly Santa in gold. Check out the close up below!


I think this is one of my all time favorite stamp sets, there are so many fun and different images to play with. So I thought it would also be fun to share these two Christmas tags I created with the same image.


I wanted to have fun creating these so I used a double stamping technique to create these. Its pretty simple, you just stamp your image in one ink color and then stamp the same image in a different ink color slightly off to the side of the first image. This gives the image and sentiment a fun holographic look .


Thanks for visiting today and don't forget we would love to see what you make with Paper Wings Productions Stamps so add your projects to our Flickr Group, to Pinterest, or leave a comment with a link to your project.
Card Supplies: Cardstock- White and Blue / Patterned Paper- Chic Tags Good Tidings Collection / Paper Wings Productions Cling Stamp- Jolly Old St. Nick / Versa Color Ink Pad- Gold / Sulky Thread- Gold / Sewing Machine
Tag Supplies: Cardstock- White / Patterned Paper & Flair Buttons- Pretty Little Studio / Paper Wings Productions Cling Stamp Set- Jolly Old St. Nick / Versa Color Ink Pads- Khaki, Bamboo, Chateau Gray, Misty Mauve / Sulky Thread- Mauve & Light Green /  Large Sliver Snowflake / Sewing machine


Related Posts Plugin for WordPress, Blogger...