Showing posts with label geishas. Show all posts

Friday, August 7, 2015

Hello Hello


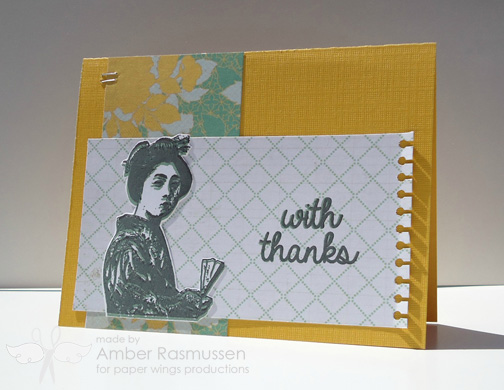
 Hello PWP fans!  Its Amber here with you today sharing another card featuring one of the Geisha girls from the Geishas Cling Stamp Set and a sentiment stamp from the Vintage Technology Clear Stamp Set. I had lots of fun creating this one. Below I have a step by step tutorial for you to check out.


Step 1. Pick two different coordinating patterned papers. I used a polka dotted paper for the top half and a dark watercolored piece for the bottom half. The top half is larger then the bottom half. 


Step 2. Cut the patterned paper to fit the card base. 


Step 3. Stamp your image and sentiment onto another piece of coordinating patterned paper. I used a pink patterned paper and stamped my images in a blue ink that matched the other patterned papers.


Step 4. Cut out your image and sentiments. I also cut out a little banner to add to the top of my card.


Step 5. Lay out your images, staple your banner to the top left, staple the two hello sentiments to the bottom left, and add some matching ribbon. After you card is assembled add some stitching around the outside edges. You can see a close up below. 


I hope you enjoyed my card today! This will be my last post for Paper Wings Productions. I've had so much fun creating for the blog. Thank you for letting me be apart of your team Carrie.
Supplies:  Cardstock- White / Patterened Paper- Basic Grays Fresh Cuts Collection / Paper Wings Productions Cling Stamp Set- Geisha's / Paper Wings Productions Clear Stamp Set- Vintage Technology / Versa Color Ink Pad- Blue /  Lime Green Ribbon- Fancy Pants / Sulky Thread- White

Wednesday, June 10, 2015

With Thanks


Hello PWP fans! Its Amber here with you today sharing another card featuring one of the Geisha's from the Geishas Cling Stamp Set. This set is quickly becoming another one of my favorites. I started with some colorful floral patterned paper from Crate Paper and used that as my inspiration. I really loved the teal/green color in the patterned paper so I found a matching ink and stamped the Geisha image in it. I then stamped over the same image with some black ink to give it a two toned effect. After my image dried I cut it out and adhered it to my second piece of pattered paper. Using the two same ink colors I stamped my "with thanks" sentiment from the Say It- Thanks Clear Stamp Set to the right side of the geisha. 


Above is a closer look at the stamped geisha and sentiment. Thanks for visiting and don't forget to check back in later this week for Carries Design Team announcement. 
Supplies: Cardstock- Yellow / Patterned Paper- Crate Paper & Lilly Bee Designs / Paper Wings Productions Cling Stamp Set- Geishas / Paper Wings Productions Clear Stamp Set- Say It -Thanks / Versa Color Ink Pad- / CTMH Ink Pad- Black / Stapler / Hole Punch 

Friday, May 29, 2015

You Are Special


Hello PWP fans! Amber here, and I'm super excited to be here sharing my colorful Geisha card with you today. This one has lots of color and stamping. I started by stamping my card base with the large paisley image from the Vintage Melange cling stamp set in black. After I had my card base stamped I pulled out some white cardstock and cut a small square for stamping. I created the background behind my geisha image by blending three different colored inks. I just took the ink pads and swiped them across the white cardstock to get the blended look above. You could also achieve this look with some ink and an ink dabber or some watercolors. To finish off my vertical panel I  added a small strip of  pink cardstock to the top of my stamped piece and a larger piece of pink cardstock to the bottom. I also stamped some text in black to the upper and bottom pink cardstock strips along with a "you are special" sentiment and some twine.


Above is a closer look at the stamped geisha with the blended background. I hope you enjoyed my card today. Thanks for visiting and don't forget to check out Paper Wings Productions current Design Team Call! Please submit your applications by June 1st to Carrie at paperwingsproductions@hotmail.com.
Supplies: Cardstock- White, Neon Purple, & Pink / Paper Wings Productions Cling Stamp Sets- Vintage Melange, Text, & Geisha's  / Paper Wings Productions Clear Stamp Set- Dragonfly Fairy / CTMH Ink Pad-Black / Versa Color Ink Pads- Helitrope, Hyacinth, & Boysenberry / WeR Memory Keepers Twine-Black

Friday, May 4, 2012

Flight Plan: Mission 002


Hello peeps!

It's Julie again!  I can't believe it is already May, can you? April went by so fast.  The Paper Wings gals really enjoyed looking at the submissions for April and can't wait to see what this month's Flight Plan will inspire you to create. Are you ready?  Here we go... 


What is a Flight Plan? 

It is a guide of sorts to get your project started by giving you some guidelines to follow, but in our case, we hope your creativity will interpret these plans into amazing and clever new creations. We’d love to see your finished pieces, so we have set up a Flickr gallery where you can share your submissions with us. So, put on those paper wings and get ready to take flight!

Your Mission:
Create a project (card, ATC, tag, scrapbook layout, multi-media piece, etc.) using paper wings productions stamps with the Flight Plan as your guide.
  • Share a picture of your project on our Flickr group. Make sure to tag it using this code: FP002. If your picture is not tagged we will not know it has been entered into the challenge.
  • You have until Thursday, May 31, 2012 at 11:59 p.m. central time to post your entries.
  • Enter as many times as you wish before the deadline.
  • We will choose a winner to receive their wings and a stamp set of their choice.
Julie's Sample:  This time I chose to use a literal translation of the Flight Plan. The Snapshot Framer and Let's Eat Cake sets made quick work of this clean and simple birthday card.  I like this style, and with a few color changes, would be a perfect card for the birthday guy in your life.
Shay's Sample: My interpretation is pretty literal too as an art journal page.  I decided to use three framed ladies to created the large block and used pattern paper strips behind the framed ladies for journaling.  I was able to use a few stamp sets...one was a leftover scrap from my first canvas.  Waste not, want not!  Stamp sets used: Melange Women (this one I use a lot), Geishas, Melange 4 -Architecture (I used the fairie panel and the tip of the pointed building on the left and right hand edges--fun find), Flourish Fun 2 (as background on the little tag) and Life Framer (the frame image, but also the numbers and year on the little tag). 


We look forward to seeing your creations! 

Happy Stamping!
Julie
Related Posts Plugin for WordPress, Blogger...