
***To join the July Emboss It Challenge: Click Here***

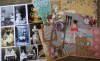
Hi Paper Wings fans! Dana here today sharing a layout that I created with the July Tea Time Nesting Components Kit. This kit contains a small tub of Golden Extra Heavy Gel which is excellent for holding peaks. Extra Heavy Gel also dries clear so I was able to create a super cool textured background with color both below and on top of the gel for a fantastic effect.

I started with the piece of thick white cardboard that comes in the kit. This cardboard holds up beautifully to wet media and layers of embellishments.

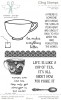
I primed the cardboard with a thin coat of gesso and then stamped a border and text pattern using Archival inks, the Lace Border Clear Stamp Set and the Text Melange Cling Stamp Set.

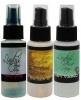
I then used a spatula to spread a layer of Extra Heavy Gel over my background. (Note: I had a larger open tub of Extra Heavy Gloss Gel so I used that rather than the Extra Heavy Matte Gel that comes in the kit. The technique and results are the same with both gels except the Gloss Gel dries with a bit more shine.) I used a plastic comb to add the circle pattern into the gel. Once the gel was dry I spritzed the background with Lindy's Stamp Gang Mist in Brushed Nickel and Kissin' Kenickie Coral.

I wanted to add more color to my background so I used watercolor pencils to brighten up some of the circular grooves.

Here's a full shot of my project again. I immediately loved this photo on the Clip Art Sheet from the kit. It reminded me of the great diner scene from the film When Harry Met Sally, and I borrowed the line "I'll have what she's having" for the title of my layout.

I cut a portion from the stacked teacup clip art image and used that to add a pretty floral pattern to the chipboard teacup from the kit. I used the tag from my favorite flavor of tea and attached it to the tea cup to personalize the layout. The sentiment that I stamped, "tea makes everything better." is from the NEW Tea Time Cling Stamp Set, which is 25% off this month!

Here's one more look at my gel background. I hope I have inspired you to try this technique!
Thanks so much for joining me today. If you're looking for more Tea Time inspiration be sure to check out Erica's gorgeous Accordion Mini Album and her Scrapbook Saturday post. If you didn't pick up the kit yet, Norma created a stunning Bird Cage Assemblage that is a must see.
      |
Woowzer this was an excellent tutorial. I love how you used a comb to create the circles with the Gel. Using the water color pencils on the circles remind me of those large suckers you get at the carnival. Fabulous design!
ReplyDeleteWonderful tutorial! I really love how you added color with the watercolor pencils!
ReplyDeleteIt's amazing!! Love the texture and the softcolours, and the picture is so fun!
ReplyDeleteI love this creation Dana, it's wonderful! I'd like to have some of that tea also, :)
ReplyDeleteI love this, Dana! Such amazing texture and I love that you also added a teabag tag on here.
ReplyDeleteWowwwwwww! This is gorgeous!! I love love love love love those circles!!!!
ReplyDeleteYES!!! I definitely have to give a try to this technique!!! TFS!!!
ReplyDeleteReally gorgeous Dana!!! Thanks for this simple and great tutorial, I really love your technique and what you do with the heavy gel!!
ReplyDeleteSuch a stunning art work! Very clever use of the heavy gel; Awesome results!!! Love it!!!
ReplyDeleteThis is very cool Dana! I've never played with Extra Heavy Gel medium, I'm gonna have to add that to my shopping list. Great project, thanks for the inspiration :D
ReplyDelete