Showing posts with label flourish fun 2. Show all posts

Thursday, July 11, 2013

Themed Thursday: European Vacation


Hello there!  It's Shay here today to bring you Themed Thursday.

But first I need to toot the horn of the rest of the design team because they are doing a fabulous job! 
Want to see what I mean?  Of course you do!

Here are some recent posts to enjoy:


Wow!  That's a whole lot of gorgeous inspiration. 

Hopefully I can live up to what has preceded me.  Let me know how I did!

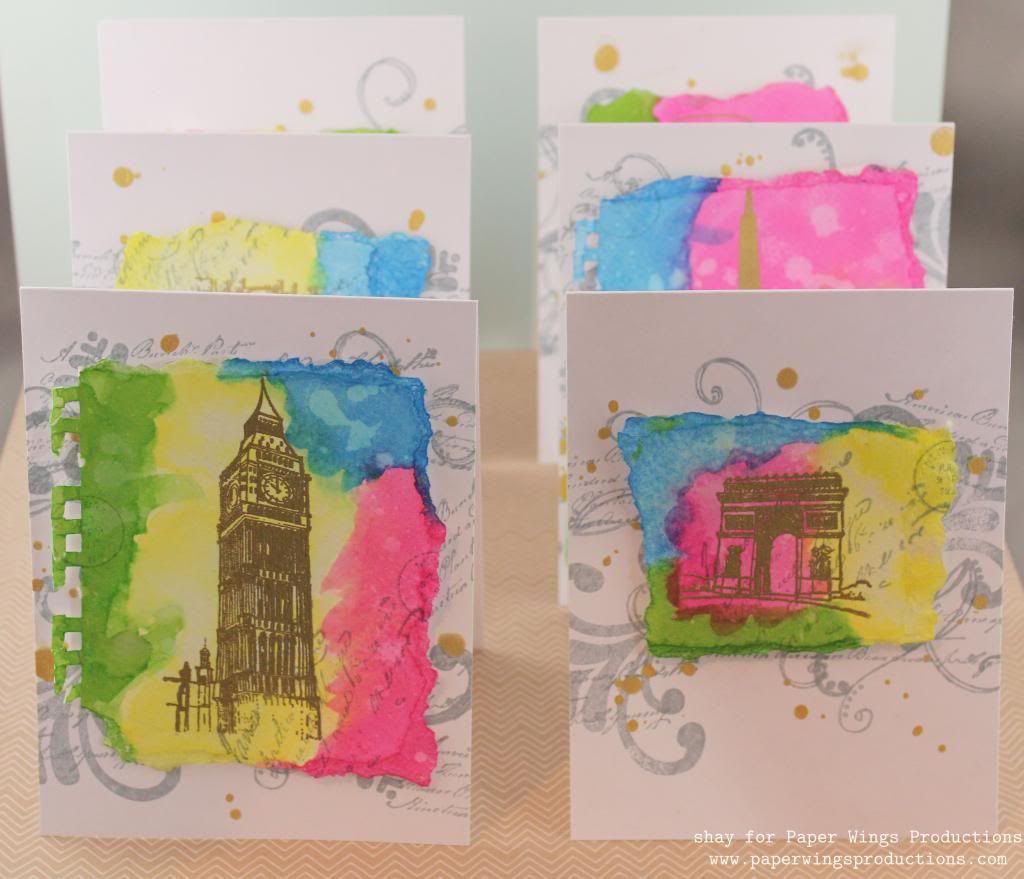
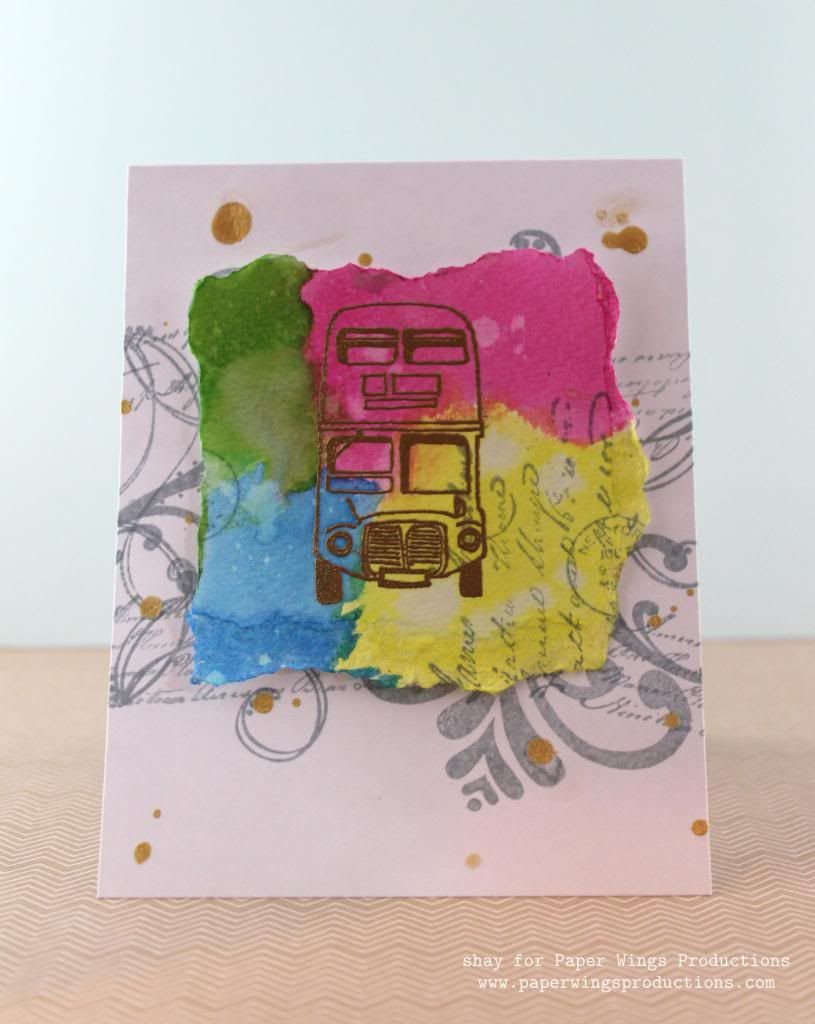
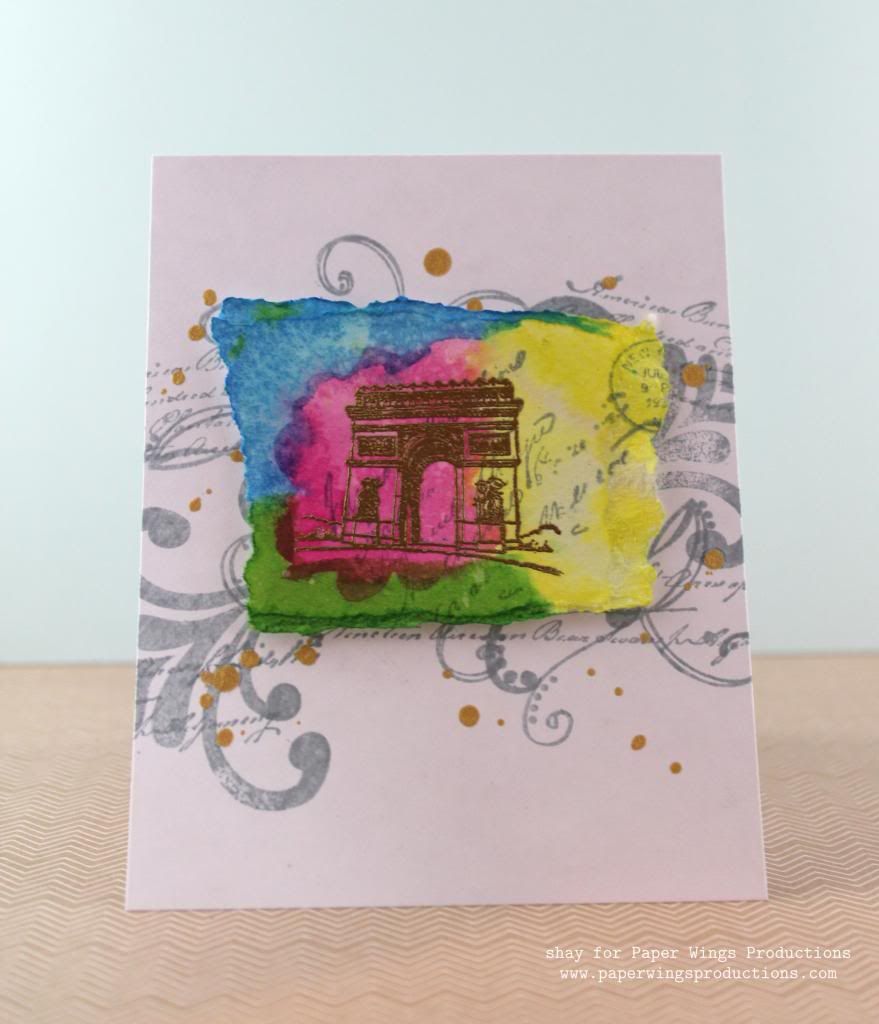
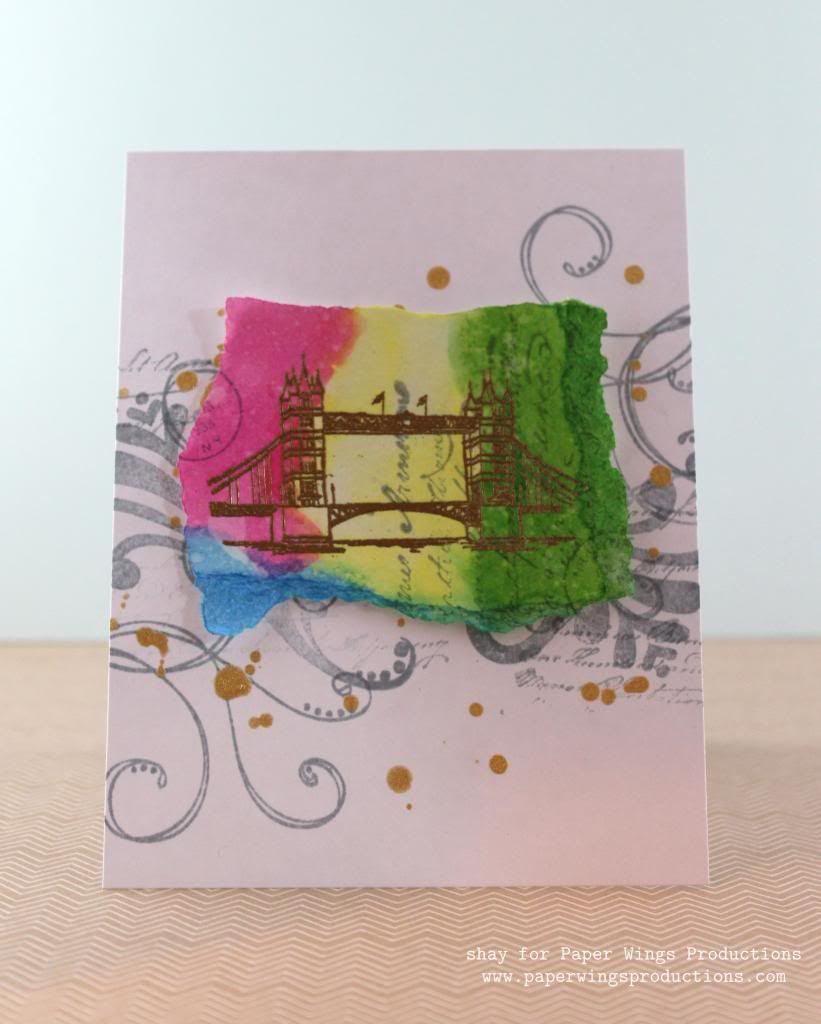
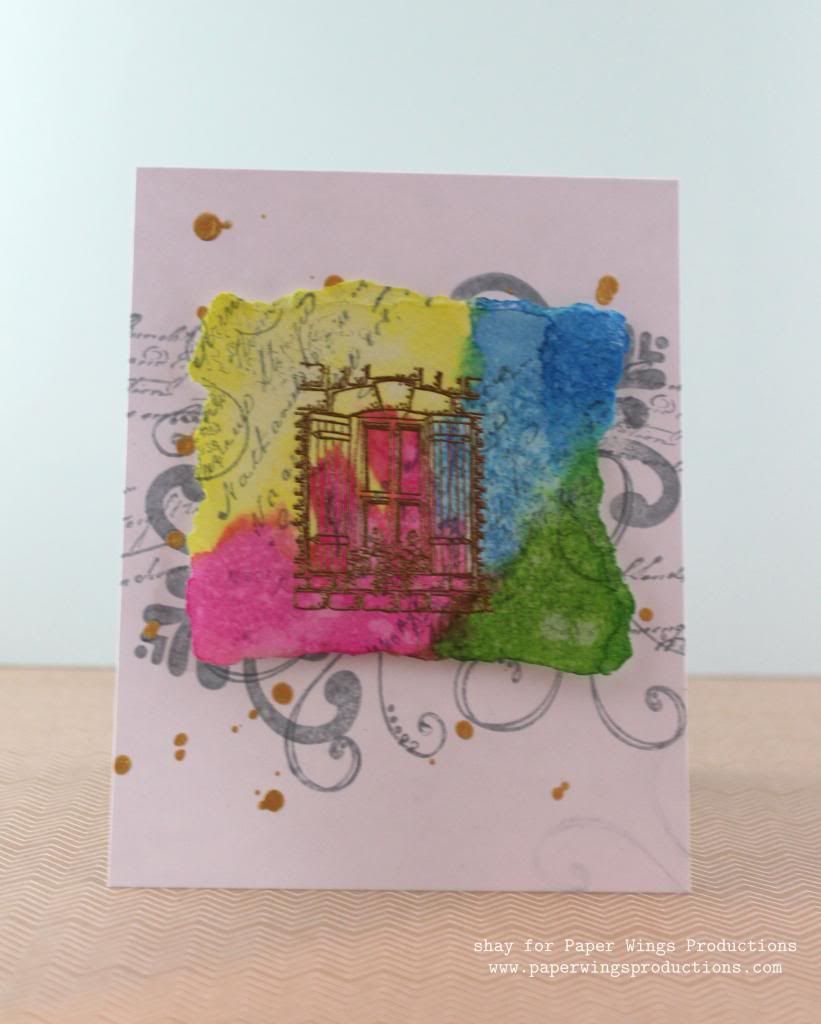
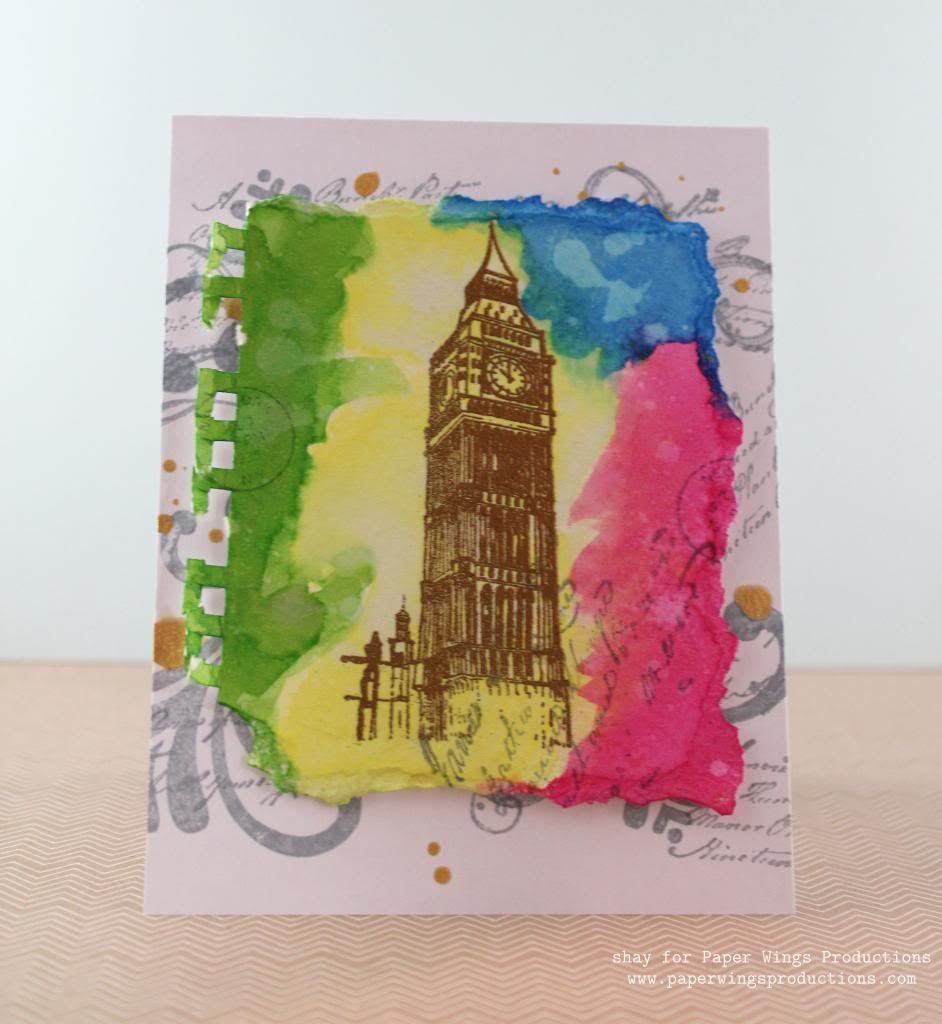
I went for a set of bright and happy cards using the London and Paris stamp sets.  Summer is the time of travel and although I am not travelling anytime in the foreseeable future, I can always dream and use these stamps to travel vicariously.


What I did:

1. I stamped an image from the London and Paris sets onto a piece of torn watercolor paper with VersaMark and heat embossed it using gold embossing powder.
2. I painted the piece of watercolor paper with watered down Distress Inks.  Flicked water over the image and let it dry.
3. I stamped the postage seal and some of the handwriting from Text Melange or Text onto the piece of watercolor paper in grey ink. 
4. For the background of each card I stamped in grey ink some images from Flourish Fun 1, Flourish Fun 2 and Text Melange or Text
5. The final touch for the background were drops of gold color shine. 
6. I adhered the watercolor panel to the card base with dimensional adhesive.


Voila!  A bunch of fun cards.  You can easily add a stamped or handwritten sentiment under the image or do all the writing inside.

We would *love* to see what you make with Paper Wings Productions stamps. Add your projects to Facebook, our flickr group, to Pinterest, comment with a link on this post or even email pictures to us!

Take flight,
Shay.


Supplies:
Stamps:


Ink: mowed lawn, squeezed lemonade, picked raspberry and salty ocean, Tim Holtz Distress Ink by Ranger; weather vane, Jenni Bowlin for Ranger; VersaMark, Tsukineko
Paper: white cardstock, Georgia Pacific; watercolor cold press 400 series 140 lb., Strathmore
Other: detail metallic gold, JudiKins; heat embossing gun; gold color shine, Heidi Swapp; dimensional adhesive


Wednesday, December 12, 2012

What's Up Wednesday - One Layer Cards


Hey peeps! 

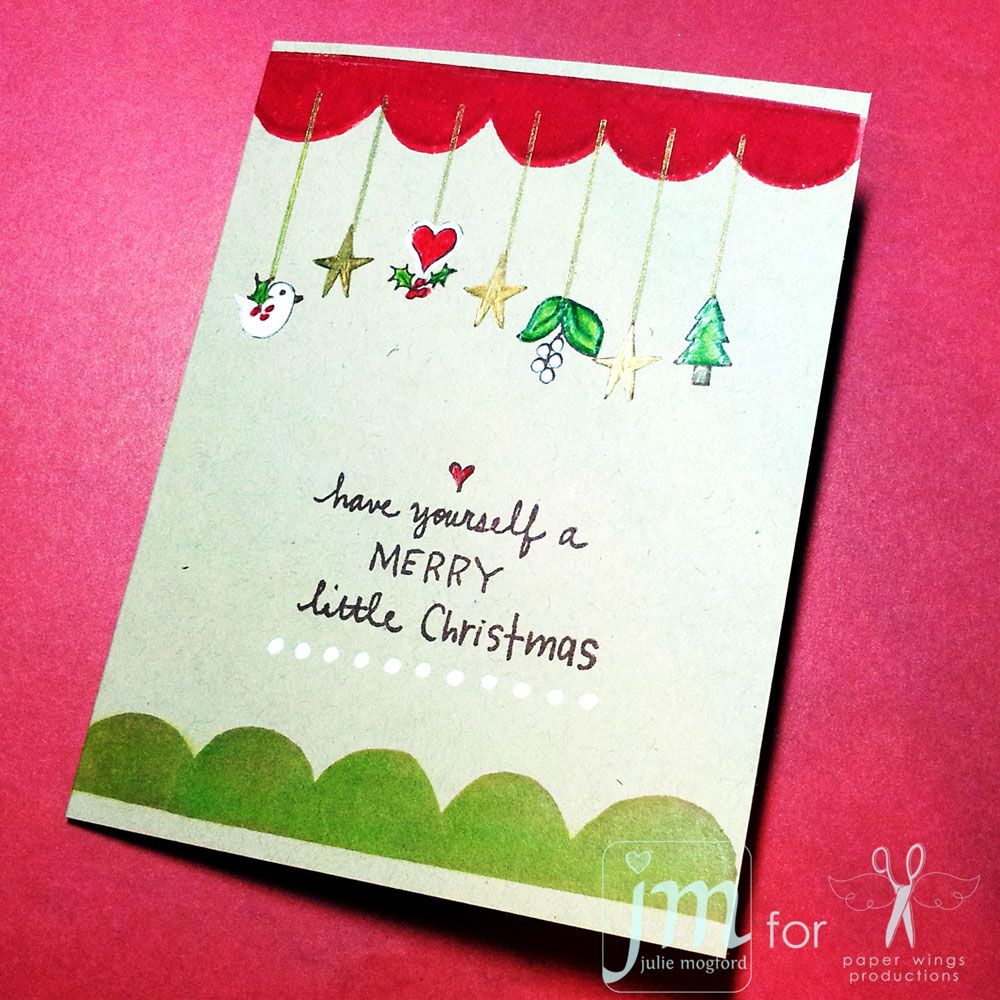
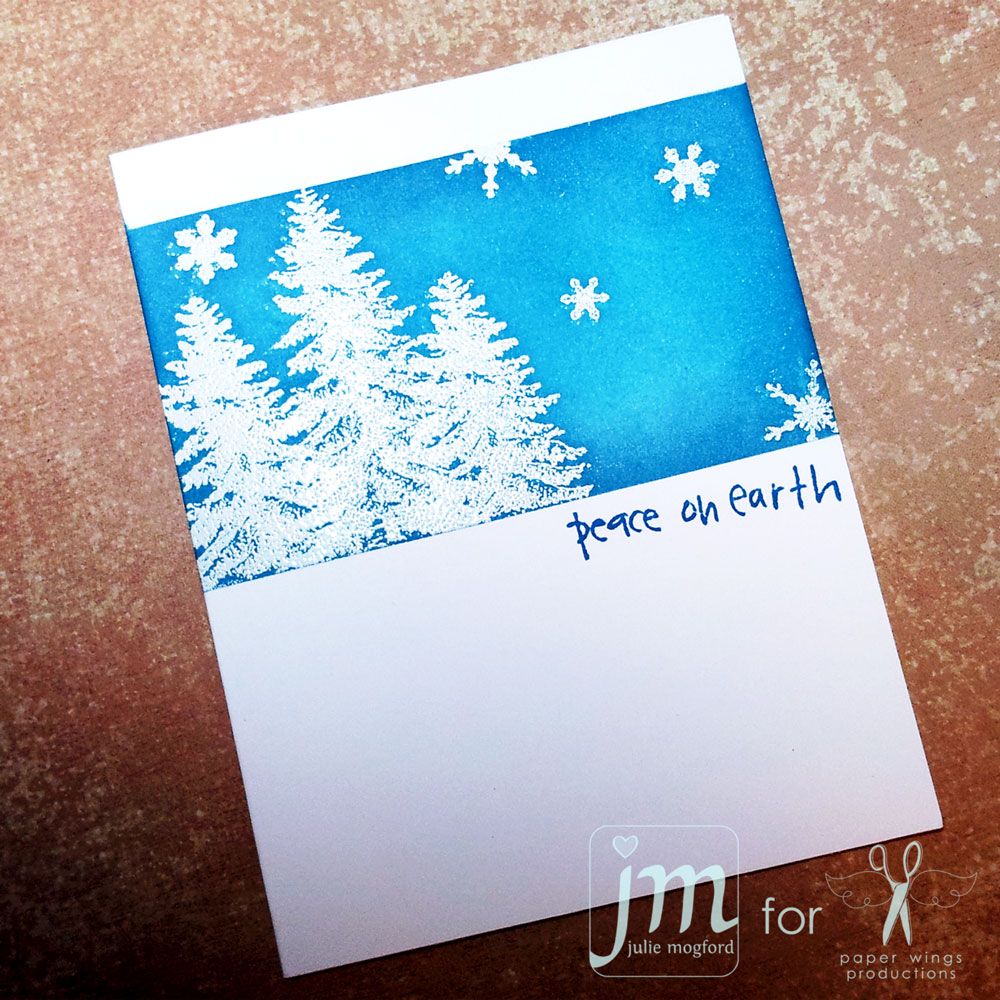
I've been on Pinterest a lot lately and I'm SO addicted to looking at pins and searching for ideas. Are you?  [have you pinned your favorite PaperWings stamps yet?] I have been seeing so many great ideas for Christmas cards, and I thought I would try a few ideas using our new and previously released stamps, but I gave myself a challenge.....ONE LAYER CARDS!  I have to say, it was definitely a challenge at first, but when I started thinking about a few card layouts I had seen, plus some techniques I know (but sometimes forget to use), then putting these cards together was easy!


Krafty Christmas - This idea came from to me when I remembered how much I like colored pencil on kraft paper.  I used to do these types of cards with Ms. Liz Allen all the time.  This card reminds me of her!  First I started with the Scallop Border to set my color scheme.  When I started this I made some ink choices that let me down.  I was able to restamp these clear stamp images using chalk inks and line them up perfectly! The green one was not as bright as I wanted, so I went in with a green prisma pencil to bring it up to the perfect shade I wanted to use. Next I stamped the hanger from the Hanging Stars set using gold pigment ink. Then I added the cute elements stamped in Memories Artprint Brown, from the Christmas Mix it Up and Holiday Tags sets. I colored all of the images with prisma pencils and the stars were using a gold prisma pencil - it is a really nice metallic!  Finally, I added the sentiment from the Little Christmas set and added the white dot border from the Louise set, inking only the dots I needed. I could have drawn the dots, but I like using the border so they are lined up and evenly spaced. It takes the guess work out of the equation. Cute, right???  I thought so!


Christmas Collage -  I came across a collage card that had a red Christmas sentiment in the middle of a collage card with green music in the background.  I started thinking, how could I recreate this look with our stamps?  Here is my rendition!  Images from Music Cling, Flourish Fun 2Holiday Greetings  Holiday Greenery Jolly Old St. Nick  /  St. Nick Cling and the Merry clear sentiment. I accented some of the images with prisma pencil, and the sentiment is stamped in Versamark with Festive Berries ink before embossing in red embossing powder.  The Christmas is added with Chestnut Roan chalk ink.  This came out better than I thought.  I am intimidated by collages like this sometimes, but I think it turned out well.  What do you think???


Winter Peace - This one is inspired by a few things.  The new cold weather that we are finally getting down here in Texas, and all of the cute cards I've been seeing that are masked off, stamped and embossed in white and then inked with rich colors.  First, I used some low tack masking paper to mark off the sky scene.  Using Stampin' Up! Whisper White craft ink and embossing powder, my trees from the Pines set and snowflakes from the Winter Mix It Up set come to life in the blue twilight sky.  I used Tumbled Glass, Broken China, Stormy Sky and a little bit of Faded Jeans.  After all of the inking, I wiped the embossed images off to remove any remaining ink and then removed the masking paper.  The handwritten "peace on earth" sentiment from the Little Christmas set is stamped in Faded Jeans and I think it is the perfect way to finish off this card.  I'm pleased at the effect and will be trying this again with other Christmas stamps  - it's really fun when you see the images pop off the card!

So that's my take on One Layer Cards.  I hope you give these techniques a try.  Even though Christmas is going to be here in a blink of an eye, these cards could be put together really quick for a last minute gift, or mass produced in a jiffy!

Hope you have a wonderful holiday season!

Peace

Julie

Wednesday, November 28, 2012

What's Up Wednesday: Golden Christmas


Hello peeps!

It's Shay here.  I hope everyone had a wonderful Thanksgiving.  Before I get onto today's post I wanted to draw your attention to Julie's series of Advent Calendar tags: Part 1, Part 2, & Part 3.  They are each unique and delightful.

Now that December is nearing it is a perfect time to get those Christmas and holiday cards done.

I think gold is perfect for the holidays so I pulled out my gold embossing powder, some older Paper Wings Productions stamps along with newer stamps to create a couple Christmas cards.  I really love how I was able to incorporate the older non-Christmas themed stamps with newer Christmas themed stamps to create very Christmasy cards.


For the first card I wanted to use the Madonna and baby Jesus image from Melange Women 2-Worldly Women set.  After gold embossing the Madonna, I adhered the white cardstock panel to the white cardbase which I adhered a piece of decorative gold tissue paper and wrapped around with twine.  I added a few gold embossed stars from Hanging Stars for added interest around the the Madonna and on the cardbase.   The sentiment is from Christmas Mix It Up which I gold embossed yet again and cut into banner shapes.


The inspiration for this card was the three Magi who are sometimes portrayed as kings.  There are great crown images found in the Royal Melange or Crowns sets.  I chose to use the two larger crowns.  On red cardstock I stamped in red the postcard image (such an awesome background) from Writing Backgrounds or Postcard.  I then embossed each crown with a different embossing powder: silver, gold and copper. The sentiment is the same as the first card from Christmas Mix It Up which I stamped inside the banner from Banner Day--all gold embossed.  The words fit rather well and because they are clear you can bend them slightly to fit the curve of the banner.  I adhered this panel to a gold panel.  The card base is red which I stamped in red using the big bold flourish from Flourish Fun 1 and the trio of dots from Flourish Fun 2.  All of the red layers are distressed using the red ink and my ink blending tool.

I hope you ink up some Paper Wings Productions stamps and create festive holiday cards.  We would love to see what you make with Paper Wings Productions stamps.  Add your projects to our flickr group, to Pinterest, comment with a link on this post or even email pictures to us!

Take flight,
Shay.

Supplies:

Golden Mother and Child
Stamps: Melange Women 2-Worldly Women, Hanging Stars, Christmas Mix It Up
Ink: Versamark by Tsukineko
Cardstock: Georgia Pacific in white
Other: gold embossing powder by Judikins; brown and white twine by Divine Twine; decorative gold tissue paper

Three Kings
Stamps: Royal Melange or CrownsChristmas Mix It Up, Banner Day, Writing Backgrounds or PostcardFlourish Fun 1Flourish Fun 2
Ink: Versamark by Tsukineko; Jenni Bowlin for Ranger in chili powder
Cardstock: gold and red
Other: gold, copper and silver embossing powder by Judikins and Ranger; ink blending tool by Ranger

Friday, November 16, 2012

Feature Friday- Advent Calendar: Part 2

Hello Peeps! 
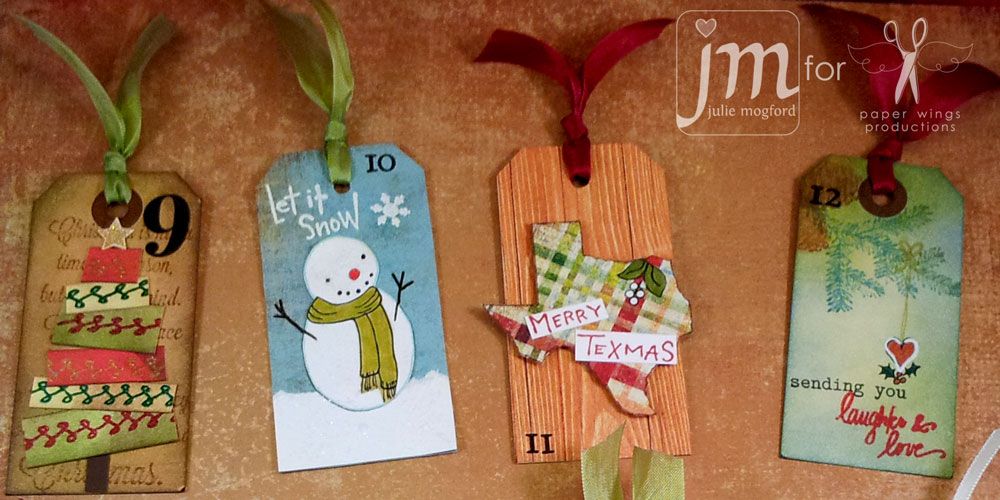
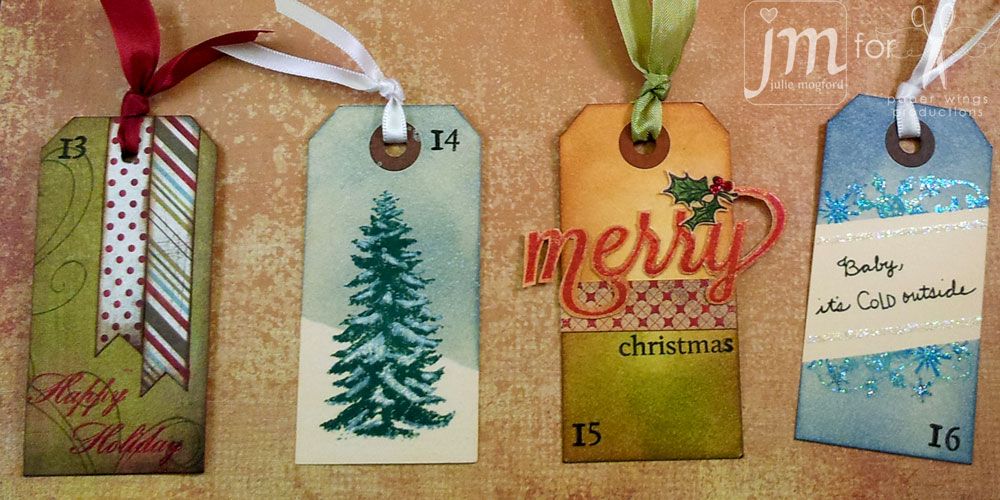
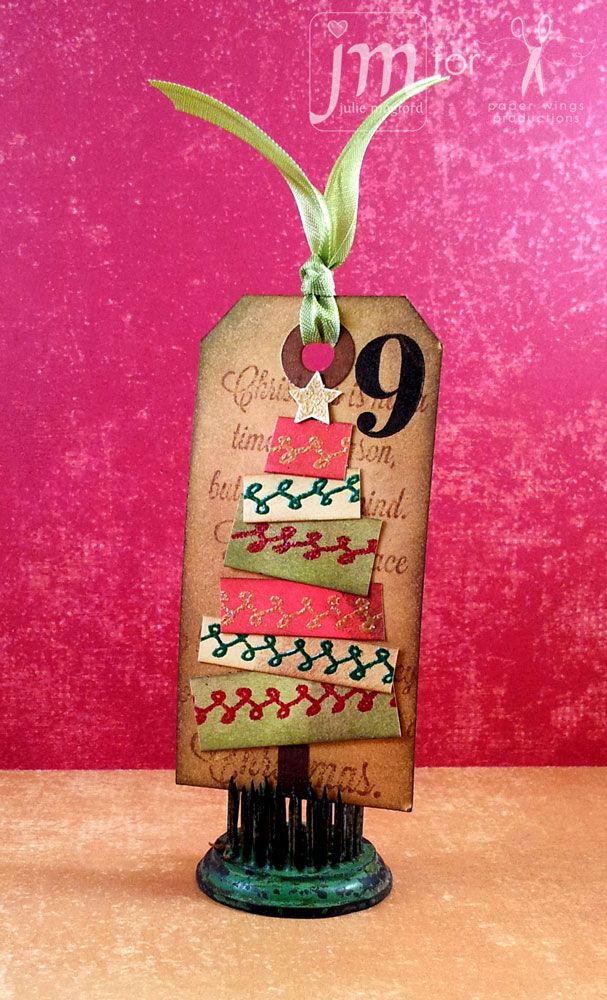
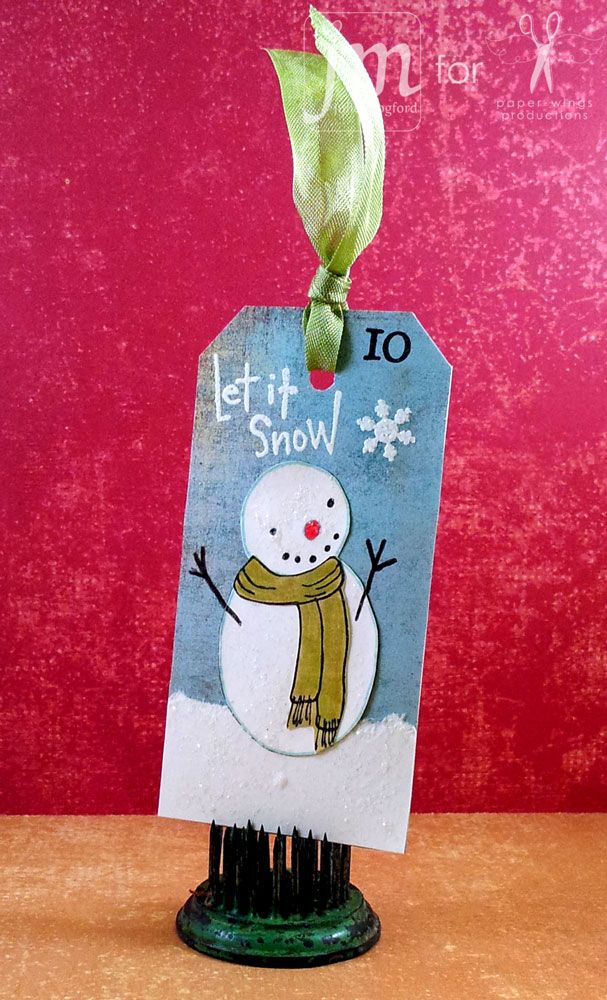
Welcome back to Part 2 of the Advent Calendar!  Today I"m sharing tag 9-16.  Since I used smaller tags for this project, I felt the smaller numbers from the Perfect Alphabet Clear set would be a better choice, and keep the focus on the image. The number 9 is from the Perfect Number Clear Set and all were stamped with Versa Fine Black Onyx.  Let's take a look at them!!


 I've been inspired by so many ideas on Pinterest, Splitcoast, and Online Card Classes Holiday Workshop.  Here are today's tags!


Details:  This tag features one of our Christmas Sentiments stamps in the background, and one of our border stamps from our Life Framer set. I inked cardstock in yellow, red and green, and then embossed the border stamp in a contrasting color and cut the strips to length for the tree shape.  The star is from our Hanging Stars set, and it is also embossed (Egyptian Gold-Judikens)


Details: Cardstock background (Basic Grey), white Neenah Cardstock with a torn edge added for snow and snowman from Snowman Love set and used the cute little scarf for this little guy.  The Let it Snow was stamped to fit the space and embossed with Stampin' Up Whisper White ep.  Since he was looking upward, I had to give him a little snowflake to watch from the Winter Mix It Up set.  And of course, I couldn't resist a little Rock Candy Distress Stickles to make the snow sparkle.


Details:  I'm a Texas gal!  So, I had to pay a little tribute to Texas!  I used the Lone Star State clear stamp and stamped it on this cute Christmas plaid paper and cut it out. I added the cute Texmas sentiment in Festive Berries distress ink. And finally, a sweet little mistletoe from the Holiday Tags clear set. The woodgrain paper is from Studio Calico.  Perfect!!


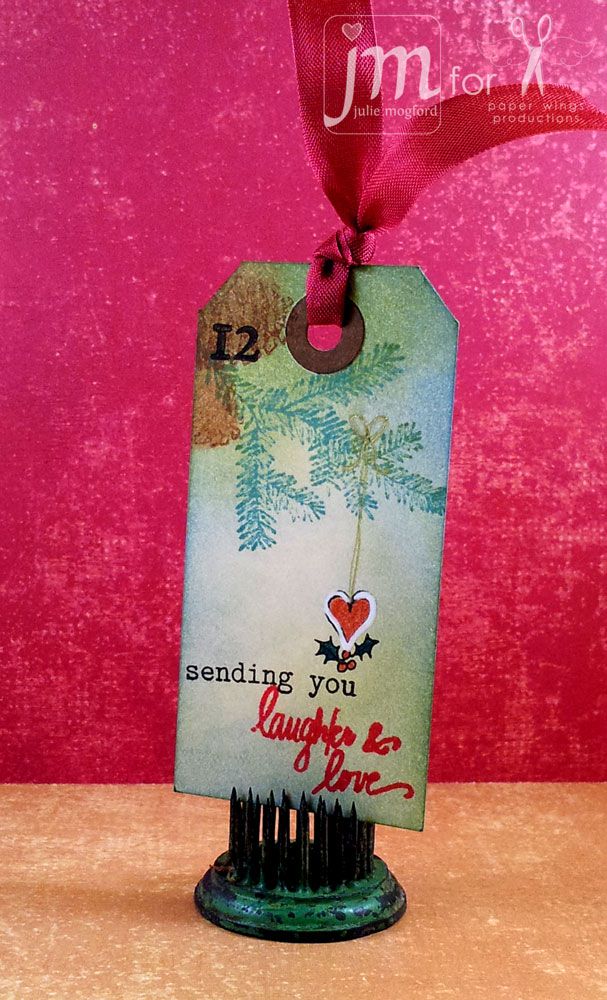
Details:  I just love this pine bough and pine cones from the Pines Cling Stamp Set. I added another element from the Holiday Tags clear set to create an ornament.  I drew the hanger and bow with a gold pen.  And, I love this sentiment from the Winter Mix It Up set.


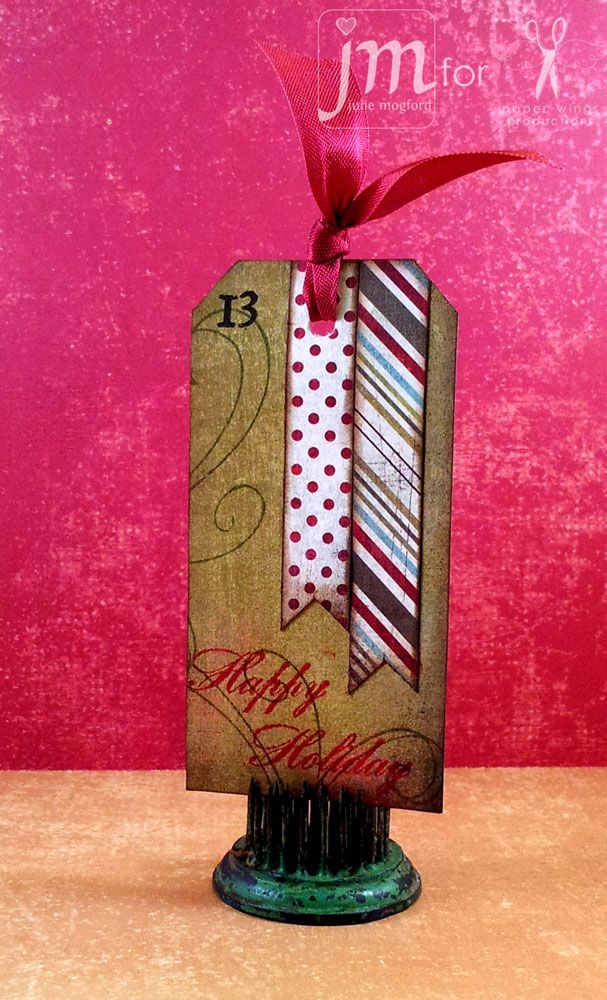
Details:  Basic Grey green paper from Figgy is accented here with Flourish Fun 2 stamp and two more strips of BG Figgy paper.  All edges are inked with Walnut Distress ink, and the Happy Holiday Script sentiment added and embossed in red! Simple and Elegant.


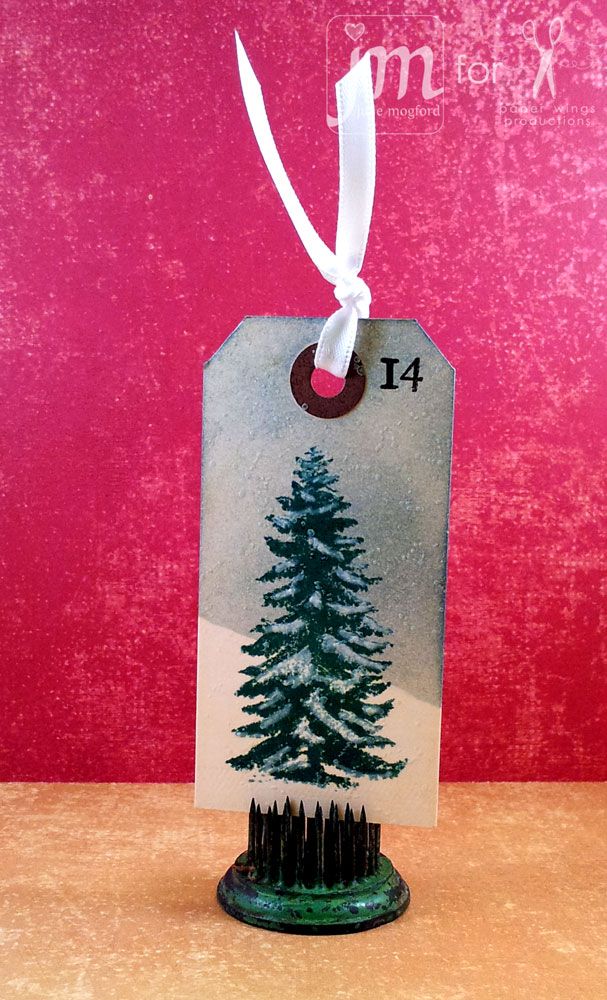
 Details: Here is another stamp from the Pines Cling Stamp Set using the large tree and I used a white pen to add snow to the tree and Frosted Lace stickles.  Although it is faint here, I used the small dot stamp from the Art Textures set to create falling snow stamped with SU! Whisper White craft ink and embossed with clear ep.  It reminds me of a trip I took to Wyoming for my first Christmas in snow.  I'll never forget that.


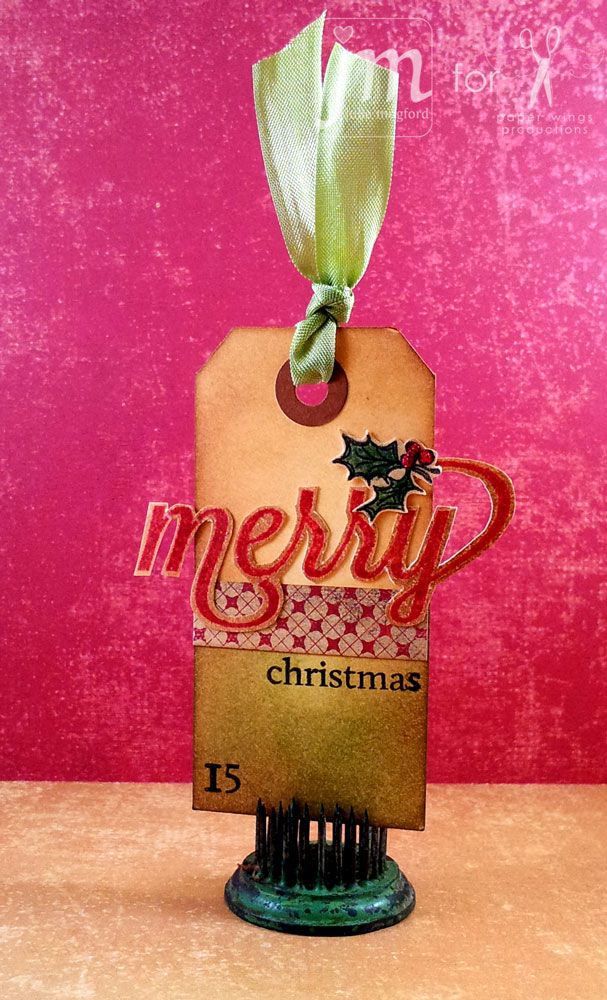
Details:  This one took a little work, but I love how it turned out.  The tag background is inked with two colors of Distress ink plus a little Walnut.  I've added a strip of paper to separate the two areas and give it some interest.  Then I used the Merry Clear stamp with Christmas in black, and merry stamped in Festive Berries on a separate brown inked tag.  I embossed merry ink clear to give it a little shine, and then trimmed the sentiment to expose the background and have the letters hang off the side. The finishing touch is the holly berries and leaves from Holiday Tags stamped and colored with Distress markers, with a touch of Barn Door distress stickles. It feels classic and delicate.


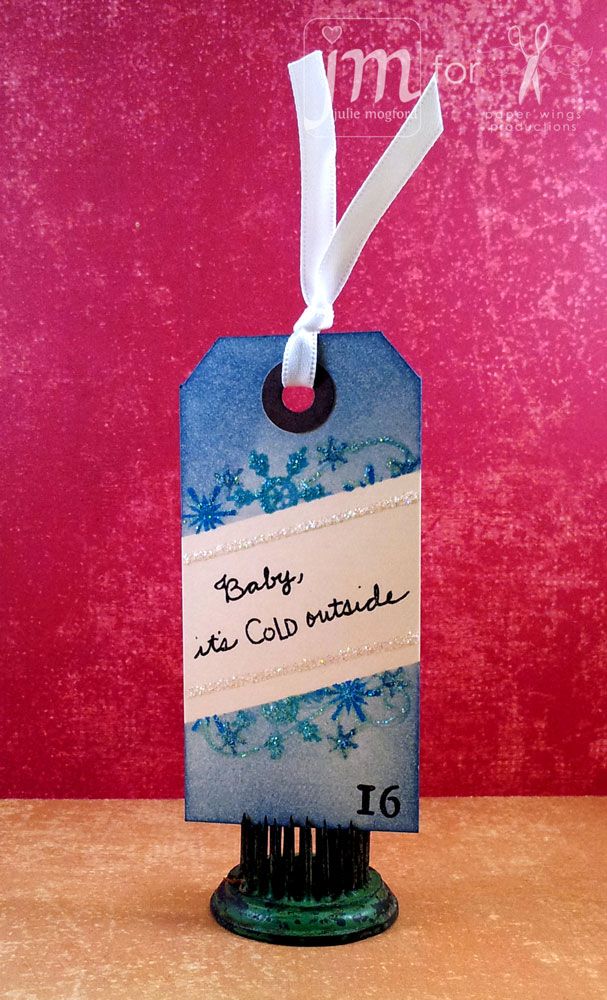
 DetailsI loved seeing this technique from Jennifer McGuire in the Online Card Classes Holiday Workshop.  First I stamped the sentiment from Snowman Love  and using a mask, I have sectioned off part of the tag and stamped a flourish and several snowflakes in a variety of blues along the edge.  Using an ink blending tool, I shaded the exposed areas of the tag.  And, to add that icy look, a touch of Diamond Stickles.  I love how this one turned out! (Flourish Fun 2 , Holiday Mix It Up, and Winter Mix It Up for the snowflakes).


Lots of festive designs here for part 2 of our Advent Calendar.  There will be one more installment of the remaining tags before the end of the month.  I hope you found something today (or several ideas) that will inspire you for your projects. As always, I'd love to see what you create!  Add your projects to our flickr group, to Pinterest, comment with a link on this post or even email pictures to us! See you soon with the final set of tags. 

"Deck the Halls!!!"
Happy Stamping!

Julie

Wednesday, September 26, 2012

What's Up Wednesday - Tag Time!


What's Up Peeps!!!

Today I thought I'd share a few items that Liz Allen and I were playing with while at the CKC convention.  We really enjoyed meeting so many people and getting the opportunity to share Paper Wings Productions stamps with them.

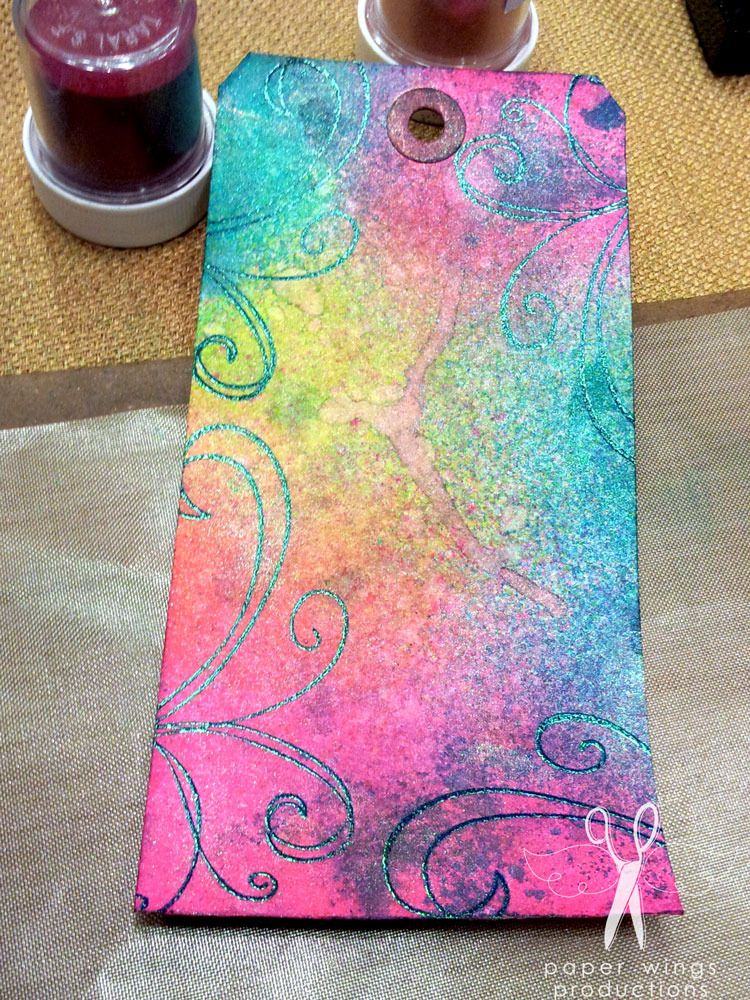
Most of Saturday, I was playing with manila tags, Dylusions inks, some spray inks and embossing powders from Lindy's Stamp Gang.  I threw caution to the wind, and started spraying like never before.  The Dylusions inks are so intense and bright - they really are amazing.  I also really fell in love with the Tibetan Poppy Teal spray from the Autumn Leaves color set and the Hyacinth Blue Jade powder.  I used the Flourish Fun 2 set with this embossing powder.  These products were so popular that we sold out of both!


Isn't this AWESOME?!?!  This card was just so pretty I never stamped any other image on it.  I bet you have items like that too.  I'll have to pick just the perfect project and add this tag to it.


Liz was in tag mode too, but she was working on smaller gift tags, and the theme was centered around Christmas.  Here are two of her "oh, so cute" tags. 


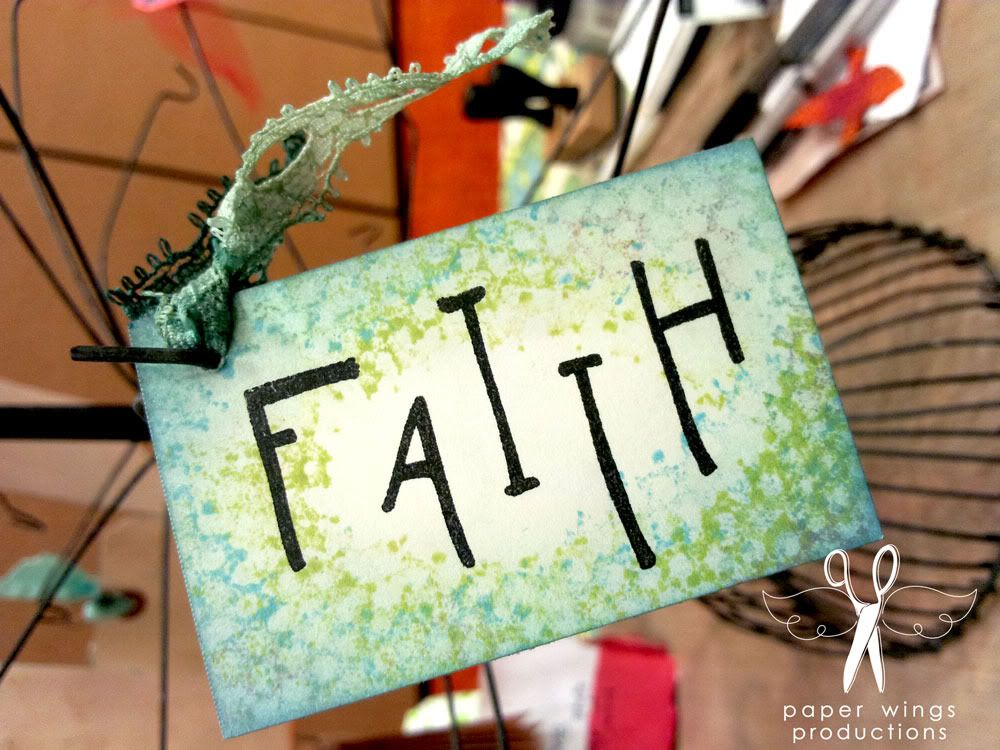
This tag uses the Art Textures stamps in shades of blue and green to create a frame around the "faith" sentiment stamped using the Funky Alphabet set.  This tag is a great example of making handmade items quickly and easily for your family and friends.


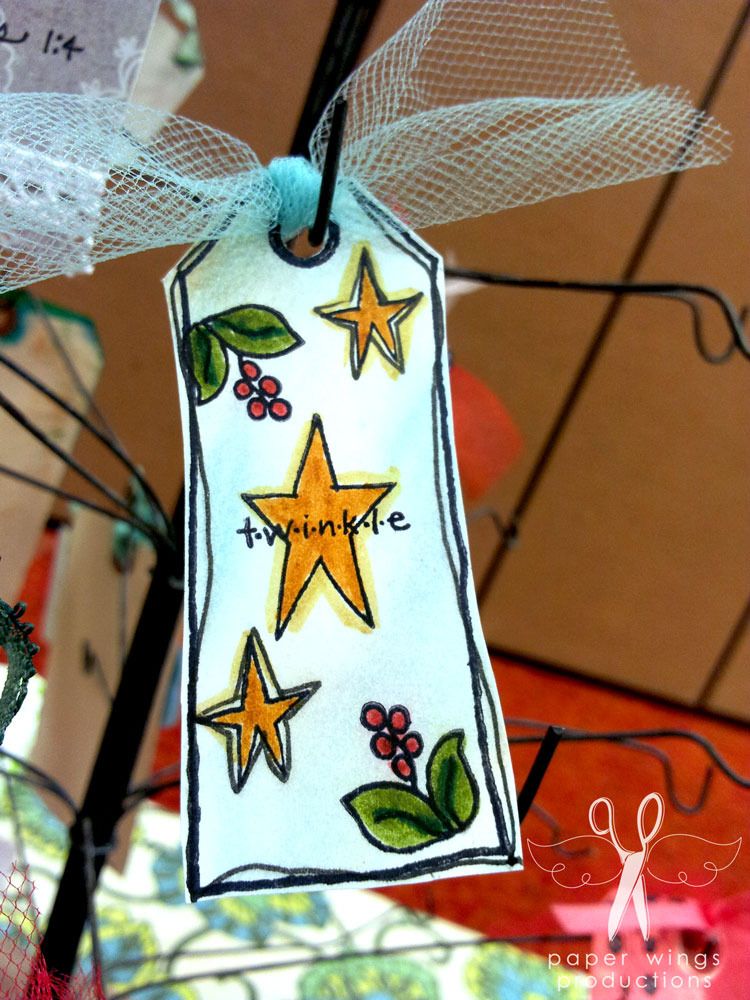
Liz made this super cute tag using the small stars from the Hanging Stars set, and some new stamps she has designed for the fall release.  The small stars work well together with the "twinkle star" and the little holly sprig. I can't wait to use them!  I always like how Liz adds her own special touches to her projects by adding extra accents and doodling lines to give each item a personal touch.  
 
 
There were many more beautiful Liz tags, but I can't divulge that many SNEAK PEEKS this early!  Keep checking back because even more sneak peeks are just around the corner for our next stamp release.
 
 
That's all for now - happy stamping!!!
 
Julie
 
 
Supplies:
Stamps - Hanging Stars, Flourish Fun 2, Art Textures, and Funky Alphabet
Ink - Jenni Bowlin, Versamark, Memento, Lindy's Stamp Gang sprays, Dylusions Sprays
Paper - Manila tags, white cardstock
Tools - Heat tool
Other - Lindy's Stamp Gang embossing powder, tulle and ribbon


Wednesday, August 22, 2012

What's Up Wednesday - Making Multiples of the Same Card


What's Up Peeps?!

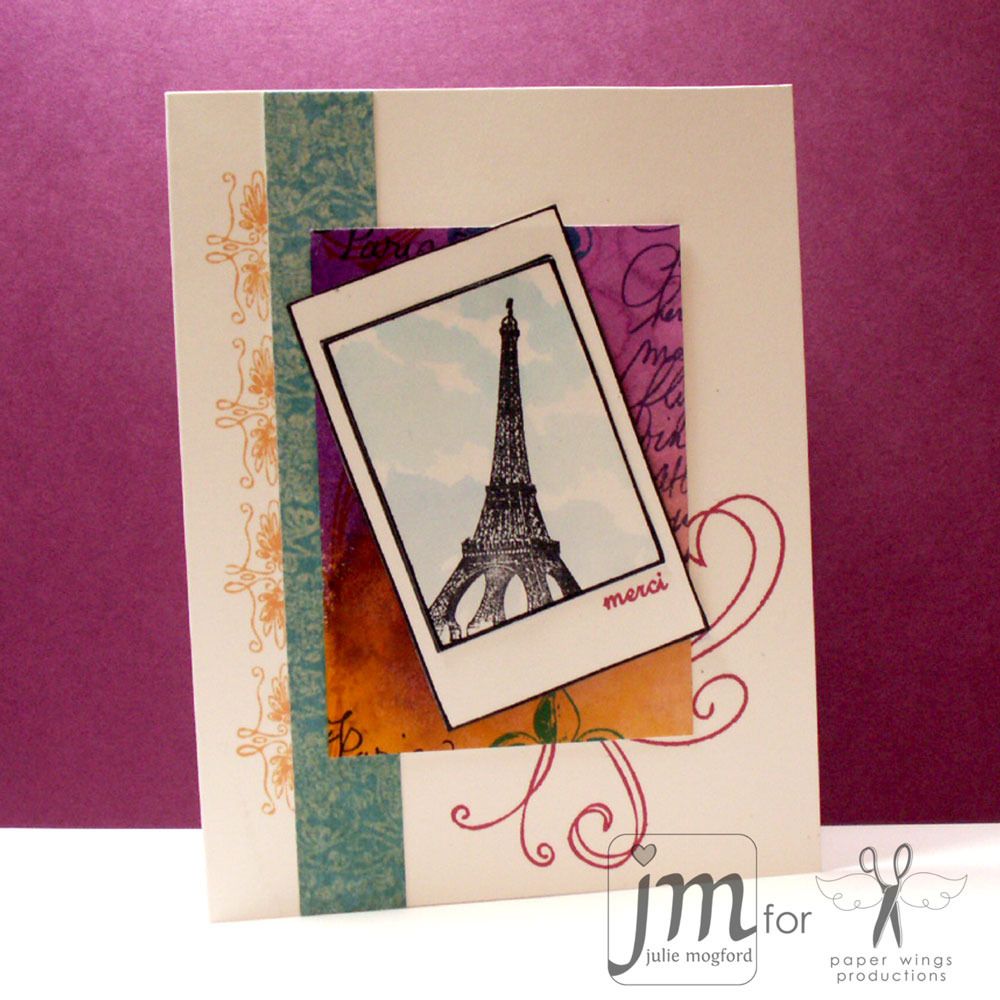
I have a card with a few techniques to share with you today.  This is a card I made to trade at the recent CKC Houston show.  I had just gotten my Paris and Royal Melange sets, and just had to make time to play.  This card is very different from what I usually do, and I wanted to trade something that had several components but was easy to put together.  I made 20 of these in several stages.  Let me break down the thought process and how I achieved this finished project.


Card base: I used the border strip in the Paris set on the left side of the card and added a strip on patterened paper.  I knew how large I wanted the pattern behind the photo frame, so I planned where it would be attached to the card and made a mark in pencil to know where to add the pink flourish from Flourish Fun 2.


Masterboard / Handmade Background Pattern:  Very much like Shay's masterboard that she demonstrated recently, I took 2 pieces of paper and sprayed them with Dylusions spray inks.  Then, I added a variety of stamps in the same color family as the orange and pink inks and turquoise paperstrip.  I measured and cut the masterboard accordingly and adhered to the card base.

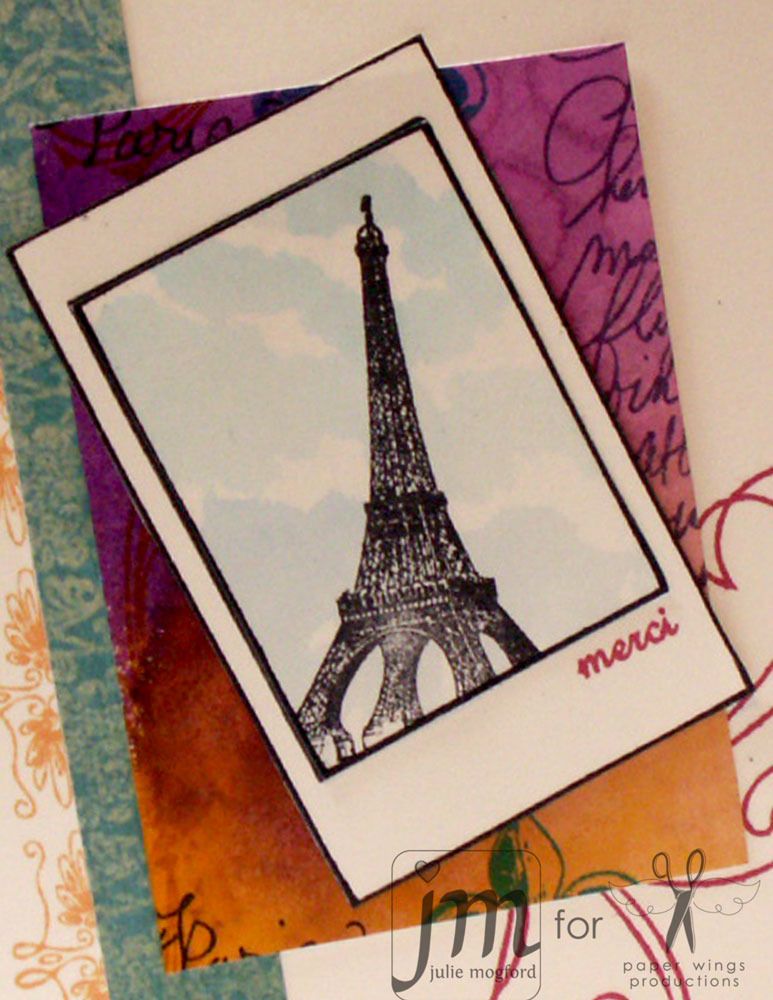
Photo Frame: I stamped the Snapshot Framer 40 times on white paper.  I needed double the amount because I one half was for the frame itself, and the other half was used for stamping the Eiffel Tower from the Royal Melange set.  Later, I would be able to cut the small rectangle and add it to the clean photo frames.  The cloud effect was created with aqua markers and a paintbrush with water.  I just picked up the aqua/skyblue color and added it to each Eiffel Tower to create a cloudy sky look.  Before adding the tower image, I stamped "merci" from the Louise set on the photo frame.  The whole Snapshot focal image is adhered with foam tape.


With the holidays quickly approaching, many of you will be making multiples of cards.  This process of breaking the project down into stages and then an assembly line could be very helpful in creating many handmade projects for friends and family. 

Thanks for stopping by the Aviary!
Take Flight!

Julie

Supplies:
Stamps: Paris, Royal Melange, Louise, Flourish Fun 1 & 2, Script, Snapshot Framer
Ink: Memento ink in tuxedo black (Tsukineko), Distress Inks (Ranger), Chalk Ink (Color Box)
Cardstock: Neenah Solar White
Patterend Paper: Stash
Other: Dylusions sprays (Ranger), Aqua Markers and paintbrush.

Friday, July 27, 2012

Feature Friday: Hanging Stars

Hello there peeps!

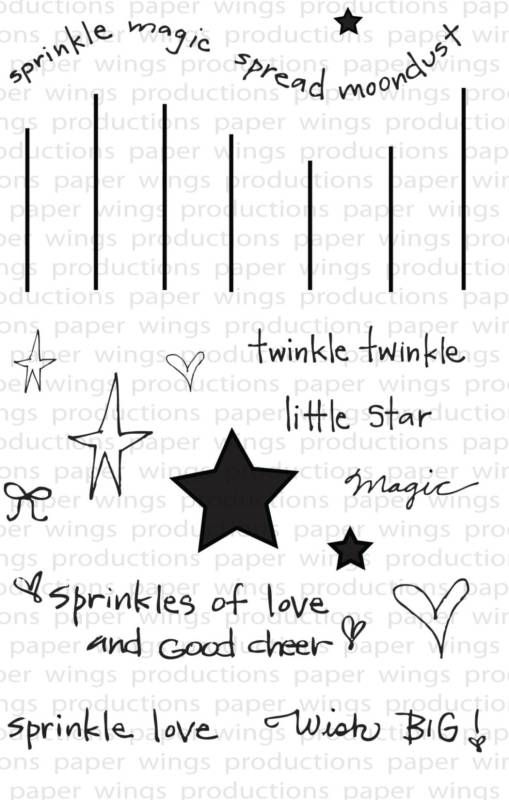
Today we feature the delightful Hanging Stars set by Liz Allen of Fine & Fancy.  Full of sparkle and charm just like Miss Lizzie herself, this set can be added to so many of your projects.  This stamp set can be used to celebrate the special people in your lives, everyday moments or special occasions like 4th of July, birth of child, congratulations, birthdays, anniversaries, Halloween, the winter holidays or just as a pick me up for someone.  Add the Hanging Stars to your tags, cards, gifts. ATCs or mixed media projects.


How about we see some tags by Liz and Julie?


The Stars Danced by Liz Allen


Details:

1. Use distress inks and ink blending tool to lightly cover the surface of tag with blue, green and purple inks.

2. Stamp flourish from Flourish Fun 1 on the top and near bottom of the tag.  Hand draw lines from top Flourish at varying heights.  Stamp or draw stars at the bottom of each line.  Stamp or draw a bow on top of each star.

3.  Write or stamp a sentiment.

4. Tear off bottom edge of tag.  Ink all edges with ink blender tool and distress ink.  Add Stickles to the bottom edge and to all the stars.

5. Tie on some tulle!

Supplies for The Stars Danced Tag
Stamps: Hanging StarsFlourish Fun 1
Ink: Memento in tuxedo black, Tsukineko; Tim Holtz Distress Inks by Ranger 
Paper: Tag
Tools: Ink Blending Tool (Ranger); black pen
Embellishments:  Stickles by Ranger; tulle


Sprinkles of Love Tag by Liz Allen


 Details:

1. Stamp flourish from Flourish Fun 2 on the top.  Hand draw lines from top Flourish at varying heights.  Stamp hearts at the bottom of each line.  Color in hearts with colored pencils.  Stamp a bow on top of each heart.


2. Stamp a sentiment.  Color in areas of background with a white colored pencil.

3. Add Stickles to all the hearts and bows.

4. Draw circles around border or stamp a border.


Supplies for Sprinkle Love Tag
Stamps: Hanging StarsFlourish Fun 2
Ink: black ink
Paper: kraft
Tools: colored pencils; black pen; Tim Holtz Distress Marker by Ranger in picket fence
Embellishments: Stickles by Ranger


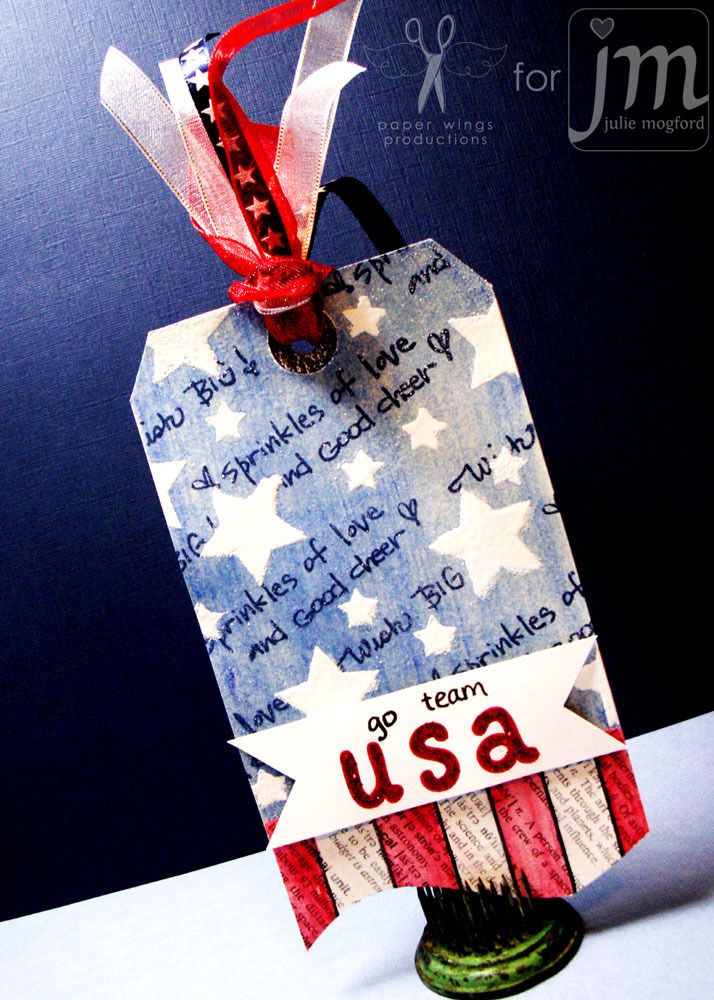
Team USA tag by Julie Mogford


We're ready for the Olympics at my house and I thought a USA inspired tag would be fun.  The Hanging Stars set had some great elements for me to use on this tag and I really like the curved bottom.  Go USA!!!

Details:
1. Cover top two-thirds of tag with blue watercolor crayon, and then use paintbrush with water to blend out the color.
2. Stamp sentiments from Hanging Stars set diagonally in darker blue ink.
3. Stamps stars with white craft ink and emboss with white embossing powder.
4. Stamp staggered lines on text paper. Use red watercolor crayon as before to create red stripe. Adhere to tag and trim tag in same shape as staggered lines.
5. Spray shimmer mist on tag and blot dry. The water could react with background, and in this case, I didn’t want it to.
6. Stamp USA letters from Whimsical Solid Alpha in red ink and write “go team” above. Cut banner slits and adhere to tag with foam tape. Use red stickles to accent USA.
7. Add fun ribbon.
Supplies for Team USA tag 
Stamps: Hanging Stars, Whimsical Solid Alphabet
Ink: Archival Black by Ranger, Color Box Chalk Ink in Warm Red and Blue Iris, Stampin' Up! Craft ink in Whisper White
Paper: dictionary paper, manila tag
Tools: heatgun, Faber Castell Pitt Artist Pen, Caran D'ache Watercolor Crayons, Stampin' Up dimensionals
Embellishments: Stampin' Up! Whisper White embossing powder, Radiant Rain Shimmer Mist in Pearl Gold by Luminarte, Glitz Stickles by Ranger in Ruby Slippers

Delight in the Lord tag by Julie Mogford


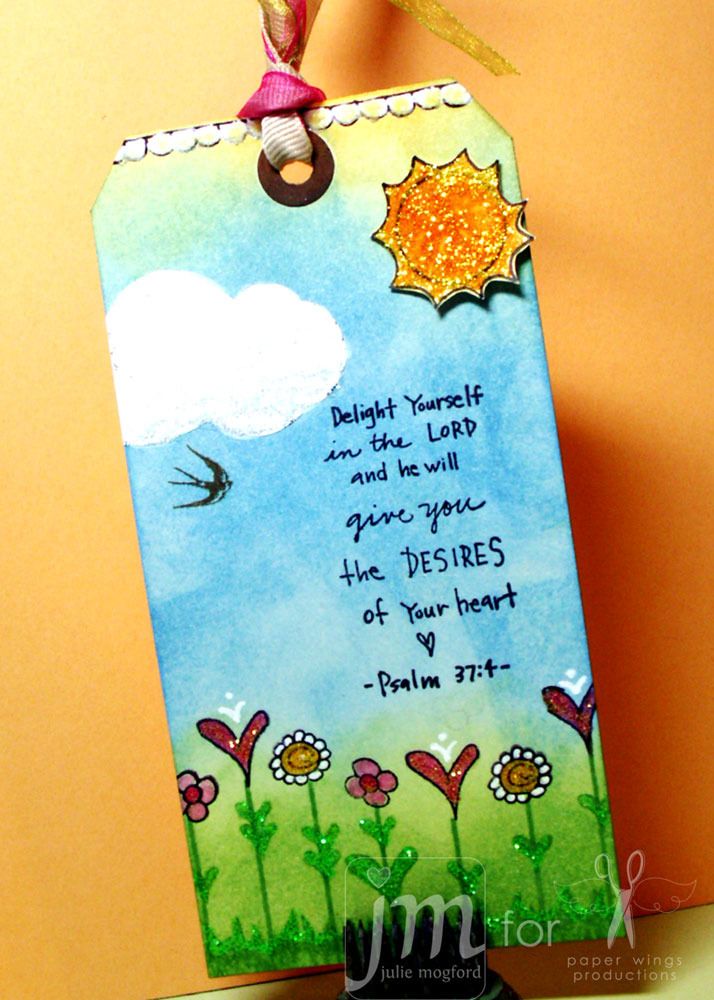
This tag was inspired by the designer herself, Miss Lizzie Allen.  To me this looks like something she might make.   I did of course have to do a little bit of stickles work.  Although you might not be able to detect it from this photo, but stickles are just about everywhere here.  The top scallop, sun, cloud, flowers, leaves and even the grass.  The sentiment is from our Scripture set, which is also designed by Liz.  I love this happy tag! 

Details:

1. Using an ink blending tool, add colors to create a sky and grass background. 
2. With same green ink, stamp staggered lines from Hanging Stars set at the bottom to create flower stems.  Using the small folk star, stamp repeatedly at the bottom of tag to create a grass effect.  Use the folk hearts to create leaves for flowers.

3. Stamp large hearts and flowers from the Louise set on the stems using black archival ink.  Press ink pads on non-stick surface to pool ink and use a brush and water to color in areas for grass, leaves and flowers.  Use white gel pen to accent flowers.
4. Cut cloud shape from text paper, adhere to tag and add white paint to dull text a bit.  Draw and cut sun shape from yellow scrap paper. Add to tag with foam tape.
5. Stamp scallop border from Louise set at top of tag and add a flying bird from the Bird Panel set. Color inside scallops with white paint or white gel pen.  Stamp sentiment from Scriptures set above flowers in black ink.
6. Use glitter to accent elements of tag.
Supplies for Delight in the Lord tag 
Stamps: Hanging Stars, Scriptures, Louise, Bird Panel
Ink: Archival Black by Ranger, Distress Ink (Ranger) in Vintage Photo, Wild Honey, Pickled Raspberry, Mowed Lawn, Salty Ocean
Paper: dictionary, scrap yellow
Tools: Ink Blending Tool (Ranger), Signo gel pen, paintbrush, stampin up dimensionals
Embellishments:  White craft paint and Stickles (Ranger) in Distress Rock Candy, Baby Blue, Firefly, Orange Peel, Yellow, and Fruit Punch


You can also see Hanging Stars being used HERE, HERE and HERE.  I hope you are inspired to add some sparkle and love on your projects too!


Come and join us for another great pwp event, tomorrow at Scrapbook N' More in New Braunfels.  We will have a trunk show, demos, and a FREE make & take project.  It's from 11-4, hope to see you there!


Thank you for joining us today.

The Paper Wings Gals.

Thursday, May 24, 2012

Oh Baby!

Happy day peeps,

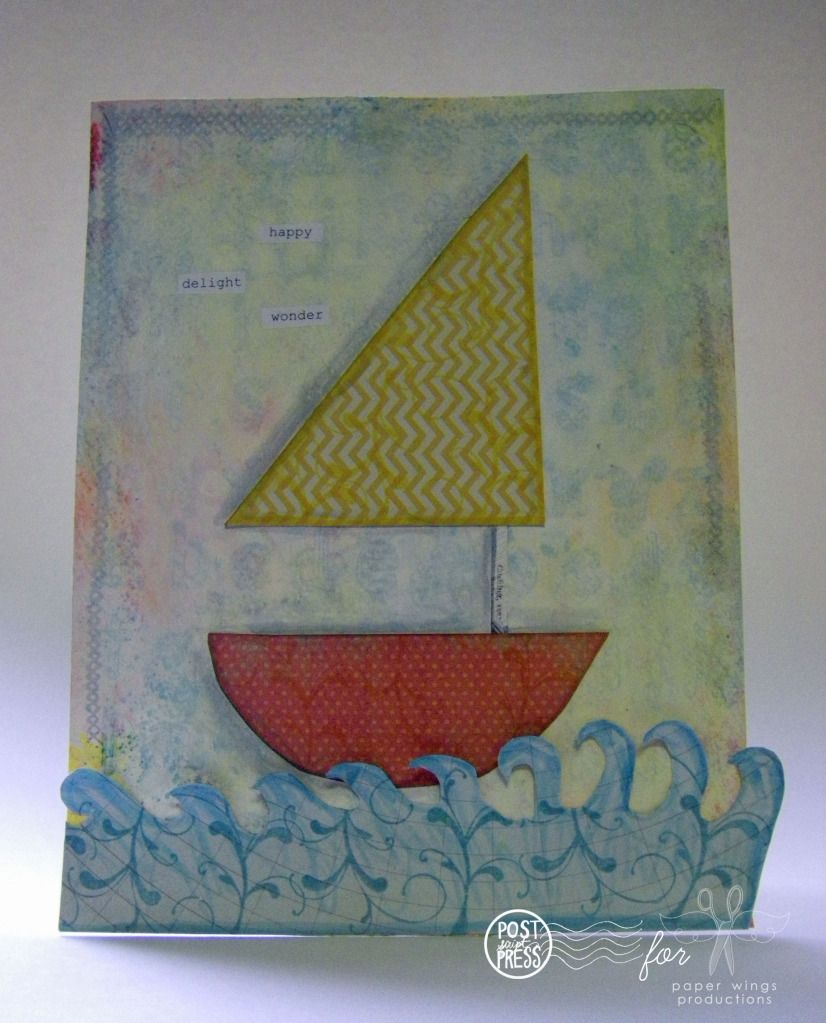
I tried my hand at a gift for a baby (probably boy, but perhaps not) that adds a little color and handmade charm to the nursery using the color combo from last week of yellow, aqua and coral.  For more information and projects using this color combo check out this post HERE and HERE


My background was inspired by Julie's baby card found HERE. I loved how she used all of her Whimsical Pattern Alphabet as a background and that is how I began as well...stamping the entire alphabet to make a fun pattern.

I then added watercolor markers, followed by Dylusions ink sprays and a Dylusions stencil and plenty of water. The colors were very vibrant and pretty, but I thought they were too intense for this project so I used a mixture of gesso and warm white paint to mute the colors. Of course this covered up the alphabet so I stamped it several times after the first time. Luckily the base of my project was a pretty heavy weight watercolor paper which held up to all the layers very well. 
I cut out the little paper boat and waves from patterned paper (don't worry about it being perfect, there is something special when you can see that someone made something themselves) and then I stamped each piece with a matching ink color using a flourish from Flourish Fun 2 and edged each with a matching color of watercolor marker. These flourishes work for nearly anything and I could probably add a flourish to every project I made so I better watch myself! 

My last bit of stamping was done sporadically around the top, right and left borders using the criss-cross border image from Details Framer using a gray ink so that it was somewhat subtle.  The words I had at hand...I like to sometimes type up a variety of words or phrases and have them when I need a few words sprinkled about a project.

Popping this little project into a frame would make a sweet gift for a little sailor.  You could easily change up the colors and patterns along with the image to suit your needs (for instance you could cut out a heart for a wedding gift...a house for a welcome home, hostess gift or housewarming gift).

Don't forget to check out the lovely card Julie made for a baby shower HERE

Take flight,
Shay.

Friday, May 11, 2012

Mother's Day

Happy Friday peeps,

Sometimes our best intentions are tread upon by everyday happenings and trying to get what must be done right now done or perhaps by circumstances beyond our control.  Perhaps you are now wondering what to give this Mother's Day.  Today I have an easy and customizable handmade gift and card you can give your mother or another important maternal figure in your life (including yourself!) for Mother's Day that can be done in an hour or less (or more depending on how elaborate you make it).


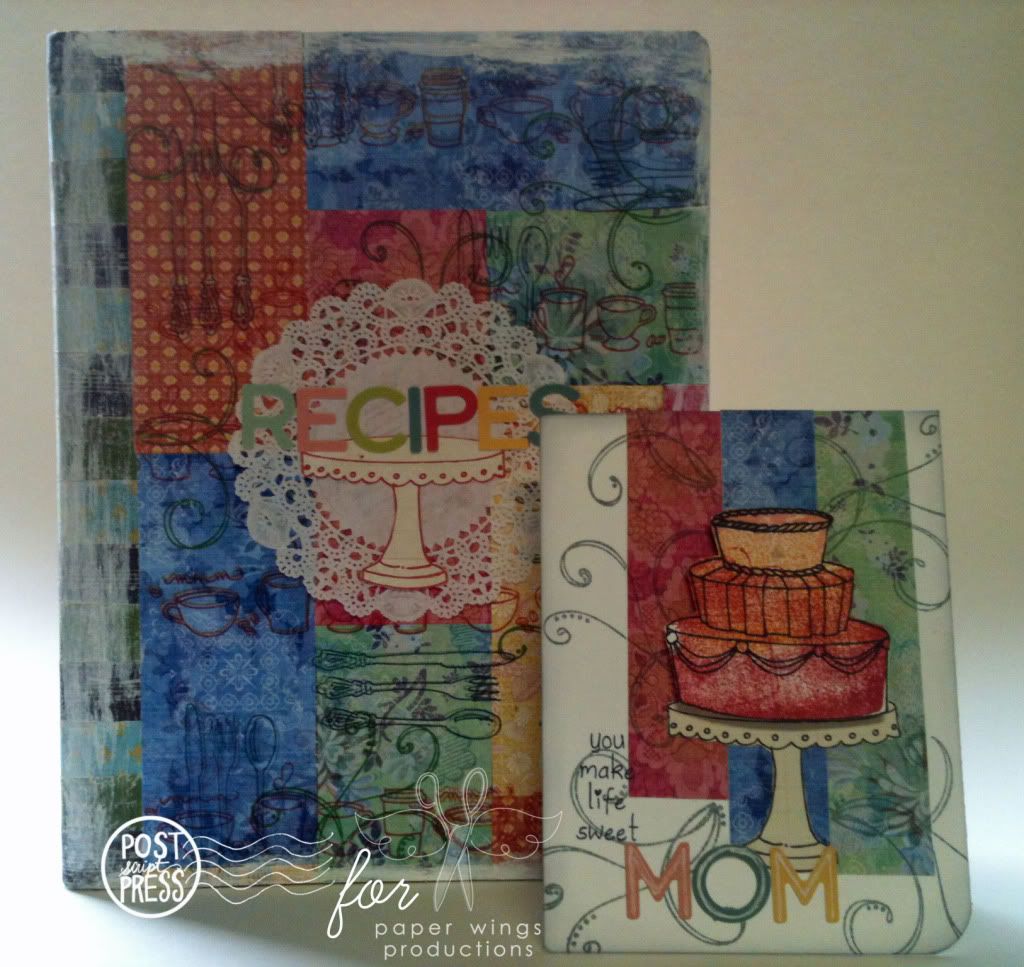
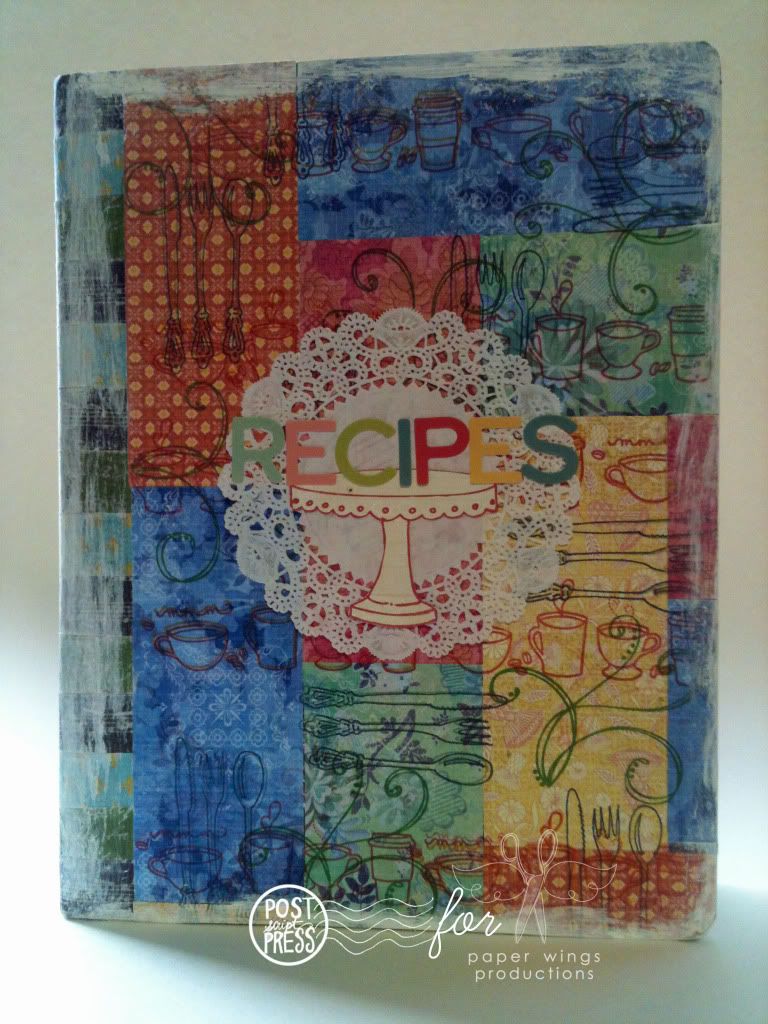
Using a simple, inexpensive and readily available composition book I customized the cover using 7Gypsies patterned tape, patterned paper, Paper Wings Productions stamps, a doily, letter stamps and gesso around the edges to mute some of the crazy color and patterns I used.  For my book I wanted to do a recipe book, but you could change it to be a goals book, travel journal, gardening book, weight loss journal, reading log, place for notes or ideas, etc. depending on what your mother, grandmother, sister, aunt, mother-in-law, friend or any other important woman in your life (likewise you could do the same thing for the men in your life too).


Because I chose to do a recipe book I chose to go with food/drink themed stamps like the coffee border in Play With Your Coffee by Julie Mogford and the silverware from Hey Cupcake by handmade by Lissie Girl.  I also added a flourish from Flourish Fun 2 for an added interest.  The cake stand is from Let's Eat Cake also by handmade by Lissie Girl.

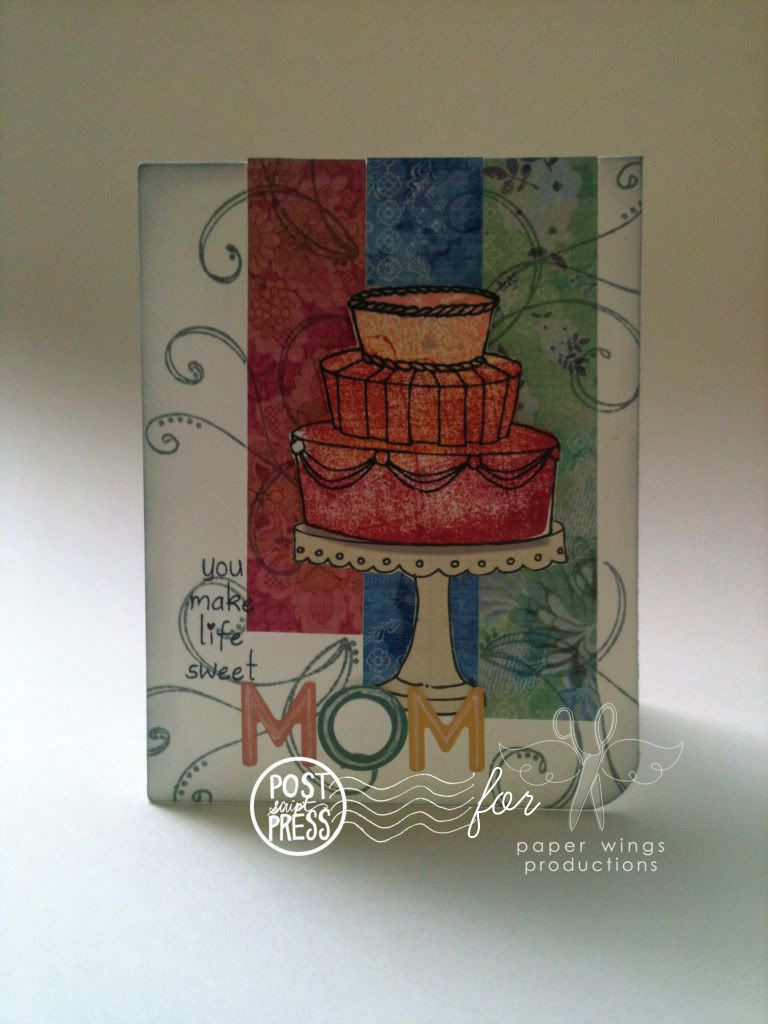
Did you notice that the accompanying card uses Flight Plan Mission 002


By using the Flight Plan I could take the guesswork out of coming up a layout and spend my time on the rest of the card.  For the cake I actually stamped the backside of the image using 3 colors of ink and then over-stamped it with the right side of the cake image in black.  I think it creates a cool effect.  The stamps used on this card are very similar to those used on the book to create a cohesive look: Flourish Fun 2, Let's Eat Cake and Hey Cupcake.

I hope you have a joyous Mother's Day celebrating the mothers in your life and all those mothers out there I hope you are showered with love.

Take flight,
Shay.
Related Posts Plugin for WordPress, Blogger...