

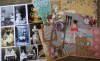
Hi Paper Wings Fans! Dana here today sharing an encaustic wax tutorial. I'm still experimenting with this new medium so please keep that in mind! Today I'm going to share some techniques that work for me, as well as my mistakes, and how to avoid them.


I used the Purple Cows Melt Tool, interchangeable tips and encaustic wax for the projects I'm sharing today. I also used a heat gun.

I cut several small pieces of cardboard (from my Nesting Components Kit) and primed them with gesso. I did experiment with pieces cut from a cardboard box and was not happy with the way the wax settled on the ridged surface.

Once the gesso was dry, I melted clear wax onto a piece of cardboard, spread the wax around to cover the entire piece of cardboard and then heated the wax with my heat gun to fuse and smooth the layer of wax. Note: Apply heat just until the surface of your project is shiny. Overheating the wax will cause the wax to run off your project.

I stamped an image from the Text Melange Cling Stamp Set onto a piece of white tissue paper using black Archival Ink.

I then placed the tissue paper onto my piece and melted a layer of clear wax over the top. The tissue paper blends with the wax for a seamless finish. Again, I used my heat gun to smooth and fuse the second layer of wax. Why not stamp directly onto the first layer of wax? I'm still a beginner and need much more practice to create a wax layer that is smooth enough to stamp onto and produce a crisp image. Until that time, tissue paper works great!

I changed the tip on my heat tool and selected a gold colored wax to add a colored edge to my piece.

I added a rub-on sentiment, which I then sealed with a small amount of clear wax.

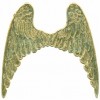
I finished this piece with a set of Gold Foil Wings.

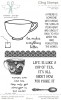
I created a second piece using the same techniques as above. I selected several stamps from the NEW Tea Time Cling Stamp Set, some small circles from the Double Dot Border Clear Stamp Set and some washi tape from the Tea Time Nesting Components Mixed Media Kit.

Everything was going well until I started adding color. Note the difference in the evenness of the wax in this photo compared to the finished piece. I overheated the wax when fusing the colored layer and then added more clear wax over the top to try to even out several areas. I made things much worse and smeared the yellow wax, which resulted in a "dirty" finish.
My advice is to add the colored layers last and do not try to go back over a finished piece. It is easy to overheat the wax when fusing layers, so keep the heat gun several inches above the project. Do not direct the heat onto any one area too long to avoid creating wells in the wax. Also, if adding layers of stamped tissue paper, overheating the wax will cause the tissue paper to slide around, smearing the image.
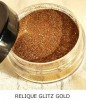
Since I was not able to repair the finish on this piece I decided to try adding some sparkle with a bit of Relique Glitz Gold Iced Enamels. If you work quickly, you can add glitter or other sparkly bits into the warm wax!
A big thanks if you made it to the end of this post! I'd love to continue my journey with encaustic wax and share my results with you. If you'd like me to try encaustic wax with a specific technique or on a different surface please leave me a note in the comments section.
Stick around awhile and check out Katie's Tea Time Mini Album and Amber's Christmas in July Card. There is still time to join our July Emboss It Challenge. CLICK HERE for all the details.
      |
Thanks for all the details - may have to give encaustic a try. A small format like an ATC is not terribly intimidating. I *love* the piece you created with the wings and the stamped music - gorgeous! Thanks for the inspiration!
ReplyDeletevery neat idea!
ReplyDeleteGreat tutorial Dana, love your first ATC! Thanks for sharing as I've just bought an Encaustic stylus and set! :)
ReplyDeleteThanks for the great tutorial Dana, encaustic is on my list of things I wanna try. Great project :D
ReplyDelete