Hello! Ashley here today I'm sending you warm wishes - because I need them
myself. It's 5 degrees here today and it literally hurts to go outside.
For this "warm wishes" card, I used two stamp sets: Play with your Coffee and Winter Mix it Up. I adore this little border of coffee cups in the Play with your Coffee stamp set. So cute!
I
used distress ink + watercoloring for the background. I heat embossed
my stamp and my sentiment. Here is a close up of the stamping:
Thanks so much for looking! I hope you're all staying warm!
Wednesday, December 27, 2017
Wednesday, December 20, 2017
Stocking Stuffies
Hi friends! Dana here today sharing a fun tutorial for stocking stuffer animals that I created for my daughters. My crafty time is definitely short this holiday season, so I started with a Craft-Tastic Design Your Own Stuffies kit from Ann Williams Group. I purchased this kit from Zulily, but you can find these kits in the craft sections of several major big box stores. These super-cute pre-sewn felt and plastic paper stuffies are ready to design and were a real time-saver.
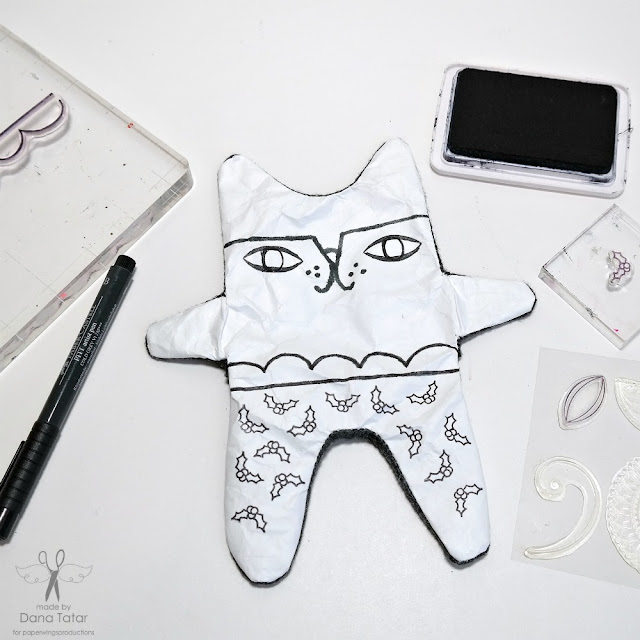
Here are the two stuffies I started with. I know that with my limited sewing skills I could not have stitched these pieces together myself. I was happy to skip the assembly step and start designing with stamps!
I designed a cat on the larger stuffie. I used the product examples from the box as a guide to draw the nose with a black marker. Then I used stamps and black archival ink to finish the rest of the design. The Sacred Geometry Clear Stamp Set and the Single Dot Border Clear Stamp Set together made a great eye! I used the Scallop Border Clear Stamp Set and the holly from the Holiday Add-Ons Clear Stamp Set to add a festive pair of pants.
Next, I added color with Faber-Castell Gelatos, Pitt Artist Pens, and Stamper's Big Brush Pens. I added a small heart to the right side of this stuffie with the Easter Cling Stamp Set.
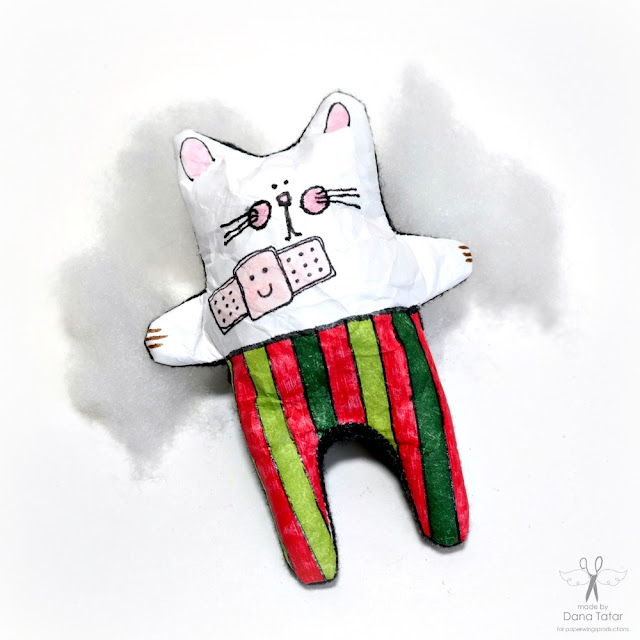
I used the Easter Cling Stamp Set again to stamp a rabbit face onto the second stuffie. The happy Band-Aid is part of the Under the Weather Cling Stamp Set. I created the striped pants with the Straight Journaling Lines Clear Stamp Set. Once both stuffies were stamped and colored, I filled them with the polyester stuffing that was included in the kit.
I know my girls will love finding these stuffies in their stockings! Thanks for stopping by today!
Pin it!
Wednesday, December 13, 2017
DT: 12 Days of Christmas Love
Dear Scrappers,
This is Veronica from www.vickyscrappingpassion.blogspot.com sharing with you A quick minialbum I made this morning. I was inspired by the Paper Wings Productions: Perfect numbers, clear stamp set.
For this album, I used:
Liquid Glass
Inks: Black, red, and gold: Hero Stamps.
Glittery snow, DecoArt
Glittery snow, Martha Stewart
A closer look at my mixed media title:
For this album, I used mostly components of the nesting mixed media kit. I added some fake snow
to the snowflake and the inked wood shipies
For the album covers, I used the harder packing material included in this kit. And make the wholes using my Cro-A-dile. I attached some trimmed paper from October afternoon included in the kit, sanded and inked the edges. I cut more paper for the inside pages and added picture mats and stamped embellishments. The coordinated kits makes this process a breeze.
I hope you enjoyed my minialbum and visit my blog.
Have wonderful and blessed day,
Vicky Tovar
Wednesday, December 6, 2017
Life is a Journey wall hanging
Hello, crafty friends! Leslie here to share a DT inspiration project with you today, a funky mixed media piece created with the Art Textures, Big Art Textures, Writing Backgrounds and Kind Words stamp sets. This is my last post for Paper Wings Productions and I wanted to create something really neat! Life is definitely a journey and we need to make the most of it! I'd like to thank Carrie and the rest of the design team for having me along this term. I've thoroughly enjoyed myself!
I started with a 5x5 Gessobord and then added a torn piece of corrugated paper, a piece of fabric mesh and a rusted metal heart attached to a swivel clasp. I applied some crackle paste as well as some distress grit paste with a stencil. From there, I added an assortment of gears, charms, a book clip, buttons, beads, flowers, and sea glass, and then covered everything in white gesso. Several of the items were repurposed- the fabric mesh, a pop-top and a hard plastic ring. Then came the fun part of inking it up with red, pink, orange and yellow India inks, spritzing with water and letting it run. I rubbed gold acrylic paint over all the surfaces and then I did some random stamping with black StazOn ink. I splattered watered-down white Gesso over the entire piece with a fan brush.
The final step was adding the pieces of paper straws, the sentiment and the twine for hanging. I'm really happy with how this turned out!
For more details and additional photos, please see my blog post at Love To Scrap 2.
I hope you’ve enjoyed today’s project! Be sure to check out all the fun stamps and other goodies at Paper Wings Productions! Thanks so much for stopping by today!
Scrappy hugs,
Leslie
Tuesday, December 5, 2017
Believe
Hello friends. Larissa here with you today. I wanted to make sort of a vintage looking card using this stamp. I am always using the bright colors and bling so this was a little challenging.
Products Used:
Paper Wings Productions Vintage Santa Stamp
Kraft Cardstock
Cocoa Ink
Prismacolor Pencils
White GellyRoll Pen
Autumn Red Nuvo Drops
I cut the piece of Kraft cardstock and stamped the image on it using cocoa ink. I then colored the image very lightly using my Prismacolor pencils. Once I was done coloring I took a white eraser and rubbed over the color to fade it a little more.
Once I was done this was the hard part for me.. to leave it alone! No rhinestones no sequins no glitter. NOTHING..
I rounded the corners off and matted it on a piece of white cardstock then onto a kraft card base. I did end up adding a Nuvo drop in each corner. I also took my Gelly Roll pen and made little snow dots around the image. I love the way white looks on the Kraft cardstock.
I hope you enjoyed my post today. Have a wonderful Holiday season.
Merry Christmas and Happy New Year to you.
Larissa Pittman
Merry Christmas and Happy New Year to you.
Larissa Pittman
Friday, December 1, 2017
December Blog Hop
WELCOME to the Paper Wing Productions Design Team Blog Hop & Giveaway!
Are you ready for our last blog hop of the year? The theme for this month is “Celebrations”. We will look at how each of our designers uses celebrations in their creations. How does your family celebrate holidays? Do you hand make cards, presents, or even wrapping paper? We hope you will hop through the projects and find inspiration for your own holiday projects. If you complete the hop, you will be eligible to win an awesome prize!
The prize is a $25.00 gift certificate to the Paper Wings Productions online store.
For a chance to win all you need to do is:
- be a follower of the Paper Wings Productions blog
- visit each of the participating designer's blogs and leave a comment
- come back and leave us a comment on the pwp blog telling us you completed the hop.
To increase your chances of winning: like our Facebook page and/or invite your friends to the hop. Be sure to leave a separate comment for each of your additional entries. The winner will be announced on Tuesday, December 5, 2017 here on the Paper Wings Productions blog.
Before we begin celebrating, let's look at four ways to use our "celebrate" clear stamp set.
Before we begin celebrating, let's look at four ways to use our "celebrate" clear stamp set.
Make sure to head on over to Dana's Blog Next!!
***Here is the complete line up just in case you get lost along the way***
Paper Wings Productions Blog “The Aviary - http://paper-wings-productions.blogspot.com/
THANK YOU SO MUCH FOR JOINING US TODAY!
&
Let Your Creativity Take Flight!
Subscribe to:
Comments (Atom)


