Showing posts with label watercolor. Show all posts

Friday, April 6, 2018

April Blog Hop


Welcome to the Paper Wings Productions April Blog Hop and Giveaway! The theme for the hop this month is Watercolor. The design team is sharing their own water-colored projects! We hope you will hop through and find inspiration for your own projects.


If you complete the hop, you will be eligible to win a $25 Gift Certificate to the Paper Wings Productions Store!


For a chance to win all you need to do is:

  • Follow the Paper Wings Productions blog.
  • Visit each of the participating designer's blogs and leave a comment.
  • Leave a comment on the PWP blog telling us you completed the hop. 

To increase your chances of winning, like the PWP Facebook page and/or invite your friends to the hop. Be sure to leave a separate comment for each of your additional entries. The winner will be announced here on Tuesday, April 10th.


Let's get hopping!

Dana
Ashley
Larissa
Veronica
Paper Wings Productions


THANK YOU SO MUCH FOR JOINING US TODAY!

~and~

Let your creativity take flight!

Wednesday, March 28, 2018

Easter tags!

Hi PWP friends! Ashley here today sharing two Easter tags I made for our niece and nephew. I've attached these onto their Easter treat bags :) One is pink and girlie and the other is blue and brown for a boy, but I used the Easter cling stamp set for both tags!

For my girlie Easter tag, I added some flowers from the Flower Power cling stamp set. I heat embossed the images onto my tag and then just used some misting + the packaging technique to add some color to the background. The "Easter blessings" sentiment is from the Easter cling stamp set.


With my boy Easter tag, I basically did the same thing. I used one of the bunny stamps from the Easter cling stamp set and heat embossed him with brown embossing powder. I added the sentiment from the same stamp set in blue embossing powder. Then I used some blue mist + the packaging technique for added color and texture to the background.

Thanks for looking!

Wednesday, March 21, 2018

DT: Spring Burlap Pannel

Hi Scrappers,

This is Veronica from www.vickyscrappingpassion.blogspot.com  sharing with you a burlap panel I made using the indian-blanket-cling-stamp and the wildflowers-cling-stamp-set sentiment


I used:


Indian Blanket stamp set, PWP 
the wildflowers-cling-stamp-set sentiment 
Burlap Panel, TH, Ranger 
Distress Crayons, TH, Ranger 
ModPodge 
Water Brush, TH, Ranger 
Stencil, Michael 
Gold Chalk Marker 
Archival ink, Ranger 

See my SnapGuide here, for steps by steps. In short, I stamped the Indian Blanket image using archival ink on tissue paper. I diluted some distress crayons with ModPodge instead of water and added to the burlap panel using a stencil for a colorful background. Then, I diluted some golden chalk also with ModPodge and added a faint border around the panel. When it was died, I added the stamped tissue paper to the panel using ModPodge and let it dry. Finally, colored the stamped image using the diluted crayons with ModPodge and a brush. To finish the look, I used a previously stamped specialty paper with the wildflowers sentiment and inked the edges of the fussy cut paper with golden chalk. I attached the sentiment to the panel using 3D zots.


Some closer looks:


I hope you enjoyed my burlap panel and visit my blog:  www.vickyscrappingpassion.blogspot.com.


Wednesday, December 27, 2017

sending you warm wishes

Hello! Ashley here today I'm sending you warm wishes - because I need them myself. It's 5 degrees here today and it literally hurts to go outside.


For this "warm wishes" card, I used two stamp sets: Play with your Coffee and Winter Mix it Up. I adore this little border of coffee cups in the Play with your Coffee stamp set. So cute!

I used distress ink + watercoloring for the background. I heat embossed my stamp and my sentiment. Here is a close up of the stamping:

Thanks so much for looking! I hope you're all staying warm!

Wednesday, November 29, 2017

cocoa warms the heart

Hi everyone! Ashley here today sharing a cup of warm cocoa! 

I made this card using the Play with your Coffee and Frothy Concoctions stamp sets. 

The first thing I did was run my background through my Grand Calibur. I chose this layered heart embossing folder because I knew my sentiment would be 'cocoa warms the heart' from the Frothy Concoctions stamp set and I wanted a play on words. Next I watercolored the background with distress inks.


I stamped my coffee cup from the Play with Your Coffe stamp set onto patterned paper and fussy cut it. I stamped some marshmallows on white cardstock and fussy cut those before adding them to my cup with foam adhesive.


Then I used foam adhesive to place my cup of cocoa on my embossed heart background.


Thanks for looking!

Wednesday, October 25, 2017

you make life sweet


Hi! Ashley here today, sharing a card I made with the Hey Cupcake stamp set. I chose the little cupcake to stamp, heat emboss, and watercolor.


I like to use distress inks + my Tim Holtz watercolor brush to color my images. After I heat embossing the cupcakes with white fine detail embossing powder, I fussy cut them and did the same technique with the cupcake stand. I didn't want the whole cupcake stand - it was too large for my cupcakes! - so I fussy cut just the top part of the cupcake stand for my card. Always be on the look out for ways to make your stamps go further and work for your needs!


My sentiment is also from the Hey Cupcake stamp set, which I heat embossed with a coordinating pink embossing powder. I added a spot of watercoloring to my base using the same distress inks I used on the cupcake frosting. I think it helps to ground my sentiment.


Then I adhered the cupcake stand and my cupcakes with pop dots.


Thanks for looking!

Wednesday, September 27, 2017

grateful to you

Hello there! Ashley here today with a fun way to make a big impact with a small stamp.


I used the little leaf stamp from the Fall Mix it Up stamp set to make a background for my card. I stamped it multiple times and heat embossed it with white fine detail embossing powder. Then I water colored over the heat embossed images and they resist the watercolors. You could do this with any image or sentiment.


My sentiment for this card came from the same stamp set. I stamped it with Memento Tuxedo Black ink.


I added some twine and a wood veneer to complete the fall look. What do you think?

Wednesday, July 13, 2016

A Sparkly Tiara

Hello friends. I am so excited to have this stamp set in my hands right now. It has been on my list for awhile and I finally got it. :) It is called With Some Sparkle

I started off with a piece of watercolor paper and did my favorite smooshing technique with some Peerless Watercolors. I then heat embossed the sentiment using Ultra Fine Antique Gold embossing powder from Simon Says Stamps.


To finish it off I matted the piece of watercolor paper onto a piece of Stampin Up Melon Mambo Cardstock and then added a few hot pink sequins to finish it off. I adhered the card front to a white card base. 


I think this has to be my favorite sentiment and I think I will be stamping it in my planner a few times. 

Hope you enjoyed my post today.
Have a wonderful day friends.

Larissa Pittman 

Thursday, January 7, 2016

dance in the rain

Hello everyone! Ashley here and today I'm sharing a card using the Under the Weather stamp set from Paper Wings Productions. This is a really cute stamp set to bring some cheer for someone.

I stamped the umbrellas with Memento ink, colored them with Copic markers, and fussy cut them. For my card base, I used watercolor paper with distress inks. This is one of my favorite new techniques I've tried.

My sentiment is from the same stamp set, inked with VersaFine ink and stamped right onto the card base. I added a strip of glitter at the bottom in a coordinating blue.
Doesn't that water colored background remind you of a rainy day? Here is a throwback post from Erica using this stamp set. She used bright, cheerful colors on her cards.

Friday, August 29, 2014

Featured Friday: One stamp set, Two ways!


Hey there Paper Wings Productions fans! I am glad you stopped in today. It's Kristie here again to share with you a little something'-somthin'!  I hope you find it fun and are eager to try it for yourself!


Today for Featured Friday I am doing a bit of a twist... ONE stamp set, TWO ways BUT with water-colour as the medium. 

So it's kind of technique-y but also shows you what you can do with just one stamp set! Sometimes we feel like we have to have a TON of stamps, but you just need stamps you LOVE and you can have loads of fun! 


The stamp set I am featuring today is the lovely Paris Clear stamp set.


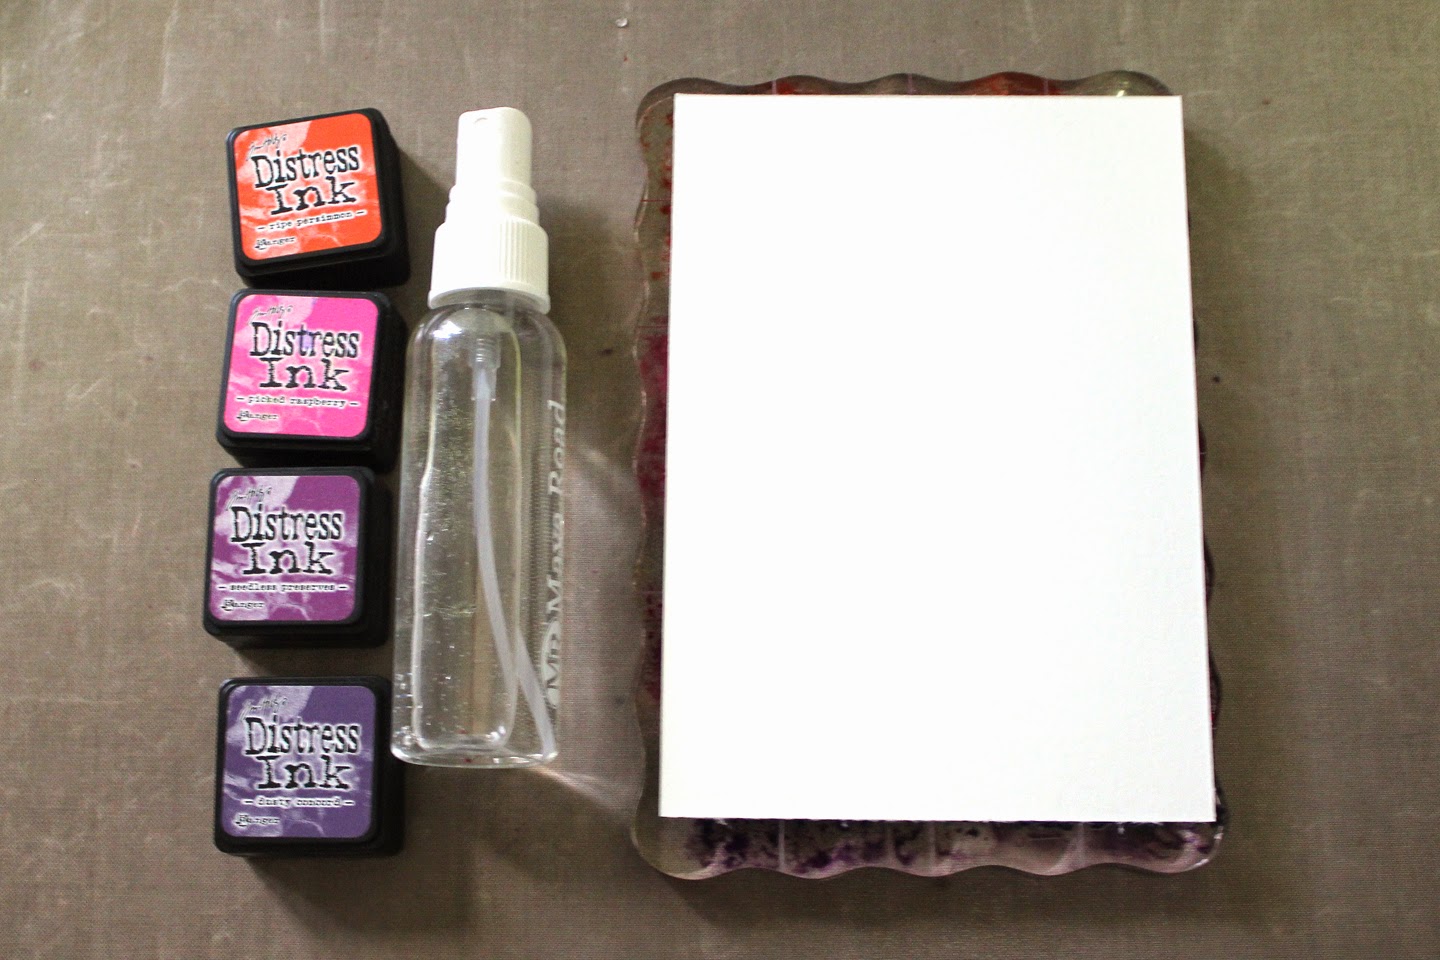
For my first card, I pulled out this old large stamp block that has some grid lines etched into it. 


Using Distress Inks, I rubbed my colours on my block and then spritzed it like crazy-crazy with some water:


I laid down a piece of water-colour paper over the top of the ink and let it soak in. It's really helpful to put a towel or a scrap piece of paper over the top of it to help you press the paper into the ink without making a terrible mess, but then again, that's kind of the fun part isn't it ; )


When I pulled up my paper...Voila!! It left this great colour but also a grid patter from my stamp block! It's like two textures in one go, which I love!


I embossed the Eiffel Tower image with black embossing powder


And now you get to see the crazy part of me... I usually line up my sentiment on my block and then stamp it a few times. First I want to be sure there isn't anything on my image (lint..dirt.. chocolate ;).
I want it to be a crisp image, but also straight! I have this big grid paper pad I use to stamp on. I line up the lines on my block to the lines on the pad and then see if the sentiment comes out and then adjust accordingly.
Ever since I started doing this I have saved myself a lot of crooked stamping! I love the paper pad also because it gives a little cushion, so I get a good impression every time. I just picked one up at my local stationary/book store for $2. I HIGHLY recommend it!


And that's it! You could really crank these babies out if you needed a lot and have SO much fun blending the inks. In fact, I made quite a few panels cause I love it so much! I rounded the corners of my panel and popped it up on a white card base and my card was born!


So with my first card finished I wanted to show you another way to use this stamp set with watercolors. It's definitely the most traditional way... by actually painting! (Gasp!) 
I used a little masking technique to create a scene for this card. 

First I stamped my chairs:


Then after creating a "chair mask" with a post-it note and placing it over the stamped chair image, I then stamped the window image overlapping the mask.


And this is my favourite part....when you remove the mask, you can see my little Paris scene! (Can you hear the music? It's like a Woody Allen movie!  ; )


Now, I'm not a water-colour-er by any stretch, but I wanted to show you a little step by step of how I watercolored my scene. I started with the neutrals and moved on to the brighter colours and detail. I added some shimmer to my little window flowers to give it some oomph... Also notice the shadow under the table and chairs. This adds some weight to the scene to help ground it. Now my chairs aren't floating on my card!


I finished off with some embellishments. I spritzed a doily with some grey spray mist. Added some crinkled silk ribbon and a hat pin. I found this fun striped vellum at my craft store and used it to mat my watercolored image.


And that's it! Two cards made with just one AMAZING stamp set! It's such a fun set to use. I keep grabbing for it again and again! So what do you think (did you make it this far? It's a long one!) Do you love to water-colour? Does it intimidate you (as it did me, for a while?) Sometimes you just have to jump in and enjoy it! I would love to hear from you so drop me a line in the comments! I would love to come pay you a visit.


Thanks so much for stopping in today!
xoxo
k


Tuesday, August 19, 2014

Technique Tuesday: Iron-Off Embossing with Watercolor


Hello! It's Kristie Larsen here... I'm excited to be joining you for my first blog post as a guest designer for Paper Wings Productions! 


Today I wanted to show you a fun technique that I love to use: Iron-Off Embossing with water-colour. I used this technique for my CAS card above, but I will show you step by step how to make it work for you whether you like scrapbooking, ATC, journal art or card making. This technique is fun regardless!


You want to start with a few supplies right at your fingertips. You will need some Versamark ink, clear embossing powder, an embossing gun and your regular ol' clothes iron (without water) and of course water-colour paper! You also need your Paper Wings Productions stamp of choice.  I chose to use the gorgeous Tile  Pattern clear stamp.  Mmmmm, how I love it ; )


Now let me tell you why I love this stamp.... one word: Versatile, with a capital V! I  love its size because you can use it perfectly on an A2 size panel and it creates a perfect frame around it. Or you can cover small spaces or continuously stamp big spaces. There's not a place where you can't use it. It's just perfect!

Step 1:  Trim a piece of water-colour paper to standard A2 size. Stamp image with Versamark ink and heat emboss with clear embossing powder.


Step 2: Secure your embossed paper onto your table (I used washi tape... it's so pretty!). Be sure to secure the edges so the water doesn't warp it too much. Because of the nature of the stamp I chose, I also masked off the edges of the images so no colour would get into my 'white frame' around the stamp.

Step3. Now watercolor to your hearts content! Here I used 3 shades of Peerless Watercolor to create an ombre effect.  I'm impatient so I dry it quick with a heat gun.


Step 4:  Cover your dried stamped image with a scratch piece of type paper. Using your iron set on med-high, iron over the scratch paper. It will melt the embossing powder underneath and lift off the stamped image leaving only the water-colour.


You can tell you have it all off if you bend it in the light and all the shiny embossing is gone. What is revealed is a gorgeous watercolored image and no glossy powder.  I love the effect! It's so stunning but not too shiny.

Step 5: Finish off your project! I trimmed my panel down a bit more and popped it up on a card base. I love the look of white on white! I then used some die cuts to create my sentiment and adhered it over the top of my ironed-off image. And my new card was born!


You can also use your favourite Paper Wings Productions stamps to make an amazing background on any size piece of paper. Below I made another card, but since I used single images, it would be easy to adapt it to a bigger scrap page or even custom stamped paper for an altered item! I used more of my favourite stamps (can you have too many favourites?!) These are all images from  Vintage Technology.


After stamping and embossing my images I made a pretty mess with three different water colours. I ironed off my powder and then used the panel as a starting off point for a more elaborate look. I used the Solid Whimsical Alphabet set to stamp in grey ink along the centre diagonal of the panel and then used the Sacred Geometry  set for some circular designs along the top right corner.  If you look really really closely you can see I used the Tile Pattern stamp again in a pale blue along the bottom lefthand corner. I wanted to do the exact opposite of my first card and get some real layering going!


I used some stencils and some water spritz to lay over another ink layer on top. I fussy cut and watercolored another camera image from Vintage Technology and added a sentiment from it on the bottom right of my card. I trimmed my panel and justified it down to the bottom right hand corner leaving a trim of white card base peeking out on the left/top side.


See how great?! One technique that can be used in so many ways that the possibilities are endless! It is so much fun to do this technique because you get really inky and can spend an entire evening in stamping bliss! Ironing has never been so much fun. Trust me!

Thanks so much for joining me. I hope today brings you a breeze of inspiration from an unexpected place. Keep you're eyes open!

xoxo
k


Related Posts Plugin for WordPress, Blogger...