Showing posts with label Copic markers. Show all posts

Thursday, March 31, 2016

Home Tweet Home

Hello friends. Larissa here today with a Home Tweet Home card for you.
I am using the stamp set Home Tweet Home clear set .


I stamped the images on a piece of white cardstock and colored them using Copic markers. I used B00, B02, B21, B23, E000, E00, E01, BG000, and RV4.
I adhered the card front on a piece of blue cardstock as a mat and then on a gray card base.
I wrapped a piece of ivory and gold twine around the side of the card to finish it off.

This would be a perfect set to make a wedding card as well. 


Have a wonderful day friends.

Larissa Pittman 

Thursday, January 7, 2016

dance in the rain

Hello everyone! Ashley here and today I'm sharing a card using the Under the Weather stamp set from Paper Wings Productions. This is a really cute stamp set to bring some cheer for someone.

I stamped the umbrellas with Memento ink, colored them with Copic markers, and fussy cut them. For my card base, I used watercolor paper with distress inks. This is one of my favorite new techniques I've tried.

My sentiment is from the same stamp set, inked with VersaFine ink and stamped right onto the card base. I added a strip of glitter at the bottom in a coordinating blue.
Doesn't that water colored background remind you of a rainy day? Here is a throwback post from Erica using this stamp set. She used bright, cheerful colors on her cards.

Sunday, November 29, 2015

Dear Santa

Hi everyone, Steph Ackerman here today and I'm happy to be working with these lovely stamps from Paper Wings Productions.

Christmas will be here before we know it, so let's get those cards ready.  I think this would be a great card for the kids to send their letters to Santa.

 
I used the Christmas Mix It Up clear stamp set, which includes 11 words and images.  I repeatedly stamped the santa hats across white cardstock, then colored them with Copic Markers.


Two different sized panels were cut to fit the card, then matted with cardstock before adhering them to the card.

 
Dear Santa was stamped and punched out then added to the card.  Now have your child write their letter to Santa and send it on it's way.
 
Thanks for stopping by today.
 
Steph


Monday, November 3, 2014

Paper Wings Productions November Challenge

Welcome to the Paper Wings Productions November challenge!  Thank you to everyone who linked up to our October challenge!  I loved seeing all over your Halloween projects!  Please give a big congrats to our randomly chosen winner Renee Robbins from the Scrap Owl!

Renee please contact Carrie at paperwingsproductions@hotmail.com to claim your prize and please add October Challenge Winner to the subject line.  Thanks again for linking up and we hope to see you again this month!

This month's challenge is an Anything Goes challenge so get creative and have fun!  We can not wait to see what you create!  This months challenge is sponsored by Paper Wings Productions!

  Here are a few challenge details!

  • Create a project (card, ATC, layout, tag, mixed media piece, etc.)
  • Add your project using the blue button below
  • You will have until November 30 at 11:00 p.m. CST to link up your project
  • You may enter our challenge up to 3 times
  • You may combine our challenge with other challenges
  • The use of Paper Wings Productions products is not required but will give you 3 extra entries to win

Here is a look at what the Paper Wings Productions Design Team and Guest Designers have created for this months challenge.


Now it is your turn to get creative, have fun and link up!  

Tuesday, October 7, 2014

Tutorial Tuesday- Copic Coloring


Hey everyone, Katie here for Tutorial Tuesday! Today I wanted to share these cards I created using the Vintage Technology stamps and my Copic markers.


Before we get started, I want to congratulate the winner of our Blog Hop Giveaway!  

Great hop!!! Love all the projects. I look forward to seeing what the DT comes up this month.

Heaher, please contact us at paperwingsproductions@hotmail.com for instructions on how to claim your prize.  Thank you to everyone who hopped along with us!


I love my Copic markers. They're pricey, but worth it! I'm honestly still pretty new at using the alcohol ink markers, but I wanted to show you guys how I use them to add depth to my stamped images by blending the colors.

Start by stamping your image onto cardstock (copic specific paper is even better but not necessary). Memento ink is the best for Copics!


For this technique you need 3 shades of one color.
1. Color your image with your lightest color.
2. In the areas where you think should be shadowed or darker, color with your 2nd (the medium shade) color.
3, Go over the edge of where the 2 colors meet with the light color, coloring in small circles along the edge.
4. Repeat steps 2-3 with your darkest color and in the far shadows.


How to make the dotted background:
1. Starting with your lightest color, place the very tip lightly down onto the paper to create a small dot. Keep adding tiny dots around your stamped image out in a circle.
2. Repeat with your medium color.
3. With your darkest color, keep the dots close around the middle around your stamped image.


So there you have it- a couple of easy Copic coloring techniques to use on fun stamps like the Vintage Technology stamps!

If you haven't joined in on the October challenge yet, all you have to do is create a project using a Halloween theme or the colors orange and black and link it here.

Monday, May 20, 2013

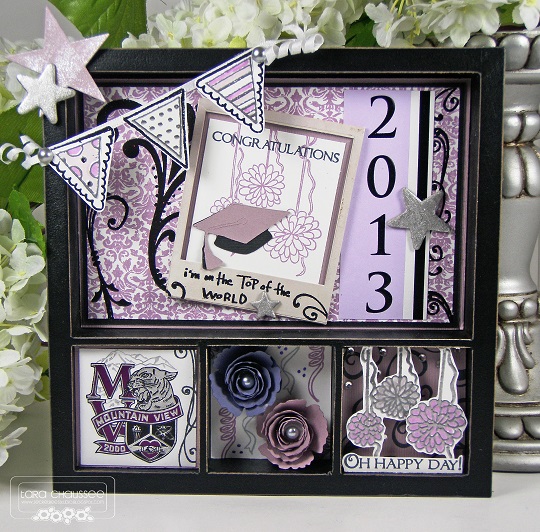
Mixed Media Monday - Grad Shadowbox!


Hi everyone! Tara C. here with a graduation celebration Mixed Media Monday.  It's graduation season and today I have the perfect gift for this high school rite of passage. I will be attending a special young lady's graduation in a few weeks and I wanted to create a memento to help her remember this special day.  Not that she is likely to ever forget the final day of mind numbing classes, bad lunches, crazy teachers..... but hopefully this little gift will help!


I purchased the shadowbox at Archivers and left it black as it is one of her schools colors. I took her graduation announcement and cut it up to use as decoration in some of the boxes and then combined them with fabulous Paper Wings Productions stamps!  


The largest box has a gorgeous damask background from the Backgrounds Cling stamp set that I also embossed with a few flourishes from Flourish Fun One in glossy black.  It also features a sweet little banner embossed in silver and colored with Copic Markers and some poms from Happy Day stamped in lilac.  I added in a grad cap cut with my Cricut and some painted and glitter misted stars. The perfect sentiment is from the Earth & Sky set.


I wanted to showcase her school logo cut directly from the announcement.  I only added a couple of stamped flourishes from the Flourish Fun One set.


I had to girly this box up so I added some rolled flowers on a background of silver and purple confetti from Happy Day.


The final box again features more of the pretty poms embossed in silver and colored in shades of purple and more flourishes.  Plus a few clear crystals for a bit of bling!

Thanks for visiting today! I hope you enjoyed my Mixed Media Monday project and that it inspires you to create handcrafted gifts for the grads in your life. Check out all of these fabulous stamps at the Paper Wings Productions store and come back and visit on Wednesday and Friday to see what the other designers have created for your viewing pleasure.

The Paper Wings Productions supplies used:
Related Posts Plugin for WordPress, Blogger...