Showing posts with label Damask. Show all posts

Monday, July 15, 2013

Mixed Media Monday - Thanks for the memories!


Hi everyone!  Tara C. here with my final post as a designer for Paper Wings Productions!  It has been such a sweet ride and I have been privileged to work with these amazing and creative women.  I have been so inspired by their knowledge, their skills and their imagination! This has been a wonderful team experience and the new design team is lucky to be part of it.


For my last post, I have a mixed media thank you card that I created to say thanks to all of the beautiful ladies on this design team.  I have incorporated lots of goodies on this card so it had to be a big one; 6 inches square to be exact!  I started with a bright, cheery yellow background and added a strip of distressed Core'dinations card stock and a small strip of washi tape that just barely peeks out.  I then layered a couple of tags, stamped with the damask background, over a sweet doily.  I used one of my favorite Paper Wings Productions stamps on the doily, the vining flower from the Flower Power set, and then added lots of bling in the form of black pearls and dark grey crystals.  Two fancy gold butterflies and a delightful sentiment complete the front of this card.


The inside of the card features the same cheery card stock and a few more pearls.  The sentiment is simple and definitely doesn't express the gratitude and joy I had in being part of this wonderfully organized team.

Thanks for visiting today!  Make sure you come back and check out what the other designers have created for this month and be sure and stop by and welcome all of the new designers in August.  Plus, check out the new and improved Paper Wings Productions store as there are lots of new goodies!

Thanks everyone for all of your support and kind words.  I have so enjoyed sharing all of my creations with you!

The Paper Wings Productions supplies used:

Monday, May 20, 2013

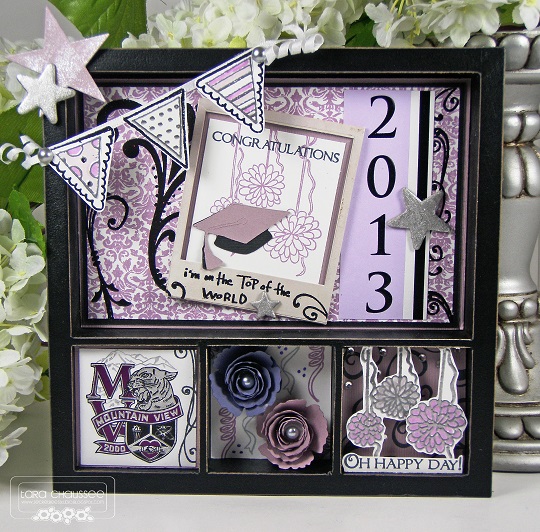
Mixed Media Monday - Grad Shadowbox!


Hi everyone! Tara C. here with a graduation celebration Mixed Media Monday.  It's graduation season and today I have the perfect gift for this high school rite of passage. I will be attending a special young lady's graduation in a few weeks and I wanted to create a memento to help her remember this special day.  Not that she is likely to ever forget the final day of mind numbing classes, bad lunches, crazy teachers..... but hopefully this little gift will help!


I purchased the shadowbox at Archivers and left it black as it is one of her schools colors. I took her graduation announcement and cut it up to use as decoration in some of the boxes and then combined them with fabulous Paper Wings Productions stamps!  


The largest box has a gorgeous damask background from the Backgrounds Cling stamp set that I also embossed with a few flourishes from Flourish Fun One in glossy black.  It also features a sweet little banner embossed in silver and colored with Copic Markers and some poms from Happy Day stamped in lilac.  I added in a grad cap cut with my Cricut and some painted and glitter misted stars. The perfect sentiment is from the Earth & Sky set.


I wanted to showcase her school logo cut directly from the announcement.  I only added a couple of stamped flourishes from the Flourish Fun One set.


I had to girly this box up so I added some rolled flowers on a background of silver and purple confetti from Happy Day.


The final box again features more of the pretty poms embossed in silver and colored in shades of purple and more flourishes.  Plus a few clear crystals for a bit of bling!

Thanks for visiting today! I hope you enjoyed my Mixed Media Monday project and that it inspires you to create handcrafted gifts for the grads in your life. Check out all of these fabulous stamps at the Paper Wings Productions store and come back and visit on Wednesday and Friday to see what the other designers have created for your viewing pleasure.

The Paper Wings Productions supplies used:

Tuesday, February 12, 2013

Art Journaling Video - Tutorial Tuesday


Hey there bloggie friends!  I hope you all had a wonderful weekend and a smooth Monday.  Did you all see Shay's G-O-R-G-E-O-U-S Old Fashioned Valentines on Friday?  I just love all of her projects and these are so so cute, you really need to go check them out.   She definitely inspired me to get creative over the weekend, so let's get to it and I'll show you what I did!

Welcome to:


Today we're gonna have a little art journaling fun with the new PWP Feb Mixed Media kit:


Join me through my creative journey!!!


I hope you enjoyed seeing this page come together.  So far I've created three VERY different projects using this beautiful kit: a layout of my sweet grand daughter, this art journal page, and a beautiful little card.

Here are some closer looks at this page:

"I Love to Create..."

 "...and Play Every Day"

February Mixed Media Kit
If you'd like to purchase the Feb Mixed Media kit, right now would be the perfect time to do it because the online store is running the following promotion:

"We LOVE you! To prove it we are offering 20% off everything in our online store. Offer valid now through 2/15/13. Use code LOVEU when you check out. Feel free to share the love with your friends. ♥"


So head on over to the Online Store and pick up those items you've been wanting!

Thank you so much for joining me today.  I'd like to send out a warm WELCOME to our newest bloggie friend: Michelle Bala!  Thanks so much for joining us Michelle!!

Have a BEAUTIFUL day (& don't forget to let me know what you think of the video)!!

Friday, February 8, 2013

Feature Friday: An Old Fashioned Valentine

Happy, happy Friday!

It's Shay here.  There has been some truly fabulous projects this week so I recommend first scrolling down to see them all before you return to this post.  I can wait.

Welcome back!  Are the design team talented or what?

Today I have some cuties for you.  What is better than miniature little Valentines?  Okay, winning the lottery to name one thing, but do you recall being a little lady or gent at school and giving and receiving Valentines?  I thought it was better than apple pie and I still love them so I thought why not make some with my awesome Paper Wings Productions stamps?

I created three of these little darlings...honestly I could have made dozens with the ideas swimming in my head. 


I used a nifty new die I bought that is a mini pocket to be the sleeve for my little Valentine cards.  The sleeve measures 2.5" x 3.8" while the cards are approximately 2 3/8" x 3 5/8".

Card No. 1:


This is the true romantic card set.  I inked up the Damask from Backgrounds or Damask using pink and red inks that I then spritzed with water and stamped upon the heart and the outside of the sleeve.  Under the heart is music from the Text Melange or Music in grey ink. I love these essential stamp sets...they work for nearly any theme and project.  I added the amor banner from Milagros which I stamped in red and colored in with Copic markers.  I added a heart and dots (remnants from the XOXO border on the sleeve).  I finished the card with some washi.  The sleeve is decorated with washi, XOXO, pink and white bakers twine and a heart.  The final touch is the little ticket/label from Tabs and Banners stamped with "for you" from Sophie.

Card No. 2:


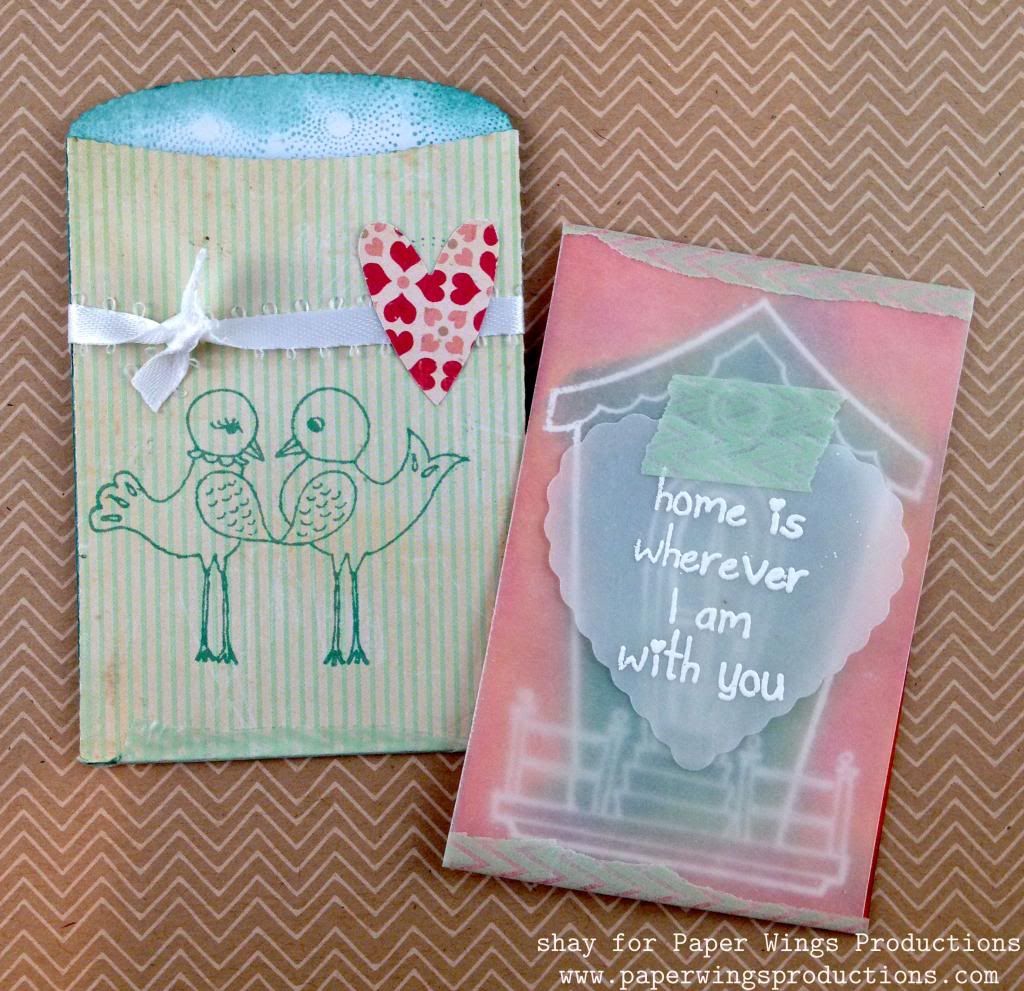
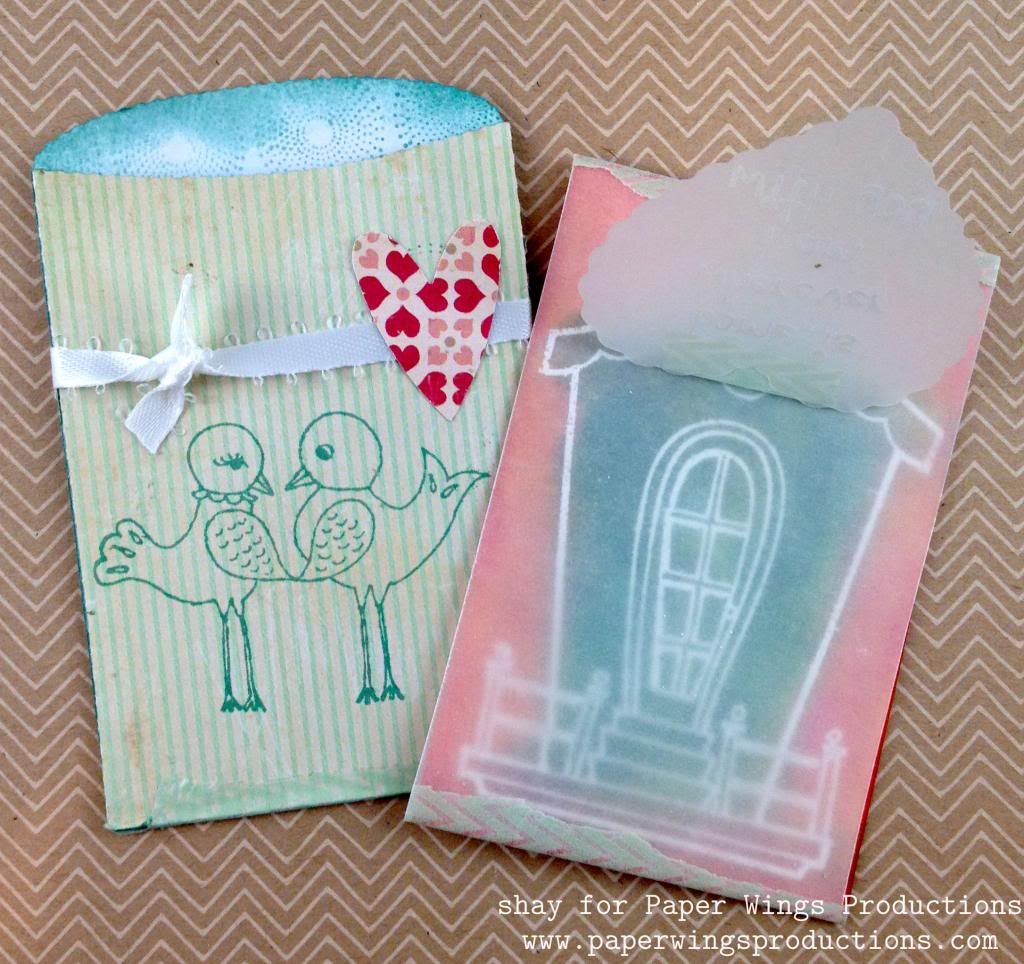
Here's the sweet card set.  The card is stamped with the birdhouse from Home Tweet Home using VersaMark and embossed with white embossing powder.  Then I colored in the image using Distress Inks.  I chose some unusual and bright colors which I then softened by adding a layer of vellum.  I added another layer of vellum with a scallop heart die cut which I embossed with white embossing powder using a sweet sentiment from Home Tweet Home.  How adorable is this stamp set?  I adhered all the vellum with washi.

Here is a look at the house under the vellum heart:


The inside of the sleeve is decorated with the circles from Backgrounds or Circles and I also inked the edges.  The outside of the sleeve is stamped with the love birds from Home Tweet Home, tied with a white ribbon and finished with a heart.

Card No. 3:


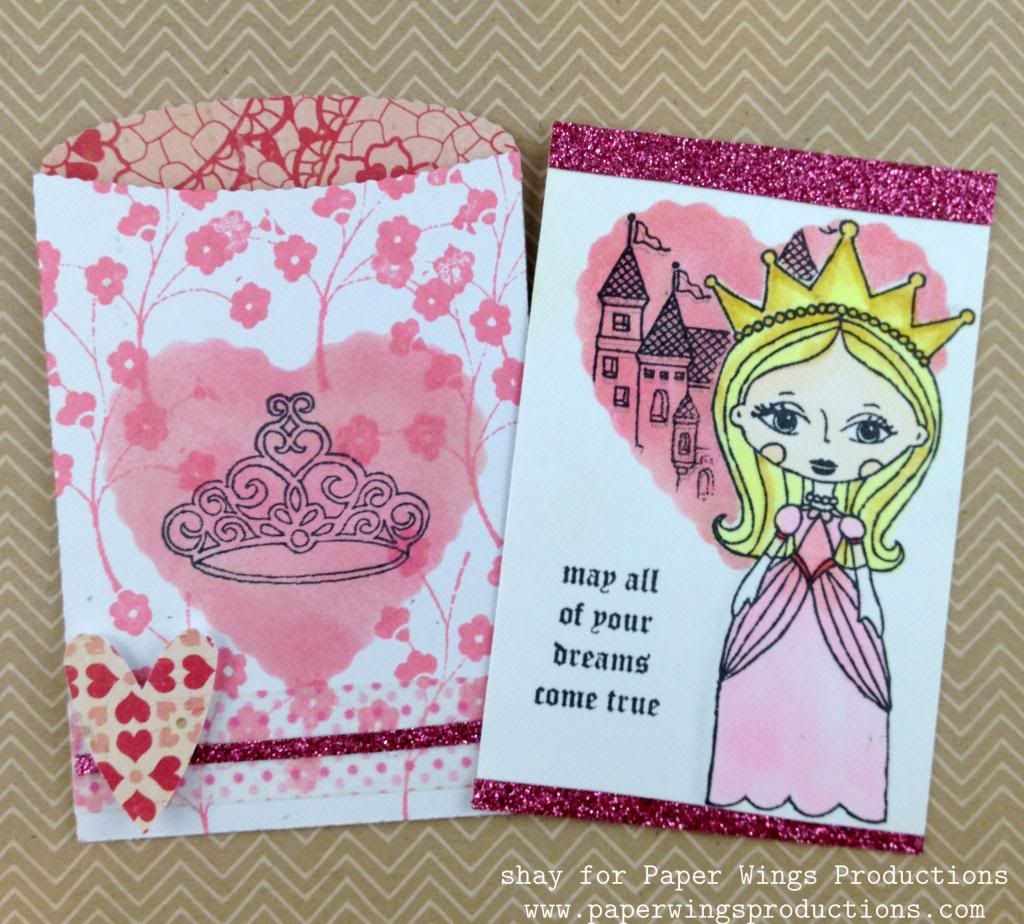
The card for your inner princess or the little princess in your life.  Using Princess I stamped and colored her in with Copic markers.  I then masked her off and used a reverse mask of the scalloped heart to ink in the area behind her and stamp the castle from Prince.  The sentiment is also from Prince.  These are truly charming and lovely stamps and so perfect for children's Valentines.  I finished the card with pink glitter fabric tape.  The sleeve is also decorated with a reverse heart mask that I stamped the crown from Princess on.  Over that I stamped the sprig of flowers from Flower Power or Mini Flowers.  This is finished off with washi, fabric tape and a heart.

What fun these would be to make with your children, grandchildren, nieces, nephews, godchild or with the kids at heart in your life!  They would have so much fun making them and so proud to give them out too.  On the back of the cards is plenty of room for a little handwritten note.  Another alternative is to pack these little sweeties in a lunch for school or work.

The possibilities of which Paper Wings Productions stamps to use and how to use them are endless.  I thought Sophie, Louise, Marcel or Luc would be fun to use not to mention the Prince.  You could easily use Paris or London.  Vintage Technology or Play with Your Coffee would be fabulous too.  That is just off the top of my head! 

Another really cool thing about these little card and sleeve duo are that they are still small enough to fit in a Project Life 3x4 pocket which is a lovely thing for anyone doing Project Life.

I hope you feel inspired to ink up your Paper Wings Productions stamps!  There is still time for Valentine's Day. 

We would *love* to see what you make with Paper Wings Productions stamps. Add your projects to Facebook, our flickr group, to Pinterest, comment with a link on this post or even email pictures to us!

Take flight,
Shay.

Supplies:
Stamps:


Cardstock: Georgia Pacific
Ink: tuxedo black Memento and VersaMark, Tsukineko; chewing gum, cough syrup and weather vane, Jenni Bowlin for Ranger; fired brick, worn lipstick, tattered rose, scattered straw, wild honey, iced spruce and evergreen bough, Tim Holtz Distress Ink by Ranger
Patterned Paper: Paper Heart 12x12 paper pad, Crate Paper; Dilly Dally "Hello" Flannel from Miss Caroline collection, My Mind's Eye
Other: vellum; heart punch, Stampin' Up!; washi, various; fabric tape; white ribbon, Offray; opaque white embossing powder, JudiKins; nesting scallop hearts dies, Lifestyle Crafts/QuicKutz; mini pocket die, Lifestyle Crafts/QuicKutz; XOXO border die, Papertrey Ink; Cuttlebug, Provo Craft; Copic markers; pink and white baker's twine


Wednesday, February 6, 2013

What's Up Wednesday - Feb Mixed Media Kit Release!!

Hello, Hello, Norma here to bring you:


I hope you all are having a fabulous week!  I'm super excited to share the NEW PWP February Mixed Media kit with you today.  This kit is filled with so many great items like twine, Prima wooden elements, metal hearts and of course beautiful Paper Wings Productions stamps.  I'm really enjoying playing with it and I know you will too!!  These kits are SO versatile and can be used on any kind of project you can think up.  So this time around I used my kit to scrapbook: 

Nearly everything I used to create this layout is included in the Feb Mixed Media kit.

I used the Circles cling stamp included in the kit and inked it up with red Colorbox to create the background.

Next I grabbed a sheet of book text, the Holly Berry Red Gold Lindy's Stamp Gang embossing powder and Damask cling stamp from the kit.  After I embossed, I ran this sheet through my Cricut using the Doodlecharms cartridge to cut hearts but you could easily use a punch or even cut them out freehand.

To give my red embossed hearts a little more substance, I used some black cardstock stamped with the circles.  I attached the red hearts and simply cut around them leaving about a 1/4" around them.

With all of my elements complete it was time to start putting things together!  I drew some flourishes here and there to add a little more interest to my background.  Next I mounted my photo onto some white washed cardboard and doodled around the edges of the photo.

I added some of the Jenni Bowlin Memo Quilted stickers from the kit and outlined them in black to help frame the photo.  I also used a few of the Jenni Bowlin Flag banners (also included in the kit) to the top corner to help balance the visual weight of all the hearts.

I used the red twine from the kit to create more flourishes around my photo and cut the feather in half to use as leaves.  Since the feather is double sided, I wanted to be able to use both sides of this beautiful feather and they were the perfect touch to add to the gorgeous metal heart.

I used the Prima Decorative Wood Embellishments in the kit to help build up my layers of hearts.  They provide a nice bit of contrast to all of the red, cream and black.

The "Happy" sticker and two heart pins are also included in the kit.

Here's a closer look at the hearts :D

I had so much fun playing with this kit and can't wait to use up all of the remaining elements on cards, tags and some art jounaling.  This wonderful kit is a limited release item so don't wait to long to get yours!!  Follow the link to browse through the Online Store and see the complete list of items included in this month's kit.

We'd love to see what you're creating with your Paper Wings Productions stamps.  So please feel free to upload photos of your projects to our Facebook page, flickr group or our Pinterest board.  You could even leave us a link to view your projects in a comment!

Thank you all so much for joining me today!  I truly appreciate all of your sweet comments and enjoy reading each one!!!   HAVE A BEAUTIFUL DAY!!!!


Related Posts Plugin for WordPress, Blogger...