Wednesday, August 1, 2012

8/1 What's up Wednesday


Happy Wednesday Peeps!


Today I am going to share a scrapbook page that I made.  I wanted to challenge myself to make an entire layout with just one sheet of paper.  All other patterns and textures had to be done with stamps.  


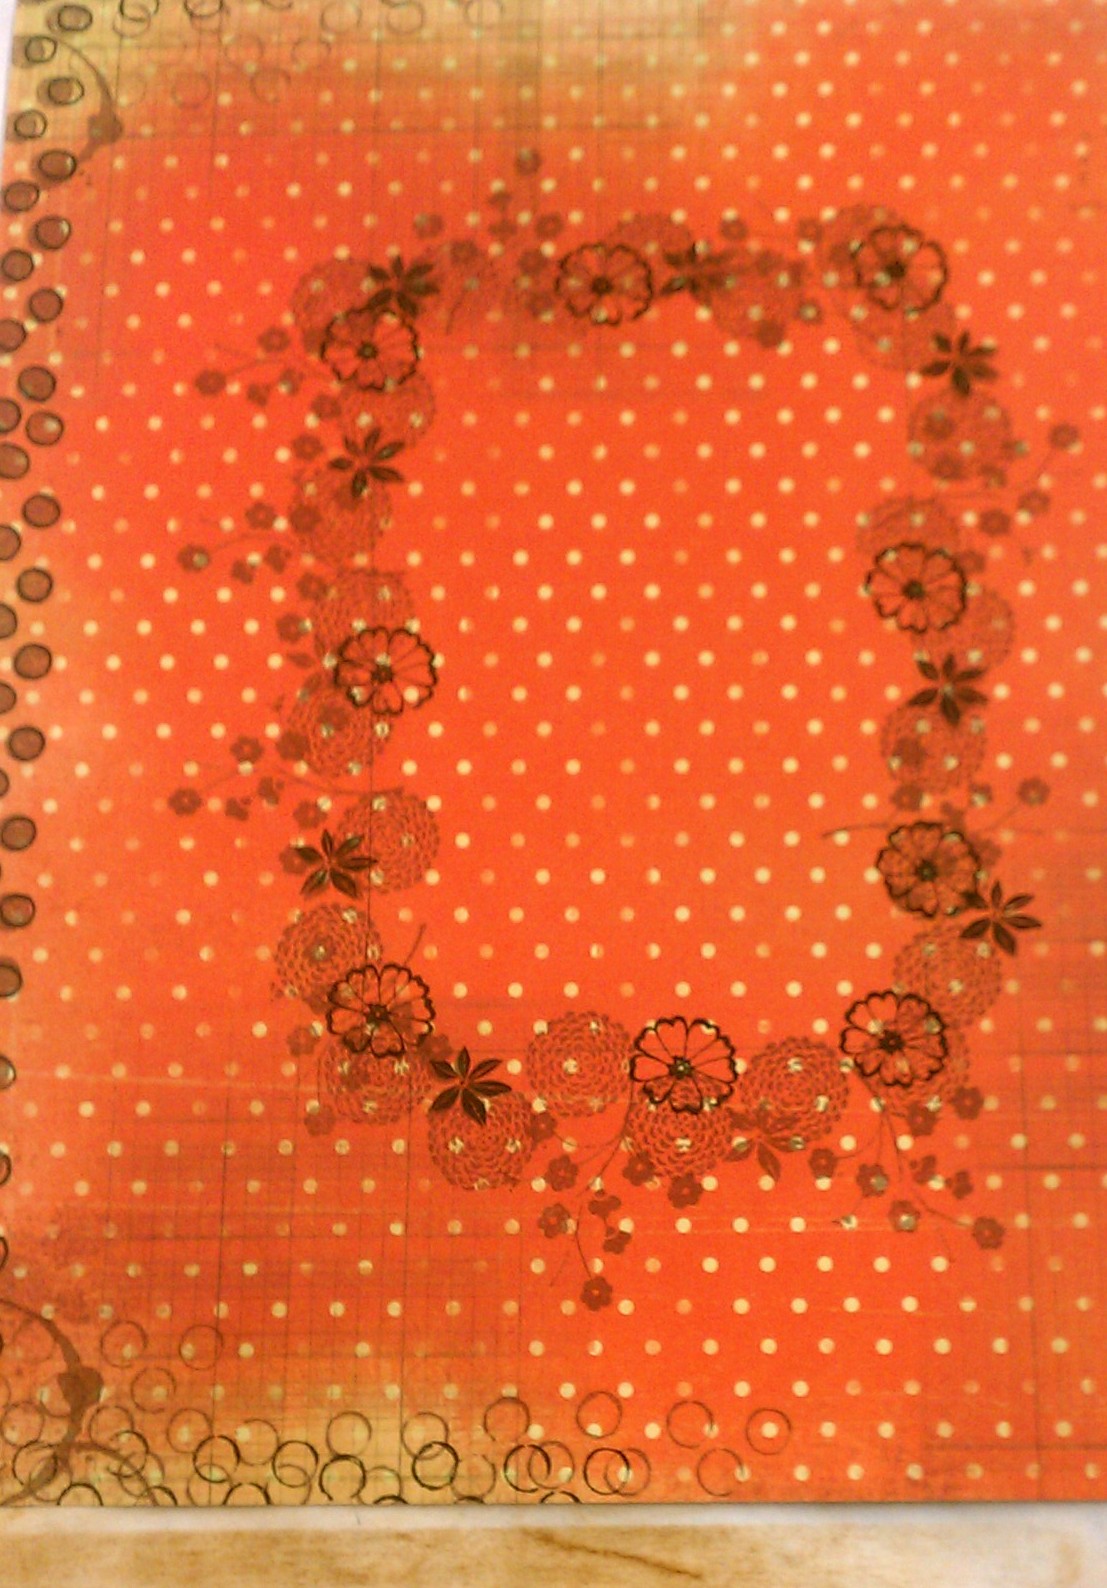
 I started with a sheet of Glitz paper.  I love Glitz papers, this one is from their Laced with Grace collection.
 

I decided where I wanted my photo to go on the layout and traced around the picture.  This gave me a guide to make a frame.


I started with one of the flower stamps from the Flower Power cling set.   I used a Memento ink pad, Rich Cocoa and stamped all around the line I traced.


 Using the same color, I stamped the flower spray from the Flower Power set.


 Next, I stamped the right edge of the cardstock with a stamp from the Text Melange cling set.


I did not reapply the ink and just kept stamping down the page.  The made the image appear lighter and lighter every time I stamped.

 On the left side I stamped some images from the Art Textures cling set.


I did end up using one small little tag from the Tim Holtz Idea-ology line.  I stamped the word "cherish" from the Banner clear set at the bottom edge of the tag.


I layered on the photo on the tag and decided that I needed a little depth in my stamping


 I decided to add more stamped images with a black Memento pad.


I added text with the Funky Alphabet clear set.  The best thing about clear stamps is that you can see where you are going to stamp!  Makes adding words to your project a breeze!


The final touch was the one of the big flowers from the Flower Power set that I stamped in opposite corners. 


I have to say that I am pleased with my challenge.  Could you create a layout with just stamps?  I challenge you to make a card or scrapbook layout with only stamps.  If you make one, I hope you will share!


Enjoy the flight!
Carrie


Stamps: Art Textures, Flower Power, Funky Alphabet, Banner, and Text Melange
Ink: Memento Ink Pads: Rich Cocoa and Tuxedo Black from Tsukineko
Paper: Glitz paper
Cardstock: Neenah Solar White and Chocolate Chip from Stampin' Up!
Embellishments:  Journaling Tag from Tim Holtz

Monday, July 30, 2012

Mixed Media Monday - Persuasion Tag


Hey Peeps!

It's Julie.  Hope everyone had a great weekend!  The Paper Wings gals were stamping their little wings off with the customers at Scrapbook N' More - and they really turned out some cool projects with the stamps.  While I was working on my demo, I was able to create a few tags, and there is one in particular I'd like to share with you here.

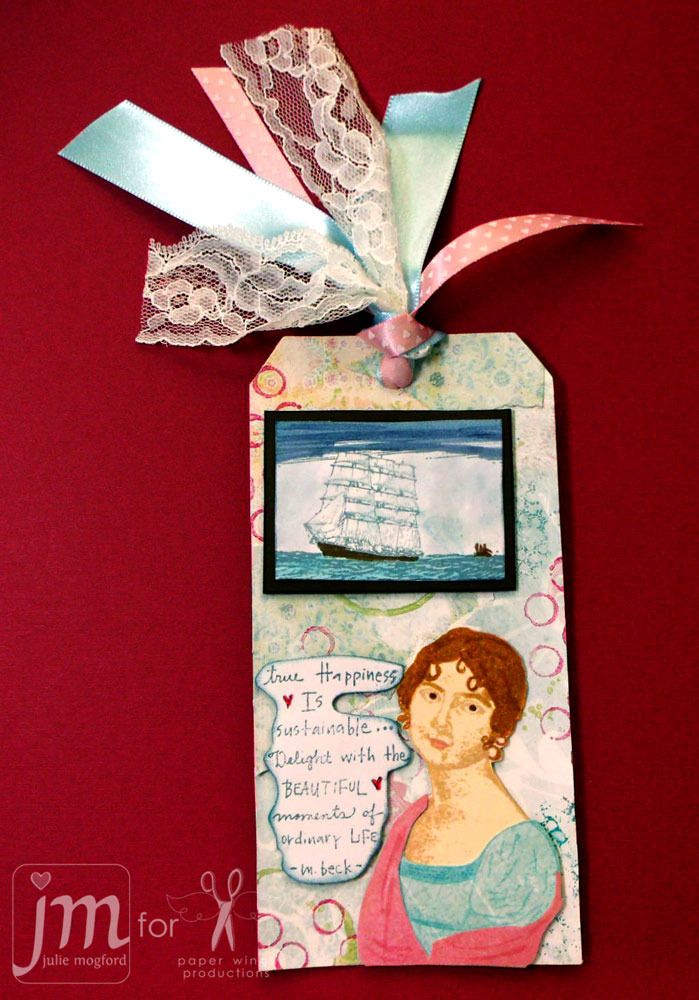
Back in June, I posted a card and made a mention of how the boat reminded me of Persuasion, by Jane Austen and that I was inspired to make a project about it.  Take a look :)


Background Details:
1.  Adhere various scraps of paper to a manila tag with glue, making sure to add glue to overlapping layers.
2.  Add a thin coat of white craft paint or gesson to mute the background and give it a more uniform look.
3.  Use Art Texture stamps and acrylic/craft paint to add interest.  NOTE:  when using paint with stamps, be sure to wash the paint off quickly so that it doesn't stick to the stamp.  Set aside to dry.


Ship Details:
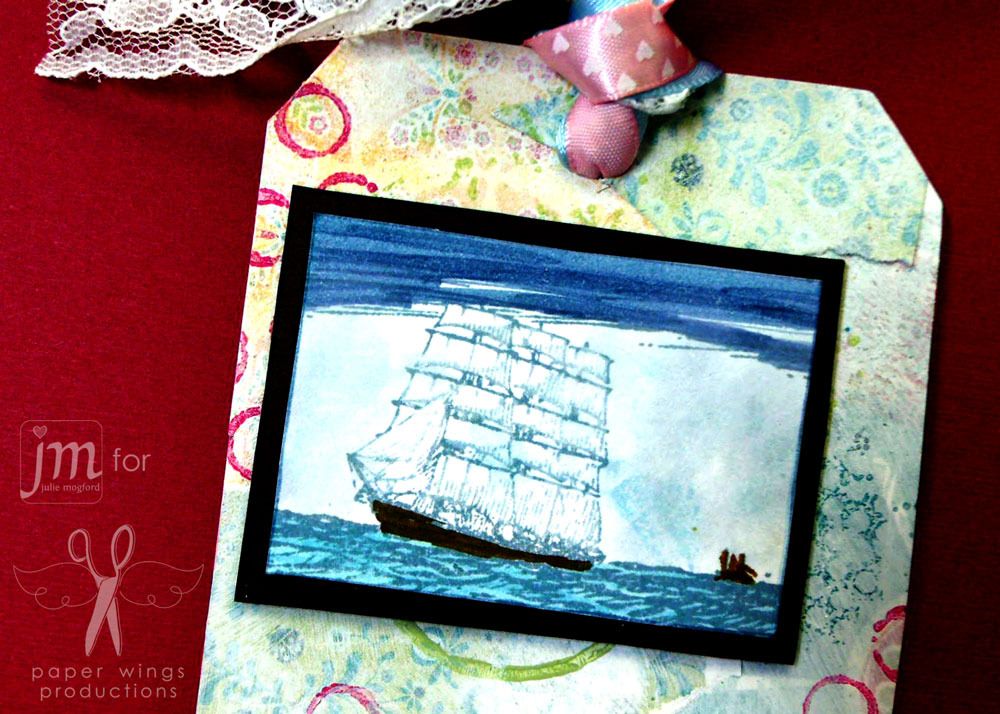
1.  Stamp Window on brown and white cardstock.  Stamp boat from Sea Melange set to same white cardstock inside window shape.
2. Color and trim boat image and add to brown frame. I used markers for the top sky and sea, and boats.  To make cloudy look behind boats I used a distress marker on my craft sheet and added a little water, and then dipped my fingertips into the color and added it to the paper repeatedly.
3. Adhere with foam dots.


Main image and sentiment details:
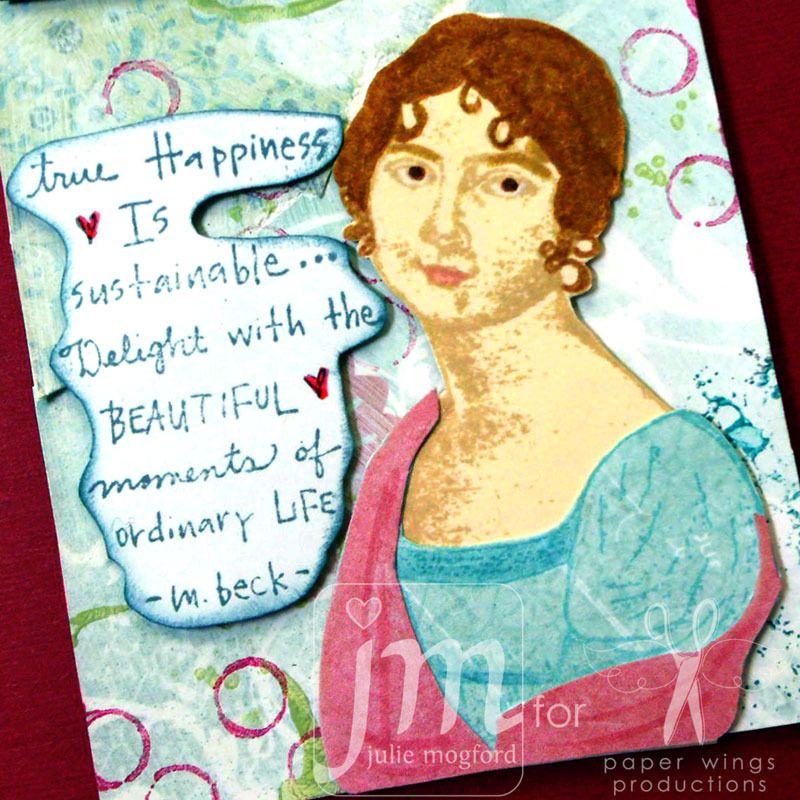
1.  Stamp lady from Melange Women in very light ink on manila tag and color in features with distress markers.
2.  Stamp her again on two patterned papers with a coordinating ink and cut out elements to paper piece dress and shawl.
3. Stamp sentiment from Sentiments and Sayings on white cardstock.  Trim and ink edges with ink blending tool.  Add pink to heart elements.

I always feel so happy for Miss Anne Elliot when she finally finds out that Captain Wentworth really does love her.  Makes me want to go watch it again.

I love how this tag turned out with all of it's elements.  I think the added textures in the back give it something extra, and I liked working on the paper piecing of the dress.  I had not tried it on a stamp like this one, but I think the results are great.

On a side note, tomorrow is the last day for our Mission 004 Flight Plan challenge.  Make sure to get your projects posted to either Flickr or Pinterest.  Maybe this card will inspire you to make a project!

Take Flight!

Julie


Stamps: Art Textures, Window, Sea Melange, Melange Women, and Sentiments and Sayings 
Ink: Distress Inks by Tim Holtz/Ranger
Paper: Scraps from stash and a manila tag
Cardstock: Neenah Solar White and Chocolate Chip from Stampin' Up!
Tools: Crop-a-dile, Ink Blending Tool from Ranger, foam tape, Prisma pencils, Distress Makers (Ranger), glue stick, acrylic paint
Embellishments:  Glaze pen by Sakura and ribbons

Friday, July 27, 2012

Feature Friday: Hanging Stars

Hello there peeps!

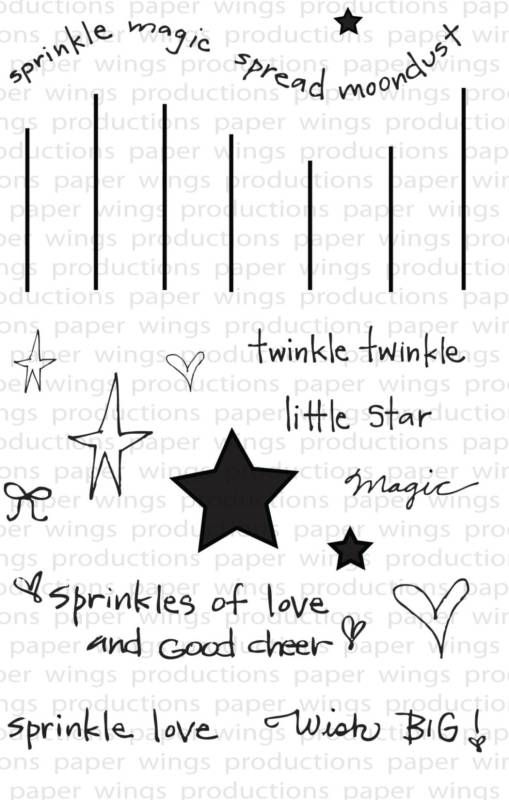
Today we feature the delightful Hanging Stars set by Liz Allen of Fine & Fancy.  Full of sparkle and charm just like Miss Lizzie herself, this set can be added to so many of your projects.  This stamp set can be used to celebrate the special people in your lives, everyday moments or special occasions like 4th of July, birth of child, congratulations, birthdays, anniversaries, Halloween, the winter holidays or just as a pick me up for someone.  Add the Hanging Stars to your tags, cards, gifts. ATCs or mixed media projects.


How about we see some tags by Liz and Julie?


The Stars Danced by Liz Allen


Details:

1. Use distress inks and ink blending tool to lightly cover the surface of tag with blue, green and purple inks.

2. Stamp flourish from Flourish Fun 1 on the top and near bottom of the tag.  Hand draw lines from top Flourish at varying heights.  Stamp or draw stars at the bottom of each line.  Stamp or draw a bow on top of each star.

3.  Write or stamp a sentiment.

4. Tear off bottom edge of tag.  Ink all edges with ink blender tool and distress ink.  Add Stickles to the bottom edge and to all the stars.

5. Tie on some tulle!

Supplies for The Stars Danced Tag
Stamps: Hanging StarsFlourish Fun 1
Ink: Memento in tuxedo black, Tsukineko; Tim Holtz Distress Inks by Ranger 
Paper: Tag
Tools: Ink Blending Tool (Ranger); black pen
Embellishments:  Stickles by Ranger; tulle


Sprinkles of Love Tag by Liz Allen


 Details:

1. Stamp flourish from Flourish Fun 2 on the top.  Hand draw lines from top Flourish at varying heights.  Stamp hearts at the bottom of each line.  Color in hearts with colored pencils.  Stamp a bow on top of each heart.


2. Stamp a sentiment.  Color in areas of background with a white colored pencil.

3. Add Stickles to all the hearts and bows.

4. Draw circles around border or stamp a border.


Supplies for Sprinkle Love Tag
Stamps: Hanging StarsFlourish Fun 2
Ink: black ink
Paper: kraft
Tools: colored pencils; black pen; Tim Holtz Distress Marker by Ranger in picket fence
Embellishments: Stickles by Ranger


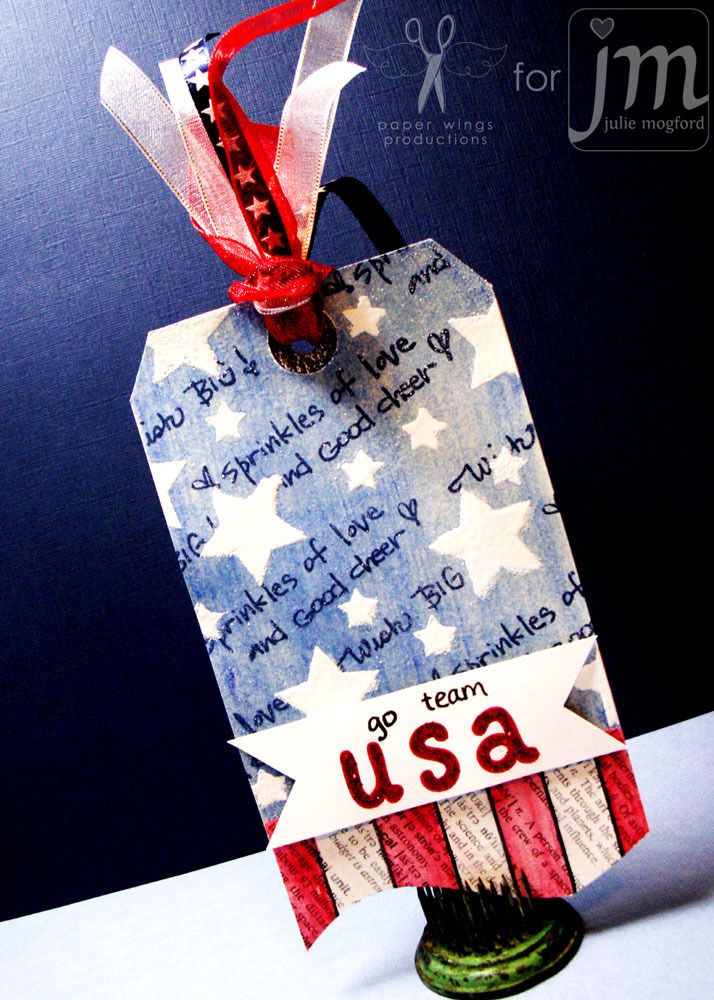
Team USA tag by Julie Mogford


We're ready for the Olympics at my house and I thought a USA inspired tag would be fun.  The Hanging Stars set had some great elements for me to use on this tag and I really like the curved bottom.  Go USA!!!

Details:
1. Cover top two-thirds of tag with blue watercolor crayon, and then use paintbrush with water to blend out the color.
2. Stamp sentiments from Hanging Stars set diagonally in darker blue ink.
3. Stamps stars with white craft ink and emboss with white embossing powder.
4. Stamp staggered lines on text paper. Use red watercolor crayon as before to create red stripe. Adhere to tag and trim tag in same shape as staggered lines.
5. Spray shimmer mist on tag and blot dry. The water could react with background, and in this case, I didn’t want it to.
6. Stamp USA letters from Whimsical Solid Alpha in red ink and write “go team” above. Cut banner slits and adhere to tag with foam tape. Use red stickles to accent USA.
7. Add fun ribbon.
Supplies for Team USA tag 
Stamps: Hanging Stars, Whimsical Solid Alphabet
Ink: Archival Black by Ranger, Color Box Chalk Ink in Warm Red and Blue Iris, Stampin' Up! Craft ink in Whisper White
Paper: dictionary paper, manila tag
Tools: heatgun, Faber Castell Pitt Artist Pen, Caran D'ache Watercolor Crayons, Stampin' Up dimensionals
Embellishments: Stampin' Up! Whisper White embossing powder, Radiant Rain Shimmer Mist in Pearl Gold by Luminarte, Glitz Stickles by Ranger in Ruby Slippers

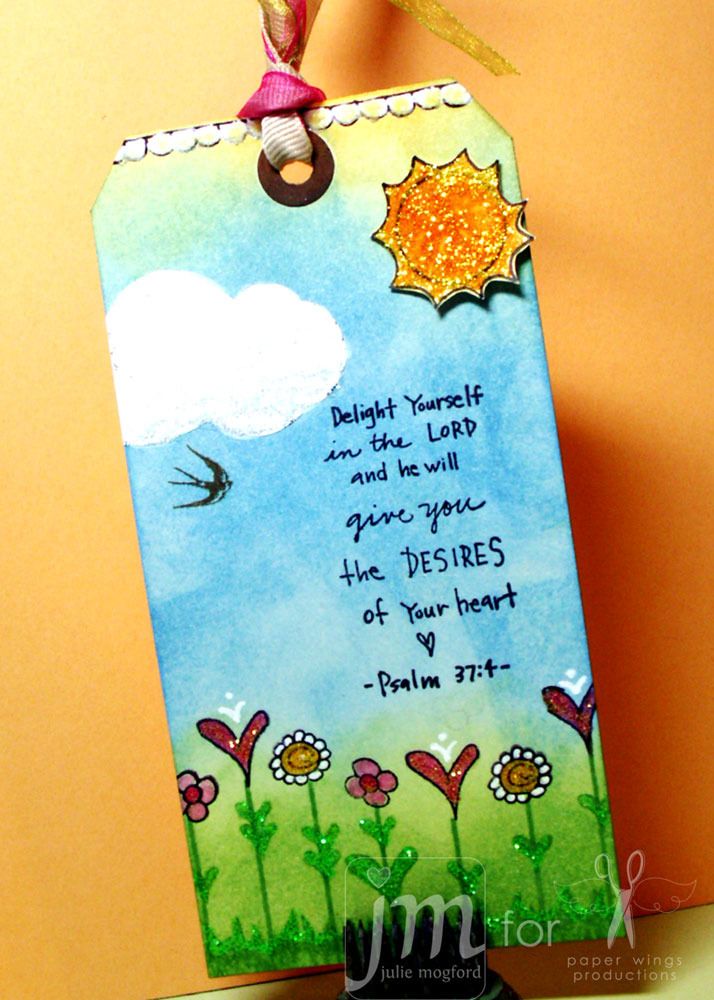
Delight in the Lord tag by Julie Mogford


This tag was inspired by the designer herself, Miss Lizzie Allen.  To me this looks like something she might make.   I did of course have to do a little bit of stickles work.  Although you might not be able to detect it from this photo, but stickles are just about everywhere here.  The top scallop, sun, cloud, flowers, leaves and even the grass.  The sentiment is from our Scripture set, which is also designed by Liz.  I love this happy tag! 

Details:

1. Using an ink blending tool, add colors to create a sky and grass background. 
2. With same green ink, stamp staggered lines from Hanging Stars set at the bottom to create flower stems.  Using the small folk star, stamp repeatedly at the bottom of tag to create a grass effect.  Use the folk hearts to create leaves for flowers.

3. Stamp large hearts and flowers from the Louise set on the stems using black archival ink.  Press ink pads on non-stick surface to pool ink and use a brush and water to color in areas for grass, leaves and flowers.  Use white gel pen to accent flowers.
4. Cut cloud shape from text paper, adhere to tag and add white paint to dull text a bit.  Draw and cut sun shape from yellow scrap paper. Add to tag with foam tape.
5. Stamp scallop border from Louise set at top of tag and add a flying bird from the Bird Panel set. Color inside scallops with white paint or white gel pen.  Stamp sentiment from Scriptures set above flowers in black ink.
6. Use glitter to accent elements of tag.
Supplies for Delight in the Lord tag 
Stamps: Hanging Stars, Scriptures, Louise, Bird Panel
Ink: Archival Black by Ranger, Distress Ink (Ranger) in Vintage Photo, Wild Honey, Pickled Raspberry, Mowed Lawn, Salty Ocean
Paper: dictionary, scrap yellow
Tools: Ink Blending Tool (Ranger), Signo gel pen, paintbrush, stampin up dimensionals
Embellishments:  White craft paint and Stickles (Ranger) in Distress Rock Candy, Baby Blue, Firefly, Orange Peel, Yellow, and Fruit Punch


You can also see Hanging Stars being used HERE, HERE and HERE.  I hope you are inspired to add some sparkle and love on your projects too!


Come and join us for another great pwp event, tomorrow at Scrapbook N' More in New Braunfels.  We will have a trunk show, demos, and a FREE make & take project.  It's from 11-4, hope to see you there!


Thank you for joining us today.

The Paper Wings Gals.

Wednesday, July 25, 2012

What's Up Wednesday: Our 1st Newsletter

What's up peeps?!

Behind the scenes we are busy doing all sorts of projects including working on our first newsletter.  It will be full of information and inspiration all delivered right to your inbox!

We will be highlighting a stamp set from our first release.  How about a sneak?


Can you guess which stamp set will be featured?  Want to see what the final projects look like?  Read more about paper wings productions?  Don't miss out!  Sign up now for the newsletter HERE!

Take fight,
Paper Wings Gals

Monday, July 23, 2012

Paper Wings Productions Video!


Hi Peeps! 

Today, we have something special to share with you.  Check out our new video done by the very talented Julie Mogford. It is a new stop motion commercial for our company!  Take a look....


Isn't it fun??  We hope you'll rate it and comment on it at You Tube, and we would love it if you would share it with your friends on all of your favorite social media.


Thanks so much for your continued support of Paper Wings Productions. And, keep checking back for more inspiration!


Take Flight!

Paper Wings Gals


Friday, July 20, 2012

Feature Friday

Hello there peeps!

We added several new designers for our latest release of stamps.  Today we are featuring one of those designers, Erin Edelmann of Rag & Bone Studio.  Erin is Carrie's sister and a very talented freelance graphic artist.  She finds a lot of inspiration from music and lyrics.  Prints of her designs can be purchased on her Etsy shop.  Rag & Bone Studio on Etsy.


Here are some samples using the designs from Rag & Bone:


1. Stamp music from Text Melange over entire card base.
2. Stamp flowers from Flower Power on yellow pattern paper, ink edges and adhere to card base.
3. Stamp sentiment from Kind Words onto coated cardstock.  Ink paper with ink tool, and then flick water to create spots. Add sentiment and flower embellishment to aqua cardstock
4. Stamp phonograph from Lyrics on coated cardstock, cut and add distress ink to edges. Adhere with foam tape.

Stamps: Lyrics, Text Melange, Flower Power and Kind Words
Ink: Tim Holtz Distress Ink by Ranger in Barn Door, Broken China, and Vintage Photo
Cardstock: stash, clay coated paper
Pattern Paper: Basic Grey
Other:  Tim Holtz ink blending tool by Ranger; flower from Sassafrass, and foam tape from Stampin' Up!


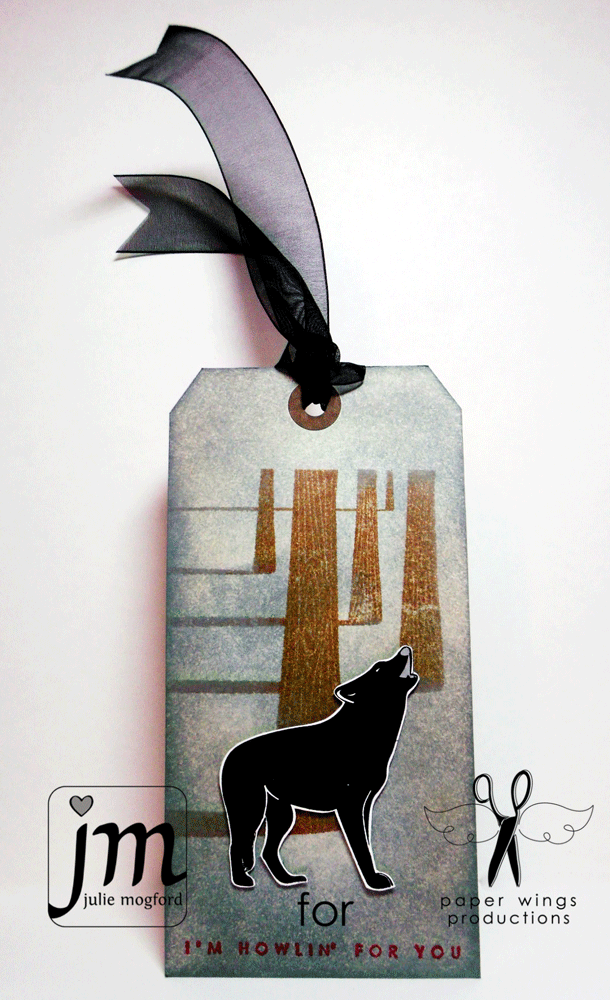
1. Use ink blending tool to add background color to tag.
2. Ink tree stamp from Howlin' For You with browns and greys and stamp on background.
3. Add sentiment to bottom of tag. (I cut my sentiment away from image for more stamping options.)
4. Stamp and cut out wolf from Howlin' For You and adhere with foam tape.
5. Tie on black shear ribbon to finish tag.

Stamps: Howlin' For You
Ink: Memento by Tsukineko in tuxedo black; Tim Holtz Distress Ink by Ranger in Weathered Wood, Vintage Photo, Tea Dye and Festive Berries (winter set)
Cardstock: Mailing Tag, clay coated paper
Other: Tim Holtz ink blending tool by Ranger, ribbon and foam tape from Stampin' Up!


1. White emboss circle background from Backgrounds in white.  Spray with mists.  Cut up piece into horizontal strips.  Attach to white panel.
2. Black emboss boots from Lyrics.  Tear piece.  Spray with mists over star stencil.  Attach onto circle background panel.
3. Stamp sentiment from Lyrics onto white strip using black ink.  Ink edges with black.  Attach onto circle background panel.
4.  Attach circle background panel to black card base.

Stamps: Backgrounds and Lyrics
Ink: Memento by Tsukineko in tuxedo black; Tim Holtz Distress Ink by Ranger in black soot
Cardstock: Neenah Papers in solar white and black
Other: Embossing powers in black and white; various sprays and mists; Tim Holtz ink blending tool by Ranger; stencil from Balzer Designs by Crafter's Workshop

Enjoy the flight!

Wednesday, July 18, 2012

What's Up Wednesday


Hey Peeps!

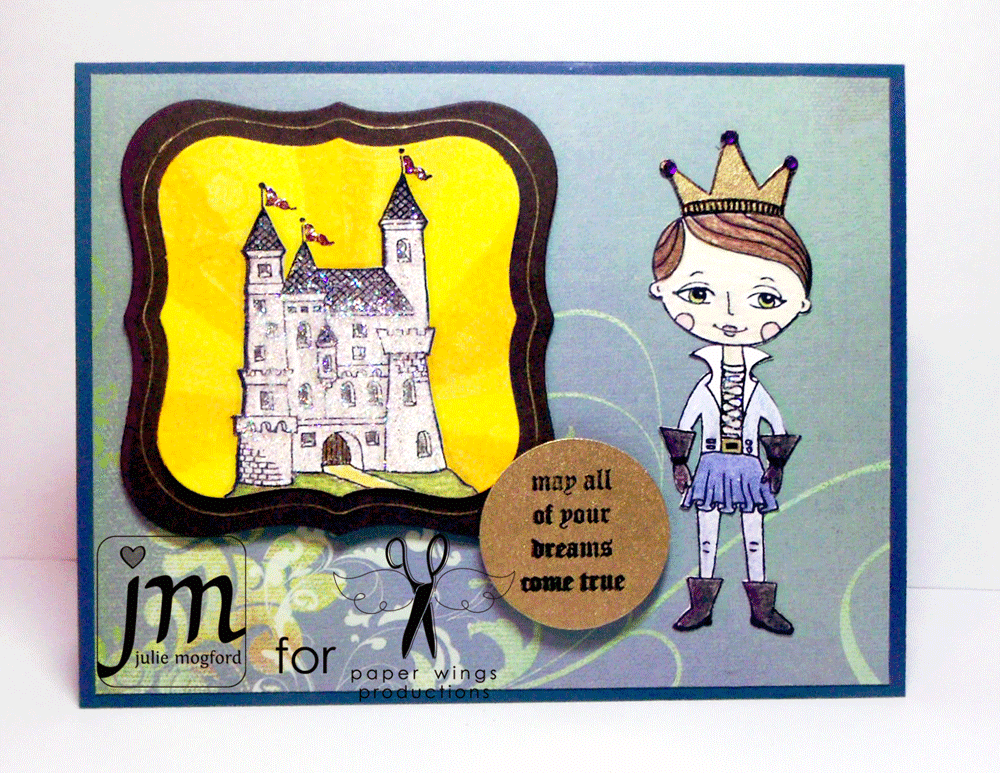
Dropping in to share a couple of cards. The first one is a fairy tale inspired card. This little prince from Handmade by Lizzie Girl is just too cute, and I really love the castle as well.  So many details on these stamps.  When I saw this castle, I just envisioned it as this gleaming, idyllic place (not unlike the fairytales of our youth) and had to give it some "stickles" treatment. 


This would be a cute birthday card for a young boy, or even a "soon to be" bride.

The Details:

1. Adhere background paper to 4.25 x 5.5 inch card base.
2. Stamp prince and castle (twice) on separate pieces of paper.
3. Color prince, paper piece gold crown, and add jewels.
4. Using Eclipse tape, I drew rays from a center point, cut the rays apart and used them as a template on one of the castle pieces for creating the sun ray background.  I used 3 different colors - yellow, orange, and a gold irridescent. Die cut this piece and a second larger piece in brown.
5.  Color second castle, fussy cut the castle leaving off the flags (they are already stamped on the first layer).  Adhere castle, color flags, and add stickles.
6. Stamp sentiment on gold paper and circle punch - adhere with foam tape.
7. Use gold pen to accent prince belt buckle and trace around label die to add detail to die cut.

I have one more card to share with you.  There is another paper wings gal with a birthday coming up next week.  Can you guess who? Happy Birthday C!


I used the Mission 004 Flight Plan as my inspiration, a few new stamps from the June release and a little creativity and came up with this fun birthday card.  I love that this is one of those cards that could be great for just about any sentiment and any color scheme! And, can you believe that the main flower, white flower and orange flower all came from the Flower Power set?  Love that!!!

The Details:

1. Adhere strip of paper to bottom of 4.25 x 5.5 inch card.
2. Stamp and cut out Lace Border stamp from yellow paper.
3. Stamp and emboss small flower stamp on textured gold paper. Adhere behind straight edge of border and then adhere both to card base.
4. Cover small tag in dictionary paper, ink paper and edges and stamp flower in orange. Cut small circle for hole and add ribbon.
5.  Use markers to color large flower directly on rubber.  Spritz with water and stamp.  Cut around flower and adhere to tag and flower with foam dots to card base.
6. Stamp sentiment in brown ink.  NOTE: I cut my sentiments apart when I want them to fit "just right".  This sentiment is from a longer stamp.
7. Add 3 brown pearls.


Thanks for dropping by the Aviary! I hope you enjoyed the projects today and hopefully they have inspired you too.  Come back soon for more stamping goodness!

Julie

Supplies for My Prince
Stamps:  Prince
Ink: Memento ink by Tsukineko in tuxedo black; Dylusions Sprays by Ranger - Lemon Zest and Squeezed Sunshine
Pattern Paper: Memory Box
Cardstock: Neenah Papers in solar white and pearlized blue cardstock and gold paper from stash
Tools: Spellbinders Nestabilities Dies, gold gel pen, circle punch
Embellishments: Stickles by Ranger - Stardust, Gold Perfect Pearls (with water for spray)


Supplies for happy birthday / Mission 004
Stamps:  Lace Border, Flower Power, Sayings and Sentiments
Ink: Colorbox Chalk Ink - Tangerine and Chestnut Roan, Distress Ink - Shabby Shutters and Peeled Paint, Stampin' Up! Craft Ink - Whisper White, Distress Markers (Wild Honey, Mustard Seed, Spiced Marmalade, Tea Dye, Walnut Stain, Shabby Shutters, Crushed Olive, Peeled Paint)
Pattern Paper: Basic Grey (yellow and green), dictionary paper, textured gold paper from stash
Cardstock: Neenah Papers in solar white
Tools: We R Memory Keepers - Cropadile (hole punch),
Embellishments: pearls and ribbon - stash, SU! Whisper White Embossing Powder
Related Posts Plugin for WordPress, Blogger...