Showing posts with label music. Show all posts

Friday, February 8, 2013

Feature Friday: An Old Fashioned Valentine

Happy, happy Friday!

It's Shay here.  There has been some truly fabulous projects this week so I recommend first scrolling down to see them all before you return to this post.  I can wait.

Welcome back!  Are the design team talented or what?

Today I have some cuties for you.  What is better than miniature little Valentines?  Okay, winning the lottery to name one thing, but do you recall being a little lady or gent at school and giving and receiving Valentines?  I thought it was better than apple pie and I still love them so I thought why not make some with my awesome Paper Wings Productions stamps?

I created three of these little darlings...honestly I could have made dozens with the ideas swimming in my head. 


I used a nifty new die I bought that is a mini pocket to be the sleeve for my little Valentine cards.  The sleeve measures 2.5" x 3.8" while the cards are approximately 2 3/8" x 3 5/8".

Card No. 1:


This is the true romantic card set.  I inked up the Damask from Backgrounds or Damask using pink and red inks that I then spritzed with water and stamped upon the heart and the outside of the sleeve.  Under the heart is music from the Text Melange or Music in grey ink. I love these essential stamp sets...they work for nearly any theme and project.  I added the amor banner from Milagros which I stamped in red and colored in with Copic markers.  I added a heart and dots (remnants from the XOXO border on the sleeve).  I finished the card with some washi.  The sleeve is decorated with washi, XOXO, pink and white bakers twine and a heart.  The final touch is the little ticket/label from Tabs and Banners stamped with "for you" from Sophie.

Card No. 2:


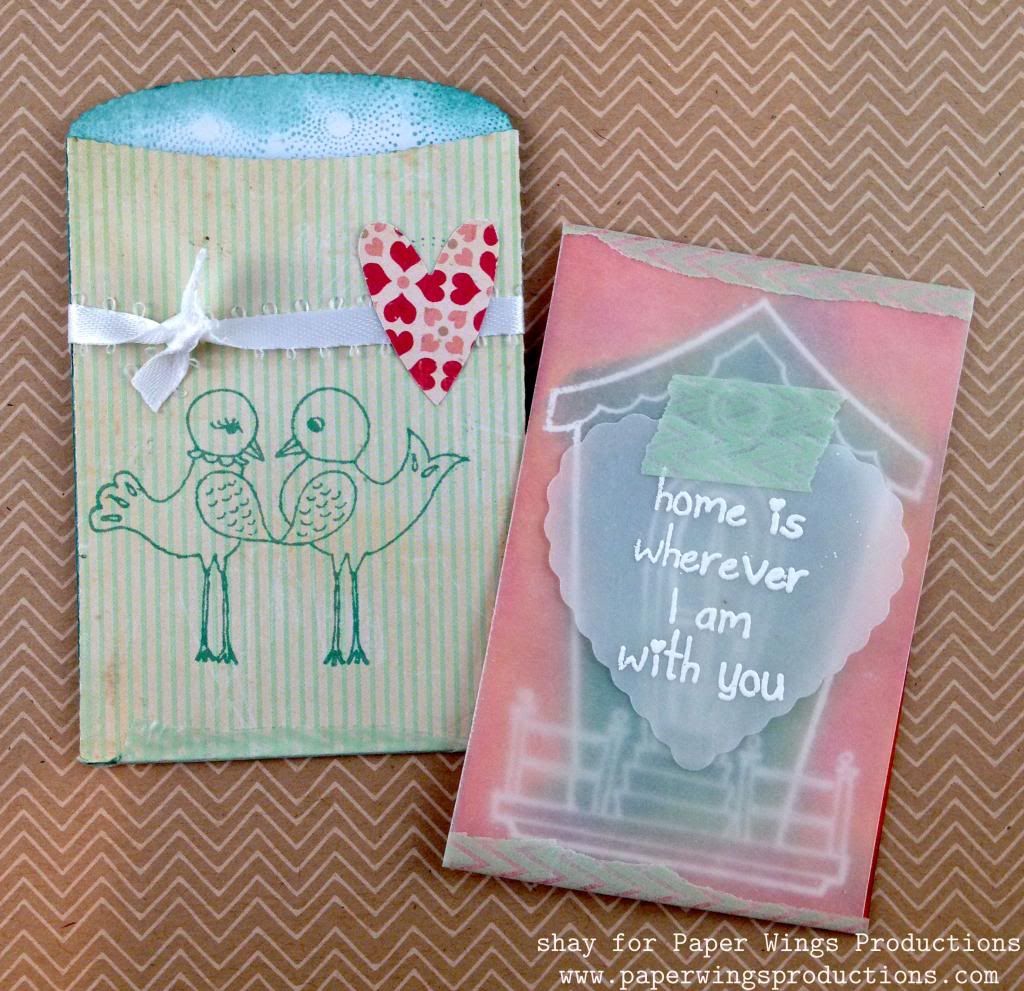
Here's the sweet card set.  The card is stamped with the birdhouse from Home Tweet Home using VersaMark and embossed with white embossing powder.  Then I colored in the image using Distress Inks.  I chose some unusual and bright colors which I then softened by adding a layer of vellum.  I added another layer of vellum with a scallop heart die cut which I embossed with white embossing powder using a sweet sentiment from Home Tweet Home.  How adorable is this stamp set?  I adhered all the vellum with washi.

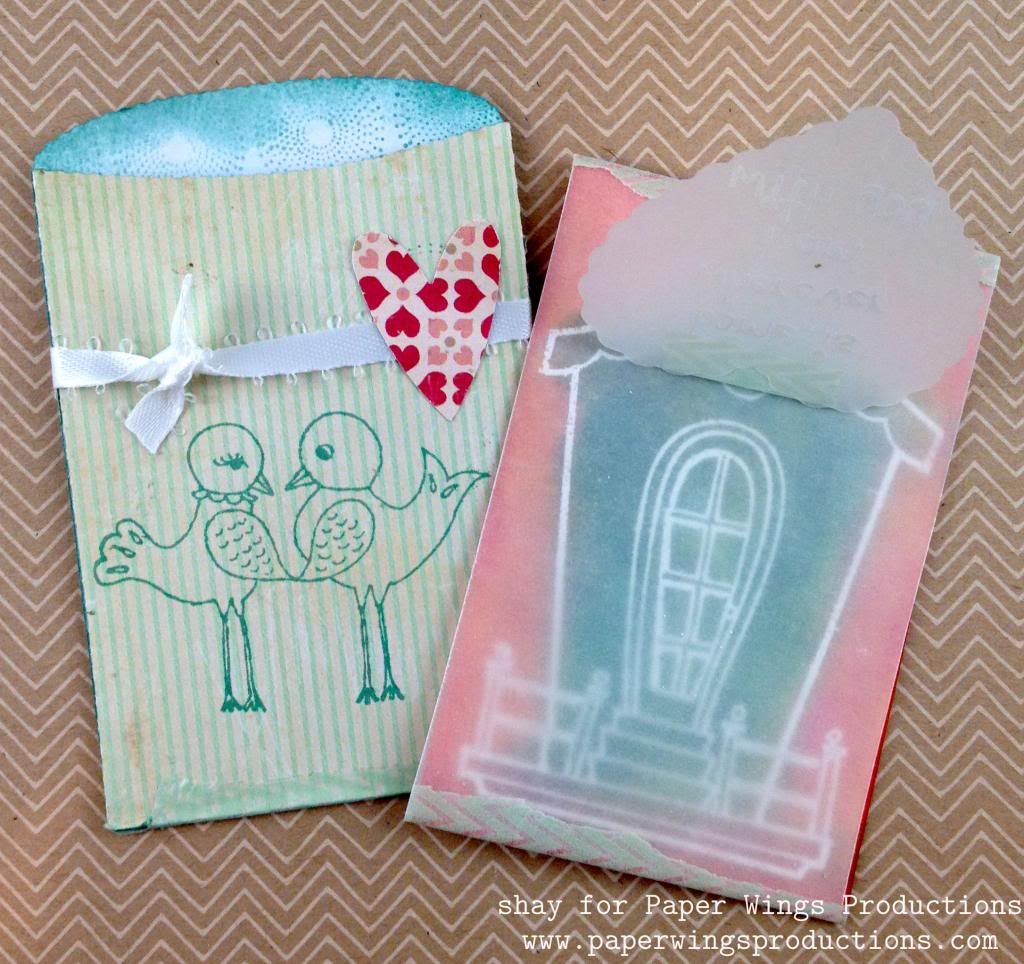
Here is a look at the house under the vellum heart:


The inside of the sleeve is decorated with the circles from Backgrounds or Circles and I also inked the edges.  The outside of the sleeve is stamped with the love birds from Home Tweet Home, tied with a white ribbon and finished with a heart.

Card No. 3:


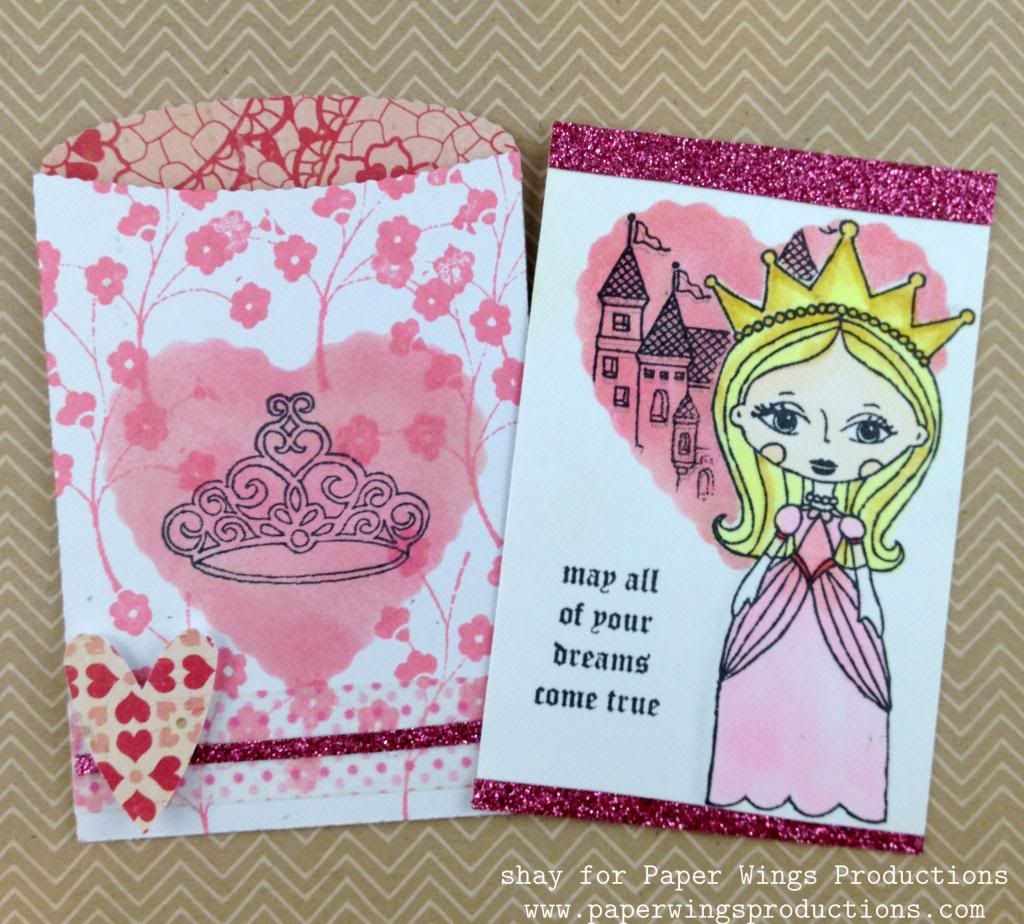
The card for your inner princess or the little princess in your life.  Using Princess I stamped and colored her in with Copic markers.  I then masked her off and used a reverse mask of the scalloped heart to ink in the area behind her and stamp the castle from Prince.  The sentiment is also from Prince.  These are truly charming and lovely stamps and so perfect for children's Valentines.  I finished the card with pink glitter fabric tape.  The sleeve is also decorated with a reverse heart mask that I stamped the crown from Princess on.  Over that I stamped the sprig of flowers from Flower Power or Mini Flowers.  This is finished off with washi, fabric tape and a heart.

What fun these would be to make with your children, grandchildren, nieces, nephews, godchild or with the kids at heart in your life!  They would have so much fun making them and so proud to give them out too.  On the back of the cards is plenty of room for a little handwritten note.  Another alternative is to pack these little sweeties in a lunch for school or work.

The possibilities of which Paper Wings Productions stamps to use and how to use them are endless.  I thought Sophie, Louise, Marcel or Luc would be fun to use not to mention the Prince.  You could easily use Paris or LondonVintage Technology or Play with Your Coffee would be fabulous too.  That is just off the top of my head! 

Another really cool thing about these little card and sleeve duo are that they are still small enough to fit in a Project Life 3x4 pocket which is a lovely thing for anyone doing Project Life.

I hope you feel inspired to ink up your Paper Wings Productions stamps!  There is still time for Valentine's Day. 

We would *love* to see what you make with Paper Wings Productions stamps. Add your projects to Facebook, our flickr group, to Pinterest, comment with a link on this post or even email pictures to us!

Take flight,
Shay.

Supplies:
Stamps:


Cardstock: Georgia Pacific
Ink: tuxedo black Memento and VersaMark, Tsukineko; chewing gum, cough syrup and weather vane, Jenni Bowlin for Ranger; fired brick, worn lipstick, tattered rose, scattered straw, wild honey, iced spruce and evergreen bough, Tim Holtz Distress Ink by Ranger
Patterned Paper: Paper Heart 12x12 paper pad, Crate Paper; Dilly Dally "Hello" Flannel from Miss Caroline collection, My Mind's Eye
Other: vellum; heart punch, Stampin' Up!; washi, various; fabric tape; white ribbon, Offray; opaque white embossing powder, JudiKins; nesting scallop hearts dies, Lifestyle Crafts/QuicKutz; mini pocket die, Lifestyle Crafts/QuicKutz; XOXO border die, Papertrey Ink; Cuttlebug, Provo Craft; Copic markers; pink and white baker's twine


Wednesday, December 12, 2012

What's Up Wednesday - One Layer Cards


Hey peeps! 

I've been on Pinterest a lot lately and I'm SO addicted to looking at pins and searching for ideas. Are you?  [have you pinned your favorite PaperWings stamps yet?] I have been seeing so many great ideas for Christmas cards, and I thought I would try a few ideas using our new and previously released stamps, but I gave myself a challenge.....ONE LAYER CARDS!  I have to say, it was definitely a challenge at first, but when I started thinking about a few card layouts I had seen, plus some techniques I know (but sometimes forget to use), then putting these cards together was easy!


Krafty Christmas - This idea came from to me when I remembered how much I like colored pencil on kraft paper.  I used to do these types of cards with Ms. Liz Allen all the time.  This card reminds me of her!  First I started with the Scallop Border to set my color scheme.  When I started this I made some ink choices that let me down.  I was able to restamp these clear stamp images using chalk inks and line them up perfectly! The green one was not as bright as I wanted, so I went in with a green prisma pencil to bring it up to the perfect shade I wanted to use. Next I stamped the hanger from the Hanging Stars set using gold pigment ink. Then I added the cute elements stamped in Memories Artprint Brown, from the Christmas Mix it Up and Holiday Tags sets. I colored all of the images with prisma pencils and the stars were using a gold prisma pencil - it is a really nice metallic!  Finally, I added the sentiment from the Little Christmas set and added the white dot border from the Louise set, inking only the dots I needed. I could have drawn the dots, but I like using the border so they are lined up and evenly spaced. It takes the guess work out of the equation. Cute, right???  I thought so!


Christmas Collage -  I came across a collage card that had a red Christmas sentiment in the middle of a collage card with green music in the background.  I started thinking, how could I recreate this look with our stamps?  Here is my rendition!  Images from Music Cling, Flourish Fun 2Holiday Greetings  Holiday Greenery Jolly Old St. Nick  /  St. Nick Cling and the Merry clear sentiment. I accented some of the images with prisma pencil, and the sentiment is stamped in Versamark with Festive Berries ink before embossing in red embossing powder.  The Christmas is added with Chestnut Roan chalk ink.  This came out better than I thought.  I am intimidated by collages like this sometimes, but I think it turned out well.  What do you think???


Winter Peace - This one is inspired by a few things.  The new cold weather that we are finally getting down here in Texas, and all of the cute cards I've been seeing that are masked off, stamped and embossed in white and then inked with rich colors.  First, I used some low tack masking paper to mark off the sky scene.  Using Stampin' Up! Whisper White craft ink and embossing powder, my trees from the Pines set and snowflakes from the Winter Mix It Up set come to life in the blue twilight sky.  I used Tumbled Glass, Broken China, Stormy Sky and a little bit of Faded Jeans.  After all of the inking, I wiped the embossed images off to remove any remaining ink and then removed the masking paper.  The handwritten "peace on earth" sentiment from the Little Christmas set is stamped in Faded Jeans and I think it is the perfect way to finish off this card.  I'm pleased at the effect and will be trying this again with other Christmas stamps  - it's really fun when you see the images pop off the card!

So that's my take on One Layer Cards.  I hope you give these techniques a try.  Even though Christmas is going to be here in a blink of an eye, these cards could be put together really quick for a last minute gift, or mass produced in a jiffy!

Hope you have a wonderful holiday season!

Peace

Julie

Wednesday, November 7, 2012

What's Up Wednesday - Advent Calendar: Part 1

Hi Peeps!
It's good to be back here on the blog today.  I hope you have been keeping up with all of the recent posts for fall, Halloween, and Day of the Dead from our talented ladies here at the Aviary - Carrie, Norma and Shay!
I'm going to change gears here from fall, to the upcoming winter holidays, and share with you a project I'm working on.  For years I've been intrigued with Advent calendars creadted by other crafters using various papercrafting supplies, and I decided that this would be my year to make my first Advent Calendar and showcase the wide variety of stamps that Paper Wings carries.  Today, I'm highlighting days 1-8.


Aren't these fun?  Let's get a close up look to see more of the details. Just a note:  All of the numbers are stamped in Versa Fine Black Onyx and are from the Perfect Number Clear Set.


Details: Flourish Fun 1 large stamp embossed in Lindy's Gang embossing powder. Winter Mix it Up sentiment stamped in Versa Fine Black Onyx.


Details: The window, bird house and cardinal set up the scene along with one tree trunk from the Howlin' For You set. Distress inks and Distress markers and a Stampin' Up! Chocolate Chip marker add pretty colors and all is finished off with Picket Fence stickles for snow and ice cicles. And, I found a little Liquid Applique and heated it up to make snow on the birdhouse. 


Details: Does this wish list look like yours??  This was too fun to pass up.  The background is inked with Festive Berries distress ink and the ledger is stamped in Pine Needles distress ink. I then added the Top 10 number list and Dear Santa from the Christmas Mix It Up set.


Details: MMM..Marshmallows!  The tag is inked with Tumbled Glass and stamped with flourishes from Flourish Fun 2 and embossed with Irridescent Ice EP from Stampin" Up! The cup from Play with your Coffee is paper pieced on Basic Grey "Figgy" paper.  The cocoa is Chocolate Chip marker again, and the marshmallows are so white from a Souffle pen.


Details: More distress ink on background (love how quick that is) and stamps from the Door set to create the wreath, colored with prisma pencils, and the little gold embossed dots are from Flourish Fun 2 set.  The sentiment is actually from two sets: Christmas Mix It Up and Holiday Mix It Up.


Details: Of course I had to get some sprays out and this one looked a little like a sky to me.  The scene unfolded before my eyes.  A crescent moon from the Build a Scene set, colored in with a VersaMark marker and embossed with Egyptian Gold EP (and the Believe sentiment too from the Dear Santa Cling set).  And the little santa from the Jolly Old St. Nick cling set looks so cute flying in the sky.


Details: I used a little more paper piecing with "vintage" Memory Box Christmas papers, but I accented the papers with the music background and letters from the Perfect Alphabet set to spell out JOY!


Details: This was another tag that I used sprays to create a background.  I thought it was just begging for Whisper White (Stampin' UP!) embossed snowflakes from the Winter Mix It Up set.  I used just a portion of the "peace on earth" from the Typed Wishes to add a simple sentiment.


So, what do you think???  This is only the beginning!  There will be two more installments of the remaining tags.  I've really enjoyed pouring over my Paper Wings stamps and looking for great images to create these fun tags.  I hope you are inspired in some way for your own upcoming holiday projects and we would love to see what you make with these and other Paper Wings Productions stamps.  Add your projects to our flickr group, to Pinterest, comment with a link on this post or even email pictures to us!


"It's beginning to look a lot like Christmas......"
Happy Stamping!

Julie


Monday, July 9, 2012

Mixed Media Monday


Hey there peeps!
Today I have a fun and fast project for you.  For this project, I have stamped onto an adhesive backed sheet of metal foil.  Ranger packages it a couple of different ways.  It can be found at your local craft store, but better yet, get it from an independent store such as Stamp Antonio.  I made the centerpiece for this card with the metal foil and mounted it onto a card.


 Here's how I made the centerpiece:
I started off mounting a square of the metal foil sheets onto a square of chipboard (thick cardboard).  I stamped the bird from the Bird Melange set and a crown from Royal Melange set using the Staz On ink pad.


I also stamped around the edges of the metal foil piece with some swirls from the Flourish Fun set.  After letting the ink dry, I took an awl (lots of things could be used...a stylus, old ball point pen, anything with a pointed edge) and drew over the stamped swirl images.


I continued to doodle and embellish the metal with the awl, creating hatch marks and creating small dots.


I glued Tim Holtz's tissue paper to the card after first crumpling it up and then smoothing it out before adhering.  

I used the words "come fly with me" from the Bird Melange set and edged the bottom of the card with the Scallop border set.  The solid scallop border was inked with a silver dabber and the outline was stamped using Staz On ink.  


I hope you have enjoyed our mixed media Monday project!

Enjoy the flight!
Carrie


Stamps: Bird Melange, Royal Melange
Ink: Black Staz On from Tsukineko
Cardstock: white square 6" card
Other: 
Tim Holtz Tissue Wrap
Silver Paint Dabber
Metal Foil Sheet
Chipboard
awl

Related Posts Plugin for WordPress, Blogger...